Quantcast
Channel: Dynamics NAVAX
Viewing all 219 articles
Browse latest View live

Testing #MSDyn365FO Odata with Postman

$
0
0

Last year I posted on using Postman. Things have changed since then and I need to update.

http://dynamicsnavax.blogspot.com/2017/05/dynamics-365-for-operation-web-service.html

There is a good article that Microsoft has written which I followed without any issues.

https://docs.microsoft.com/en-us/dynamics365/unified-operations/dev-itpro/data-entities/third-party-service-test#prerequisites

Below are some screenshot incase you are a visual person like me.

In the environment set ups. It should looks something like this.

image

When you run it, you should get a response.

image

Once you got the token. You are good to go with your messages.

Below is the same example from the blog post.

image


You run into any problems, click on the console icon at the bottom. Should give you a bit more information.

image

If you get a 401 error. It is usually a typo. Make sure you got the spaces and backslashes correct. One simple character can drive you crazy.


Automated testing #MSDyn365FO Odata with Postman

$
0
0

In the last post I did a quick run through on using Postman for testing Odata services.

This post I will give some tips on how you can write automated tests using Postman.


Tip 1 – Parameterise as much as you can

Parameterise using the environment settings. It will make your collection portable to other projects.

Below is an example where we have the environments settings parameterised.

image

You can see how I used it here. Now I can utilise the same thing across requests.

image

Tip 2 – Write test scripts

Test scripts are very easy to work with. This is for demonstration purpose only. I will explain how you can retrieve the values in the returned json.

Take the example here, where we use the “get customer” odata service. It returns a nested array with the values.

image

You can write a simple test script to retrieve values. In the below highlighted box you can see that I am logging it to the console. I am not really testing much here.

image

The console will return the below. 

SNAGHTML1377b4

One bonus tip here. Just click on the snippet codes to get sample code from Postman. Really helpful.

image

Tip 3 – Automated testing

Usually you will have dependent requests. The first request in our example retrieved the OAuth token and saved it in the environment settings. For the second request to work, it must get a fresh token to authenticate.

To run the collection, click on Runner at the top left of the main window.

image

Once the runner window opens up. Select you collection or folder. Then click on Run button at the bottom.

image

Once complete, you get your result.

image

If you are new to all this. I would recommend taking a look at postman blog on automated testing.

http://blog.getpostman.com/2014/03/07/writing-automated-tests-for-apis-using-postman/

Using Global Variables with Retail Modern POS

$
0
0

I am using version 8 platform update 15. Since the POS development is locked out and extensions only is allowed. There are some limitations and a number of objects are not accessible.

I was trying to navigate to the customer search and allow the user to select a customer and return to the calling form. This was very challenging.

One possible solution I found is to use Global variables. I used the window object.


To do this, declare the window object as per screenshot. And then just set your object :

eg. window.MyVarName = WhatEverObject;

image

To get the value just invert it.

image

You can see how I have the customer object in debug.

image

Credit to one of my colleagues who suggested this solution.


Print a Sales Invoice via X++ in #MSDyn365FO

$
0
0

Often you want to print a report via X++. One of the more common reports is the sales invoice.

Below is some code you could use to download a pdf copy. I am just picking the first invoice and printing to pdf.

Next few posts will be dependent on this. I will try to build up the scenario. Smile


public static void printSalesInvoice()
{
CustInvoiceJour custInvoiceJour;

select firstonly custInvoiceJour
where custInvoiceJour.SalesId != '';

if (custInvoiceJour)
{
str ext = SRSPrintDestinationSettings::findFileNameType(SRSReportFileFormat::PDF, SRSImageFileFormat::BMP);
PrintMgmtReportFormatName printMgmtReportFormatName = PrintMgmtDocType::construct(PrintMgmtDocumentType::SalesOrderInvoice).getDefaultReportFormat();

SalesInvoiceContract salesInvoiceContract = new SalesInvoiceContract();
salesInvoiceContract.parmRecordId(custInvoiceJour.RecId);

SrsReportRunController srsReportRunController = new SrsReportRunController();
srsReportRunController.parmReportName(printMgmtReportFormatName);
srsReportRunController.parmExecutionMode(SysOperationExecutionMode::Synchronous);
srsReportRunController.parmShowDialog(false);
srsReportRunController.parmReportContract().parmRdpContract(salesInvoiceContract);

SRSPrintDestinationSettings printerSettings = srsReportRunController.parmReportContract().parmPrintSettings();
printerSettings.printMediumType(SRSPrintMediumType::File);
printerSettings.fileFormat(SRSReportFileFormat::PDF);
printerSettings.parmFileName(custInvoiceJour.InvoiceId + ext);
printerSettings.overwriteFile(true);

srsReportRunController.startOperation();
}
}

Print a report as a byte array via X++ in #MSDyn365FO

$
0
0

In the last post I showed how to print the sales invoice as a pdf. In this post we will do the same but generate a byte array of the pdf report.

I tried to make the code as readable as possible and hopefully can use it on other reports..


public static str printSalesInvoiceBase64Str(SalesInvoiceId _salesInvoiceId)
{
str ret;
CustInvoiceJour custInvoiceJour;

select firstonly custInvoiceJour
where custInvoiceJour.InvoiceId == _salesInvoiceId;

if (custInvoiceJour)
{
str ext = SRSPrintDestinationSettings::findFileNameType(SRSReportFileFormat::PDF, SRSImageFileFormat::BMP);
PrintMgmtReportFormatName printMgmtReportFormatName = PrintMgmtDocType::construct(PrintMgmtDocumentType::SalesOrderInvoice).getDefaultReportFormat();

SalesInvoiceContract salesInvoiceContract = new SalesInvoiceContract();
salesInvoiceContract.parmRecordId(custInvoiceJour.RecId);

SrsReportRunController srsReportRunController = new SrsReportRunController();
srsReportRunController.parmReportName(printMgmtReportFormatName);
srsReportRunController.parmExecutionMode(SysOperationExecutionMode::Synchronous);
srsReportRunController.parmShowDialog(false);
srsReportRunController.parmReportContract().parmRdpContract(salesInvoiceContract);
srsReportRunController.parmReportContract().parmReportExecutionInfo(new SRSReportExecutionInfo());
srsReportRunController.parmReportContract().parmReportServerConfig(SRSConfiguration::getDefaultServerConfiguration());

SRSPrintDestinationSettings printerSettings = srsReportRunController.parmReportContract().parmPrintSettings();
printerSettings.printMediumType(SRSPrintMediumType::File);
printerSettings.fileFormat(SRSReportFileFormat::PDF);
printerSettings.parmFileName(custInvoiceJour.InvoiceId + ext);
printerSettings.overwriteFile(true);

SRSReportRunService srsReportRunService = new SrsReportRunService();
srsReportRunService.getReportDataContract(srsReportRunController.parmReportContract().parmReportName());
srsReportRunService.preRunReport(srsReportRunController.parmReportContract());
Map reportParametersMap = srsReportRunService.createParamMapFromContract(srsReportRunController.parmReportContract());
Microsoft.Dynamics.AX.Framework.Reporting.Shared.ReportingService.ParameterValue[]  parameterValueArray = SrsReportRunUtil::getParameterValueArray(reportParametersMap);

SRSProxy srsProxy = SRSProxy::constructWithConfiguration(srsReportRunController.parmReportContract().parmReportServerConfig());

System.Byte[] reportBytes = srsproxy.renderReportToByteArray(srsReportRunController.parmreportcontract().parmreportpath(),
parameterValueArray,
printerSettings.fileFormat(),
printerSettings.deviceinfo());

if (reportBytes)
{
using (System.IO.MemoryStream memoryStream = new System.IO.MemoryStream(reportBytes))
{
ret = System.Convert::ToBase64String(memoryStream.ToArray());
}
}
}

return ret;
}


Printing the byte array string as an info log looks like this.

image


To test the encoding and decoding, I have used online tools like this:

https://www.freeformatter.com/base64-encoder.html


Other sources for your reference:

https://meritsolutions.com/render-report-memory-stream-d365-aka-ax7/

https://d365technext.blogspot.com/2018/07/email-ssrs-report-as-attachment-d365fo.html


I will continue this series of posts to some exciting capabilities. Until next time, enjoy.

Gotcha with Extending Retail Channel transaction table

$
0
0

I will start by pointing you to a good article Andreas Hofmann from Microsoft has written. It steps you through what you need to extend a transactional table in the Retail Channel and bring that back to HQ via the P Job.

https://dynamicsnotes.com/extending-a-transactional-retail-channel-table-with-additional-data-hq-x-table-extension-cdx-extension-table-crt-data-service/

Now to summerise the issue I faced recently (being a retail rookie).

Following the blog post I created a custom Int64 field on the RetailTransactionSalesTrans. However, when I ran the P job it failed with this error.

“Failed to convert parameter value from a String to a Int64”

I did some investigation by trying to find out what it is actually doing. Essentially the job will do an outer join to your custom extension table. Even though your custom field is 0 by default. You won’t be creating an extension record for every single transaction record. The p job will do an outer join between RetailTransactionSalesTrans to your custom CustomRetailTransSalesTrans, you will notice some blanks in your file that is coming to HQ.

See figure below what the file looks like.

image

Remember also, that the sync happens by downloading and uploading flat files. That is why you have it trying to convert from string to int64. Hence, the error.

You can see the files by going to the Upload sessions and downloading the zip file.

image

As a colleague told me today. The advice is, use a string and treat it as a string from Channel to HQ.

Alternate way to print a report as a byte array via X++ in #MSDyn365FO

$
0
0

Earlier this month I posted on how to print a report as a byte array. I will do the same but using an alternative method. I will use the print archive instead.

You need to create an extension class for the SRSPrintArchiveContract class to add a parm method for the RecId.

[ExtensionOf(classStr(SRSPrintArchiveContract))]
final class SRSPrintArchiveContract_NAVAX_Extension
{
public RefRecId navaxPrintJobHeaderRecId;

public RefRecId parmNAVAXPrintJobHeaderRecId(RefRecId _navaxPrintJobHeaderRecId = navaxPrintJobHeaderRecId)
{
navaxPrintJobHeaderRecId = _navaxPrintJobHeaderRecId;
return navaxPrintJobHeaderRecId;
}

public RecId savePrintArchiveDetails(container binData)
{
RecId recId = next savePrintArchiveDetails(binData);

this.parmNAVAXPrintJobHeaderRecId(recId);

return recId;
}

}

This is the alternative method I wrote.


public static str printSalesInvoiceBase64StrV2(SalesInvoiceId _salesInvoiceId)
{
str ret;
CustInvoiceJour custInvoiceJour;

select firstonly custInvoiceJour
where custInvoiceJour.InvoiceId == _salesInvoiceId;

if (custInvoiceJour)
{
str ext = SRSPrintDestinationSettings::findFileNameType(SRSReportFileFormat::PDF, SRSImageFileFormat::BMP);
PrintMgmtReportFormatName printMgmtReportFormatName = PrintMgmtDocType::construct(PrintMgmtDocumentType::SalesOrderInvoice).getDefaultReportFormat();

SalesInvoiceContract salesInvoiceContract = new SalesInvoiceContract();
salesInvoiceContract.parmRecordId(custInvoiceJour.RecId);

SrsReportRunController srsReportRunController = new SrsReportRunController();
srsReportRunController.parmReportName(printMgmtReportFormatName);
srsReportRunController.parmExecutionMode(SysOperationExecutionMode::Synchronous);
srsReportRunController.parmShowDialog(false);
srsReportRunController.parmReportContract().parmRdpContract(salesInvoiceContract);

SRSPrintDestinationSettings printerSettings = srsReportRunController.parmReportContract().parmPrintSettings();
printerSettings.printMediumType(SRSPrintMediumType::Archive);
printerSettings.fileFormat(SRSReportFileFormat::PDF);
printerSettings.parmFileName(custInvoiceJour.InvoiceId + ext);
printerSettings.overwriteFile(true);

srsReportRunController.startOperation();

RefRecId printJobHeaderRecId = printerSettings.parmSRSPrintArchiveContract().parmNAVAXPrintJobHeaderRecId();

if (printJobHeaderRecId)
{
DocuRef docuRef;

select firstonly docuRef
where docuRef.RefRecId == printJobHeaderRecId &&
docuRef.ActualCompanyId == curExt();

BinData binData = new BinData();
binData.setData(DocumentManagement::getAttachmentAsContainer(docuRef));
ret = binData.base64Encode();
}
}

return ret;
}

Note that it will pop up with an info log saying it got sent to print archive.

image

If you navigate to the print archive, you will see the record.

image

I don’t mind either way. The first method looks messy with calling some dlls like the SRSProxy etc.

The second method adds overhead by sending to the print archive table. Over time, some cleaning up has go on here.

Send to Azure Service Bus in #MSDyn365FO

$
0
0

Sending a message to Azure Service Bus is really simple in FinOps.

Below is the job I wrote to send a message to the service bus. It takes a connection string and a queue name for connecting. The message string and key value pair list can be supplied to the properties.


static str connectionString = 'Endpoint=sb://navaxservicebus.servicebus.windows.net/;SharedAccessKeyName=RootManageSharedAccessKey;SharedAccessKey=h5KwXSEFIHxxxxxxxxxxxxxxxxxx';
static str queueName = 'navaxqueue';

/// <summary>
/// Runs the class with the specified arguments.
/// </summary>
/// <param name = "_args">The specified arguments.</param>
public static void main(Args _args)
{
if (connectionString && queueName)
{
Microsoft.ServiceBus.Messaging.QueueClient queueClient = Microsoft.ServiceBus.Messaging.QueueClient::CreateFromConnectionString(connectionString, queueName);
Microsoft.ServiceBus.Messaging.BrokeredMessage brokeredMessage = new Microsoft.ServiceBus.Messaging.BrokeredMessage("My Message");

var properties = brokeredMessage.Properties;

properties.Add("MyKey1", "MyValue1");
properties.Add("MyKey2", "MyValue2");

queueClient.Send(brokeredMessage);
}
}

Using Service Bus Explorer you can see the result.

image

At the moment Microsoft is working on event based triggers. One of the possible solutions they presented was writing to the service bus. Looking forward to it.

I took inspiration from one of the standard classes I noticed in in 8PU15. It subscribes to the insert/delete of a user record to send the user detail to a service bus. The big bonus is that service bus assembles are included on the machine. I won’t dive any deeper into this class in this blog post.

image


Find TableId using table browser #MSDyn365FO

Send file to temp blob storage in #MSDyn365FO

$
0
0

In this post I will talk about sending a file to a temporary blob storage. A little warning before I get into it.

This is using the Microsoft’s blob storage that is provisioned for us. I haven’t given it a lot of thought on how it would behave in production. Take it at your own risk.

Lets start by looking back on a couple of posts last month on printing a report to a byte array.

http://dynamicsnavax.blogspot.com/2018/09/print-report-as-byte-array-via-x-in.html

http://dynamicsnavax.blogspot.com/2018/09/alternate-way-to-print-report-as-byte.html

You can use those sample pieces of code to get a report as a stream and send it to the below code.

if (stream)
{
str fileName = 'myfile';
str contentType = 'application/pdf';
str fileExtension = SRSPrintDestinationSettings::findFileNameType(SRSReportFileFormat::PDF, SRSImageFileFormat::BMP);

FileUploadTemporaryStorageStrategy fileUploadStrategy = new FileUploadTemporaryStorageStrategy();
FileUploadTemporaryStorageResult fileUploadResult = fileUploadStrategy.uploadFile(stream, fileName + fileExtension, contentType , fileExtension);

if (fileUploadResult == null || !fileUploadResult.getUploadStatus())
{
warning("@ApplicationPlatform:FileUploadFailed");
}
else
{
downloadUrl = fileUploadResult.getDownloadUrl();
if (downloadUrl == "")
{
throw Exception::Error;
}
}
}

A download URL will be generated for you. The URL is going to be public and with an expiration (15 minutes I believe).

Below is an error if you try to access it after the expiration period.

image

Debug Modern POS using .NET Reflector

$
0
0

Respect to all those POS developers. It really requires some dedication and focus to be a POS developer. This is an example of something I would have not figured out without my colleagues.


We were working on a development project and we struggled to make sense out of the error.

The error we got was complaining about the a method to validate the Unit of measure and Quantity. I was sure the object was not null and I had passed the right thing to it. Unit of measure and quantity fields were populated correctly. The modification was overriding the price.

System.NullReferenceException was unhandled by user code
   HResult=-2147467261
   Message=Object reference not set to an instance of an object.
   Source=Microsoft.Dynamics.Commerce.Runtime.Workflow
   StackTrace:
        at Microsoft.Dynamics.Commerce.Runtime.Workflow.CartWorkflowHelper.ValidateCartLineUnitOfMeasureAndQuantity(RequestContext context, Cart newCart, SalesTransaction salesTransaction, Dictionary`2 salesLineByLineId, CartLineValidationResults cartLineValidationResults)
        at Microsoft.Dynamics.Commerce.Runtime.Workflow.CartWorkflowHelper.ValidateUpdateCartRequest(RequestContext context, SalesTransaction salesTransaction, SalesTransaction returnedSalesTransaction, Cart newCart, Boolean isGiftCardOperation, IDictionary`2 productByRecordId)
        at Microsoft.Dynamics.Commerce.Runtime.Workflow.SaveCartRequestHandler.Process(SaveCartRequest request)
        at Microsoft.Dynamics.Commerce.Runtime.SingleRequestHandler`2.Execute(Request request)
        at Microsoft.Dynamics.Commerce.Runtime.CommerceRuntime.Execute[TResponse](Request request, RequestContext context, IRequestHandler handler, Boolean skipRequestTriggers)
        at ECL.Commerce.Runtime.Donation.TriggerHandlers.SaveCartRequestHandler.Process(SaveCartRequest request)
        at Microsoft.Dynamics.Commerce.Runtime.SingleRequestHandler`2.Execute(Request request)
        at Microsoft.Dynamics.Commerce.Runtime.CommerceRuntime.Execute[TResponse](Request request, RequestContext context, IRequestHandler handler, Boolean skipRequestTriggers)
   InnerException

After many hours over the course a few days we struggled. A colleague suggested to use .NET reflector (this is where you need an experienced retail developer). Using this tool, I was able to make sense of the problem.


Below are the steps to use .NET reflector.

1. Download .NET reflector

https://www.red-gate.com/products/dotnet-development/reflector/

2. Install following wizard. You can use the trial for 14 days or just active it with your serial number

When you install – I would recommend both the desktop and the visual studio extension

image

3. Select the assembly to debug. There are a couple of ways you can do that.

Select using the .NET Reflector > Generate PDBs (this will pop up a dialog to select the assembly)

image

Alternatively, from your solution explorer. Select the dll that is referenced and click on Enable Debugging.
image

4. This will launch the object browser.

Navigate to the method that caused the error. Then right click, Go to Decompiled Definition

image

5. I put a breakpoint and run through the process.

What I found was that it code used the salesTransaction object rather than the cartLine to get the unit of measure. Causing a cryptic error about unit of measure/quantity. In other words, I needed to create the cart line and save it to commit it to the salesTransaction first. Then after that process is finished, I can then override the price. i.e. 2 steps rather than trying to it all in one process.

image

I hope I don’t get in trouble of advising people to use .NET reflector by blogging here. I just don’t see how else I would have figure this thing out.

Recurring import General Journal file using Microsoft Flow #MicrosoftFlow #MSDyn365FO

$
0
0

Microsoft Flow is a simple and cost effective way of integrating. In this post I will walk through how to use Flow for recurring file integration. The most common scenario I can think of is the general journal import.

First, I would recommend reading Microsoft article on recurring integration.

https://docs.microsoft.com/en-us/dynamics365/unified-operations/dev-itpro/data-entities/recurring-integrations

Solution below shows you how to use Microsoft Flow to read from OneDrive for Business and import to FinOps. The exact same thing can be done using Logic Apps for a more enterprise managed solution.

Lets start by setting up our folder structure to drop our general journal files in. Create four folders like so:

  • inbound– drop the files here to be processed
  • processing– Flow will move the file here from the inbound folder while executing
  • success– Flow will move it here when the file has successfully been imported and processed
  • error– Flow will move it here if the file fails to process for any reason

Now in Microsoft Flow designer, place a “When a file is created” and select the inbound folder.

image

In the next step, I used “Initialize variables” to be able to quickly change settings later in the flow. Otherwise, it can get messy to maintain and move around.

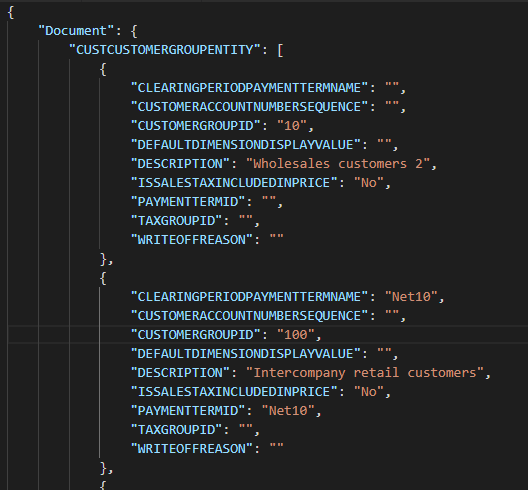
You might ask why I used an Object type rather than a String. In a string, I can set a single variable only. However, with the object I used a json string which allows me to set up multiple variables. (Let me know if this can be in a better way)

image

I parsed the json string. You can do this easily by copying the json string from above. Then click “Use sample payload to generate schema” to paste it in. It will generate the schema for you.

image

Next two steps is moving the file from inbound folder to processing folder. However OneDrive for Business doesn't have a Move action. I had to use a Create and Delete action as two steps. If you are using OneDrive for personal you will see a Move file action.

Once its moved, I use “Get file content” action to read the file.

image

Next, I used an HTTP POST action to send to the enqueue the file. I use the variables that were initialized earlier.

In the header I am setting the external identifier as the name of the file. This is done so in FinOps we can identify the job by the name.

image

This is what the result looks like in FinOps.

image

We are done sending the file to FinOps. The next steps are doing some cleaning of the file by moving to the success or error folder. Or you can email someone when a file is process or it errors out. You can get fancy.


However, I will show an example what you can do. Below I check every minute for 60 minutes if the job has been processed in FinOps. You can change the interval.

I added a “Do until” action. This is a loop that executes at an interval for a time limit.

image

The advanced query from the above is pasted below for your convenience. Its just doing an “or” condition. It checks if it is in any of these states.

@or(
      equals(body('HTTP_2')?['DataJobStatus']?['DataJobState'], 'Processed'),
      equals(body('HTTP_2')?['DataJobStatus']?['DataJobState'], 'ProcessedWithErrors'),
      equals(body('HTTP_2')?['DataJobStatus']?['DataJobState'], 'PostProcessingError'),
      equals(body('HTTP_2')?['DataJobStatus']?['DataJobState'], 'PreProcessingError')
    )

Initially it gets Queued, In Process and will go to Processed if it is successful.

All the statuses are listed here:

https://docs.microsoft.com/en-us/dynamics365/unified-operations/dev-itpro/data-entities/recurring-integrations

Next, I added a Condition to check the job status. If it is Processed, then I know it is successful. I can then move the file to the success folder. Otherwise, to the error folder.

image

I will stop here as the next few stops are pretty much a repeat of moving a file in OneDrive.

Why don’t you take it to the next level and check out Ludwig’s blog post on automating the posting of the general journal.

https://dynamicsax-fico.com/2016/08/17/automatic-posting-of-journals/

Data Entity stuck “In Process”

$
0
0
There are a few reasons a scheduled data job may not execute. I made a silly mistake and it seemed as though the jobs where stuck on “In process”.
Things I checked:
1. Check the job isn’t disabled. See screenshot below. There is a toggle.
2. Check your recurring batch job is scheduled
3. Check you haven’t made any mistakes when enqueuing the entity. (I made a typo here)
I made the mistake of copying the URL and not changing the entity name. See the highlighted part in the url.
https://myenviornment.cloudax.dynamics.com/api/connector/enqueue/123456789-5506-4314-874D-3CF51A7AE15A?entity=General%20journal&company=usmf


Below is a screenshot of the record info. You can see the Entity field contains the string I passed via the enqueue URL.


Sounds pretty simple but hopefully helps someone out there.

Azure DevOps Release Pipeline–Walkthrough

$
0
0

It is a great start to 2019. Joris from Microsoft has welcomed the year with the release of the Azure DevOps Release Pipeline task on the marketplace.
I thought I would do a walkthrough for those that haven’t had a chance to play with it yet.

New release pipeline
In Azure DevOps, click on the New release pipeline.

You will get an option to select from a template. Just select “Empty Job”.
In the first stage, make sure the Agent job is using “Hosted VS 2017”.


In the Agent job click on the + icon to add a task. Select the LCS Asset Upload task.
If you don’t see, then you have not installed it. Just select the “Dynamics 365 Unified Operations Tools”
link at the bottom. Otherwise, install from here

Stages
Now that you have the first task added. Fill in the details. You will have to add a
new connection to LCS. I need to investigate the tags to give it a better name and description.

When you click on the new LCS connection, you will get this dialog. Most of it is defaulted for you. Enter the username and password.
Client ID (Application ID) can be created in Azure Portal.
You need permissions to “Dynamics Lifecycle services”. Make sure it is a
Native application type. Hopefully it looks like the screenshot below.
Don’t forget to click on “Grant permissions”.
Artifact
Next, we go back to the main Pipeline screen and select our artifact.
Click on the Add an artifact tile. Select build and fill in the details.
What we want to do in this scenario is release the latest build.

Trigger
To set up a trigger to occur on a build. Click on the lightning icon. You can enter
filters to ensure only your release branch gets uploaded to LCS.
Run
You can run it manually to test it out. Click on the Create a release.
A successful run should look like this.
LCS
It is pretty satisfying to see the result on LCS.

Regression Suite Automation Tool - Create unique values

$
0
0
The RSAT doesn't have any roll back feature. So, it can be frustrating updating the excel file with
unique records.


Well not to worry - RSAT supports Excel formulas. The user guide suggests using RandBetween(a,b) Excel function.
However, that isn't really reliable and you are hoping you don't get the same random number.

I have been using date formula. The below concatenates the datetime to the string.
=CONCATENATE("SS",TEXT(NOW(),"yymmddhhmmss"))


If you want to get started with RSAT.
Download the tool and the user guide from here.
https://www.microsoft.com/en-us/download/details.aspx?id=57357

You can also watch a short video that walks you through how to use it.

Embed PowerApps in Modern POS

$
0
0
There was a feature released around 8.1.3 to open URL in POS.


Follow the guide to add a button to POS via the Screen Layouts. In the Action, select Open URL.
Enter the PowerApps url. In this case I want it to open up as embedded rather than popping up with a new window.
Run your distribution job to have it show up on POS.


Below is an example I am working on. We have an external system managing licensing.


Just note, that it will pop up with a Microsoft login screen. You can tick the login to remember you.


If the screen doesn’t fit in the POS window. You can click on “Fit to screen” on the top right.

Hope this gives you ideas to take advantage of in Retail space. Possibilities are endless.

Regression Suite Automation Tool (RSAT) via command line

$
0
0
The recent RSAT tool now supports running via command line. Just call the ConsoleApp executable with the right commands. This is great for automation scenarios. Normally, you would have all your test plans prepared and you just want to execute it them on a regular basis.

Below is a quick summary of what it covers.

To get the list of commands just enter ? at the end.

C:\Program Files (x86)\Regression Suite Automation Tool\
Microsoft.Dynamics.RegressionSuite.ConsoleApp.exe ?


To get the list of IDs just run this.
C:\Program Files (x86)\Regression Suite Automation Tool\
Microsoft.Dynamics.RegressionSuite.ConsoleApp.exe list

To run a list of test cases just use the playbackbyid command.
C:\Program Files (x86)\Regression Suite Automation Tool\
Microsoft.Dynamics.RegressionSuite.ConsoleApp.exe playbackbyid 104 105 106

Detailed guide on creating Business Events with Azure Service Bus

$
0
0
I have been working with the new Business Events feature released in FinOps and you should read the docs site first.
This blog post focuses primarily on setting up Azure Service Bus endpoint. Setting up the Azure services can be tricky if you are not familiar with Azure Key Vault and application registrations.

I have sequenced the post so that you don't have to jump around. There are four key elements to this:
  1. Create the app registration
  2. Create the service bus
  3. Create the key vault secret
  4. Configure FinOps

Create an App Registration

In the Azure Portal, navigate to the Azure Active Directory menu. Click on App registrations (there is the old one and the preview menu - they are the same but the UI is a bit different). I will show the original App registrations way.


Create a new Web app/API registration and give it a name. It doesn’t really matter in our case what the sign-on url is.


Take note of the Application ID as you will need it later for setting up the Business Event.

Under the Keys menu, create a new secret key. Copy the value and keep it as you will need it later.

Once the setup is done, just click on Required permissions and Grant permissions button. This has to be done by an administrator. If you don’t Grant permission. You might get an error like “Invalid client secret is provided.”.


Create a service bus

Search for service bus in the search bar. Then create a new service bus.

On the create menu, give it a name and select a pricing tier. Take note of both as they will be required later.

Once it is created, click on the Queues to create a new queue.

Give it a name and click Create. Take note of the name as it will be required later.

Next, we need to get the connection string. This is required when setting up business events in FinOps. Click on Shared access policies and then select the RootManagedSharedAccessKey. Copy the primary connection string.

Create key vault secret

Now to create the key vault secret. Key vault will hold our connection string to the Azure service bus.
I usually use the search bar on the Azure Portal to find the key vaults menu.


Create a new key vault and give it a name.


Once it is created, take note of the DNS name. We will need it later.


Under the Secrets menu, click on “Generate/Import”.


Give it a name and paste the connection string to the Azure Service bus. Take note of the name you entered. You will need it later in FinOps.


Give the application registration access to the key vault. Under the key vault > Access policies. Click on Add new.


Select the template “Key, Secret & Certificate Management”.
Click on “Select principal” and search for the application registration we created earlier and select.

You will have something like this. Just click on the save button.


Configure FinOps

The Business events menu has now moved to the System administration menu. Open up the business events form and start your set up.


When the form opens, click on Endpoints to create a new endpoint. Select Azure Service Bus Queue as the endpoint type and give it a name. This is where all those important strings you copied earlier are important.
  • Queue name - the Azure Service bus queue name you gave it
  • Service Bus SKU - the Azure Service bus pricing tier
  • Azure Active Directory application ID - this is the Application ID under the Application registration properties
  • Azure application secret - Under the application registration there was a secret key that was generate
  • Key Vault DNS name - Under the Key vault there was a property DNS name
  • Key Vault secret name - the name you gave the secret
Once all these values are set, click on OK. You will generally get a meaningful error that you could take action on.


Now that the end point is created, we will activate a business event against it. Click on Business event catalog and select the event. In my case, I selected the Free text invoice posted event.
The Activate menu, will let you select a company and the endpoint we created above.


Schedule the business events batch job

Under the system administration > Periodic tasks > Business events
Click on the Start business events batch job
You have to schedule it as a batch job, don’t just run it. Without this nothing will be sent to the business events end point.


Create a free text invoice and post it

I am not going to write anything here. You can figure this one out.


Result of the service bus queue

Using Service Bus Explorer we can see the message.


What happens in the back end.

If you want to know what happens in the back end. Business events essentially creates a record in the BUSINESSEVENTSCOMMITLOG table. This will get deleted once the batch job picks it up and sends the event to the selected endpoint.

Event Based Integration using Business Events and Data Management Framework

$
0
0
In this post I will share how I used Business Events for integration.
If you have been in the FinOps space, then you know that there is a Recurring integration pattern that uses dequeue concept. The dequeue pattern, requires that you constantly poll the FinOps URL to see if there is a file you can download.
https://{base URL}/api/connector/dequeue/{activityID}
Then you have to acknowledge the dequeue by calling a second URL
https://{base URL}/api/connector/ack/{activityID}

Another alternative is to use the Package export method. The advantage of this one is that the external system is doing the polling and executes the export job on request. No need for the FinOps batch job to run.

In summary:
  1. Both methods use a polling architecture.
  2. Both methods produce a zip file which you have to extract
  3. Both methods require that you make a second call to check the status or acknowledge the download
Now, imagine if you could use the same Data Management framework but have it coupled with Business Events to trigger from FinOps whenever there is a new file. That means your other system doesn’t have to constantly poll to find if there are new files. On top of that, rather than getting a zip file, you export the actual file (xml, csc, json etc). My preference is to export a JSON file. I will do a future post on how to do this (its actually very simple).

I have developed a business event and is available on GitHub. It contains 3 classes as with any business event. Just add that to your model and build.


Once you installed the GitHub code. You should see the Data export business event.


How it works:

Create an export in the Data management workspace with the following:
  • Data project operation type = Export
  • Project category = Integration
I put these filter conditions so that not all exports cause a business event to trigger.

Just schedule your export to run on a regular basis with as an incremental export.

The export will generate a payload that looks like this.


The main fields you need are the DownloadURL and the EntityName. The downloadURL is formed when the event fires. By default it is valid for 1 hour. Think about it when using it in production.

Below is how I am using it in Flow.
The Business Event fires to Flow. I read the JSON payload and check on the EntityName is equal to “Customer groups”. Then I use an HTTP request with the DownloadURL to get the file.


You might be wondering how I parse a JSON file using the DownloadURL. :-) You will have to wait till next blog post.

Data Management Export - XML to JSON Transformation

$
0
0
In my last post, I wrote about event based integration using Business Events. I used JSON as my export file type. JSON is a lot easier to work with in Microsoft Flow or Azure LogicApp.
Below is how I achieved it.

Data Management framework doesn’t do JSON by default. However, it does do XML file format.
A bit of googling and trial and error. I found this XSLT code that transformed XML to JSON.
https://gist.github.com/bojanbjelic/1632534
Here is the authors blog post to give credit.
https://www.bjelic.net/2012/08/01/coding/convert-xml-to-json-using-xslt/#code

Setup

Under the Data management workspace, open the Source data format form. Create new record called JSON and set the default extension to json.
  • File format = XML
  • XML Style = Attribute
  • Root element = Document (I left this as default)


Create a new Export and select your entity. In the Source data format, select JSON record that was created in the previous step.

Now click on the View map icon.


In the mapping form, click on the Transformations tab. Then upload the xslt file you downloaded from the github.


That's it for the set up. Now to run it.

Process

Normally when you export and XML file. It looks like this:

Once the transformation is applied, you get a JSON file like this.


This is great because I like to use Microsoft Flow or LogicApps to read the files to process. With XML you have to use XPATH or figure out otherwise to read it.

This works very nicely and no development or extra transformation at the target.
Viewing all 219 articles
Browse latest View live