Quantcast
Channel: Dynamics NAVAX
Viewing all 219 articles
Browse latest View live

Business Events and Date format in Flow

$
0
0
Business Events formats Dates in the Microsoft JSON format, e.g. "EventTime": "/Date(1560839609000)/"
I wish it was in ISO8601 standard e.g. "2019-06-18T05:40Z".

Below is what I did using Flow.

First get the integer part of the string by using the replace function.
Function: int(replace(replace('/Date(1560839609000)/','/Date(',''), ')/', ''))
Output: 1560839609000

To format into date.
Function: addseconds('1970-1-1', Div(1560839609000,1000) , 'yyyy-MM-dd')
Output: 2019-06-18

To format into datetime.
Function: addseconds('1970-1-1', Div(1560839609000,1000) , 'yyyy-MM-dd hh:mm:ss')
Output: 2019-06-18 06:33:29

Using an online converter I am able to validate my output.
https://www.epochconverter.com/


After that, you can use the Date Time string to or formatDateTime function.


For the developers out there. Newtonsoft is great for working with dates and supports both formats. Have a look at this link for a bit more info.
https://www.newtonsoft.com/json/help/html/DatesInJSON.htm

If you have a better way of handling dates. Please let me know.

Searching in Event Viewer for #MSDyn365FO

$
0
0
This might seem simple but I thought I would post it anyways.
I always tell everyone to check the event viewer if there are unexplained errors or issues with the system. Recently, I was investigating random SOAP messages failing. REST services was working fine. I wasn’t getting any clear errors except that it was forcibly closed.
System.IO.IOException: Unable to read data from the transport connection: An existing connection was forcibly closed by the remote host.

Problem: Where do I look in Event Viewer?

In most cases I could guess which folder to look in under Microsoft > Dynamics.


Solution: Create a custom view

So, I decided to create my own custom view.


Tick Critical, Warning and Error.
Select the Dynamics logs only.


Repeat the error and it should stand out.

Loop through AOT Display Menu Items #MSDyn365FO

$
0
0
I have been experimenting with getting Metadata information from the AOT from FinOps. There is some discussion on this forum post which helped me.
https://community.dynamics.com/365/financeandoperations/f/dynamics-365-for-finance-and-operations-forum/316468/how-to-get-aot-objects
I thought I would try to clean it up a bit to make it a bit more readable for future reference.
The X++ code below will loop through Display menu items in the AOT and print some info.
  • Menu Item Name
  • Menu Item Label
  • Model Name
public static void main (Args _args)   
{
System.Type axMenuItemTypeDisplay = new Microsoft.Dynamics.AX.Metadata.MetaModel.AxMenuItemDisplay ().GetType ();
System.Collections.Specialized.StringEnumerator menuItemDisplayNames = Microsoft.Dynamics.Ax.Xpp.MetadataSupport::MenuItemDisplayNames ();
while (menuItemDisplayNames.moveNext ())
{
str menuItemName = menuItemDisplayNames.get_current ();
//Get Model Name for the display menu item
var enum = Microsoft.Dynamics.Ax.Xpp.MetadataSupport::GetModelsOfMetadataArtifact (menuItemName, axMenuItemTypeDisplay).GetEnumerator ();
str modelName = enum.moveNext () ? enum.Current.DisplayName : '';
MenuFunction menuFunction = new MenuFunction (menuItemName, MenuItemType::Display);
info (strFmt ("menuItemName: %1, menuItemLabel: %2, modelName: %3",
menuItemName,
menuFunction.label (),
modelName
));
}
}

Embedded ChatBot in #MSDyn365FO Help Pane

$
0
0
In this post I will share some code on how to embed a Chat bot into the Help pane in #MSDyn365FO. My full code is available on GitHub. Do share any feedback.

I won’t go into detail on how to develop the Chat bot as there are a number of ways to do it. 
Options available in the Microsoft world are: 
The point is you might want to surface that bot in FinOps to help users with their queries or support requests.

Below is what it looks like. I added a field to embed the URL in the system parameters. Once you have entered the webbot url, you will see the Chatbot tab appear in the help pane.

Dynamics eCommerce source control development strategy

$
0
0
Recently, Microsoft released their eCommerce solution. I got started by looking at how to do a bit of development locally. The guide is here https://docs.microsoft.com/en-us/dynamics365/commerce/e-commerce-extensibility/setup-dev-environment
One of the first steps to development is to clone Microsoft github repo. That's fairly easy to do.
But, the next question I had was, “how do I do my development in my own private version control and continue to pull Microsoft's latest releases?”. I don't want to manually merge folders and deal with painful files.
I am not an expert in git and still have a lot to learn. However, below is the approach we have taken and will test out over the coming weeks to see how it works for us.

Go to Azure DevOps (my choice of version control) and Import the repository.
Click on Import repository.
 
Give it the github URL and name.
 
After a minute it should show an Import Successful message.


Using git bash, clone your Azure DevOps repo by the following commands. I used a clean folder called gitRetail.
cd “c:/gitRetail”
git clone git clonehttps://MyProject@dev.azure.com/MyProject/_git/Msdyn365.Commerce.Online
 
Then you can add a remote connection to the original github by the following command.
cd “c:/gitRetail/ Msdyn365.Commerce.Online”
git remote add Microsoft https://github.com/microsoft/Msdyn365.Commerce.Online.git

Now you can fetch/merge or pull from the Microsoft master branch.
By doing a git fetch
E.g.
git fetch Microsoft master
git pull Microsoft master
git remote
Below are some screenshots.
 

Useful links:


Thanks to my colleague and friend Pontus for helping out and always giving advice on git. 

Data import/export Business Events

$
0
0
Sometime last year, I posted about using Business Events with Data Export. The code was shared on Github too.

Now, I have updated to introduce a Data Import Business event. This is helpful for a number of scenarios (specially for integration).
  • Long running jobs - you don’t want to constantly call Odata services to get the status of your execution job
  • Trigger data execution alerts for integration - you could trigger alerts based on failures.
The argument here could be that you could use alert rules to fire a business event. Alerts rules are flexible but I find that I have to use Odata calls to get more information.

To use the Import Business Event, just make sure the Project category is Integration


The business event will fire when an execution history is created.


The business event looks like this. 


Any feedback is welcomed.


How to Debug Dynamics 365 eCommerce

$
0
0
Our team has been doing some development with the new eCommerce. One of the things we had to figure out was how to debug.
To debug client side javascript, you can use Chrome Inspect and dig into the javascript. If you want to debug the server side TypeScript code then you need to do that on a development box. Set your self up, as I assume you already know how to get started with development and you got it to run via yarn start.

In VS Code, install Debugger for Chrome extension.

Call yarn start to run your project
Click on Run > Start Debugging


If it is the first time debugging, then it will auto generate a launch.json file under .vscode folder.
Most of it should be there. Just add the node part of the configuration. 
{
    // Use IntelliSense to learn about possible attributes.
    // Hover to view descriptions of existing attributes.
    // For more information, visit: https://go.microsoft.com/fwlink/?linkid=830387
    "version""0.2.0",
    "configurations": [
        {
            "type""node",
            "request""lanch",
            "name""Launch Program",
            "program""${workspaceFolder}/app.js"
        },
        {
            "type""chrome",
            "request""launch",
            "name""Launch Chrome against localhost",
            "url""https://localhost:4000/_sdk/allmodules",
            "webRoot""${workspaceFolder}"
        }
    ]
}

Now you can start debugging. Put your breakpoints and be more productive.

Getting Started with eCommerce development

$
0
0
Microsoft has done a really good job with documenting eCommerce development on the Microsoft docs site.

Here I am just summarising useful links for those wanting to get started with development. 

Start by watching some of these videos. Some are repeating content but very useful information in all of them.
Accelerate your business with Dynamics 365 Commerce

Next, I suggest getting onto the forums if you need help Dynamics 365 Commerce Forum.

There is an insiders yammer channel "Finance and Operations Insider Program". Join the "Retail interest group".  I won't post the link here but this is helpful to connect with Microsoft employees who built the solution.

Last but not least. I would recommend Commerce In A Day session. It is a hands on lab sessions.
Partners can sign up here:
Customers can connect directly via:

Hope this helps those starting their learning journey.

Dual Write - How Pricing and Inventory On-Hand works in CE?

$
0
0

In the recent updates of Dual Write, Microsoft released a pricing and inventory on hand integration in CE. Real time pricing calculation and inventory on hand as per FinOps business logic. In this post, I wanted to cover how it seems to magically work.

As you know by now, Dual Write uses a push architecture. Where either FinOps pushes to CE or CE pushes to FinOps. Both call a web service on the other side to sync data. Any errors that occur are presented to the user in real time. However, the pricing and inventory on-hand feature is different. These two features pull limited calculated data as needed. Watch the "Prospect to cash in dual write" tech talk from Microsoft and you will see why. 

You wouldn't want to integrate (replicate) inventory levels or pricing logic in CE. The reason this is done this way is because integrating this kind of data would cause performance problems or a lot of chattiness. So, what Microsoft has done is a pull the data as needed (pull architecture). 

In the below screenshot, you can see there are two new buttons on the Quote or Order form. 

1. On-hand inventory - Shows real time inventory on hand information in a pop up form.

2. Price Quote/Order - Recalculates the price on the quote or order on the lines

The Inventory On-hand form shows calculated data from FinOps.

Now lets have a look at the back end that makes this work.

There is a bit of javascript that is used in CE to call OData Action methods. Below you can see the javascript resource file in the solution. You can see how the PriceOrder method calls a web service by passing in 4 parameters. The Entity name (hopefully this is fixed as it is using the label), the sales order number, the company and the action method to call.

Following this through in FinOps. You can see the DualWriteProjectConfigurationEntity has a RunDocumentAction method which takes the same 4 parameters. 

If you dig deeper, this then triggers a method on the entity that was specified. Dirtying up the record to force a sync back to CE. 

Maybe another time I can dig deeper and give some feedback.

Find information about data entities in your system

$
0
0
Just bringing attention to this docs page.

https://docs.microsoft.com/en-us/dynamics365/fin-ops-core/dev-itpro/data-entities/data-entities-report

I only saw it today and it has some nice scripts that you can run to generate information.

Go to the github project it references and run the scripts.

ScriptOutputs
AggregateDataEntitiesReport.ps1AggregateDataEntities.csv
AggregateMeasuresReport.ps1AggregateMeasures.csv
DataEntityFieldReport.ps1DataEntityFields.csv
DataEntityReport.ps1DataEntities.csv
KPIReport.ps1KPIs.csv
LicenseCode-ConfigKeyReport.ps1LicenseCodes.csv
ConfigKeys.csv
ConfigKeyGroups.csv
MenuItems.csv
SSRSReport.ps1SSRSReports.csv
TablesReport.ps1Tables.csv
This report takes awhile to run, but it produces output as it runs.
WorkflowTypesReport.ps1WorkflowTypes.csv
The scripts use C:/, you will have to change to K:/ or where ever your application is sitting in. I just did a text replace "C:/" with "K:/".


It will export your files under the users Documents folder.


The main one I am interested in is the Data Entities report.
Below is a screenshot of the DataEntities export. Includes any cusomisations you have in your system.


Creating SQL index via LCS

$
0
0
LCS has some really great tools for checking performance. Its really a matter of trying to get used to them and knowing whats available.

Under the Environment monitoring > SQL insights > Performance metrics.

You can find some slow queries and how they are affecting the environment over time.

I found that SalesLine table was missing an index for Revenue recognition.


Warning: Do this at your own risk.
You could break the system if you haven't tested this properly.

I raised a support ticket but was asked to create a non-unique index on the table via LCS.
Go to Environment monitoring > SQL Insights > Actions
Select "Create non-unique index on a table".
Turn of the "Allow page locks".


Talking about that risk.
I got an error after I did the above with batch jobs. I had to restart the batch service in LCS to fix the problem.

This is the error I got with batch job to post the sales invoices. 

Refer to Microsoft Docs page on this. Typically you want to do this as part of your development but that would cause outage and delay the whole process. In this instance, I tried the above and got past the problem.

Note that there is a drop query. So, take note of the index name you created. Then you can delete it afterwards.

Tips for getting detailed error message from Dual Write

$
0
0

In some cases Dual Write gives you some cryptic error messages. Here are a couple of tips to get or find the errors.


Tip 1.

If you get an error while mapping or trying to set up a new map. You can get a bit more info from using browser developer tools.

In Chrome, just right click and select Inspect.


Click on Network and start recording (trace).
Hopefully you get a bit more detail with the error.


Tip 2

If you are getting an integration error. There is a table that stores all the errors.
https://XXXaos.cloudax.dynamics.com/?mi=SysTableBrowser&tableName=DualWriteErrorLog

For more troubleshooting tips from Microsoft. Check out their docs page.


My Experience moving FinOps/X++ code to GitHub

$
0
0
I recently saw a question on LinkedIn, asking if we can share our experience with moving to Git version control.

Here is a response to it. I will share my experience of moving to GitHub version control. We have chosen to move our X++ code to Git and in particular GitHub about 6 months ago.

Reasons for the move

Below are some of the reasons we have chosen to move from TFVC on Azure DevOps to Git on GitHub:
  1. Every single source code/project we have is on Git except for our X++ code. I have been asked way too many times as to why we are on TFVC. I have explained many times but I can't help shake the feeling that others think X++ is some old language. In other words, better alignment.
  2. There has been considerable effort to move to GitHub as our approved version control from many other version control systems. This is to make our code more accessible to all teams, have policies in place, leverage shared tooling, better manage onboarding experience etc.
  3. Better branching and merging experience

Architecture

Below is the architecture we have gone with.

  1. Developers - we have multiple developers with their dedicated VM on our Azure subscription
  2. Jira - Our issue tracking (tasks, bugs etc) and any planning is done on Jira
  3. GitHub - Our version control where we keep our X++ source code, our pipeline code (yaml, powershell), postman collection
  4. Azure DevOps Build pipeline - we have chosen to have both forms of our build pipeline
    1. Build with Nuget via hosted agent - this is executed on every pull request to main to catch any merge issues that would result in a compile issue.
    2. Build via a build VM - this is executed in two various ways. Manually executed on demand when we wish to do a release and automatic at night when ever there is code change in main. We use the build VM because we have automated unit tests, automated RSAT runs and run CAR report that gets uploaded to the artifacts.
  5. Azure DevOps Release Pipelines - The release pipeline will take the deployable package and push to our test environment.

Repo

Here is the folder structure we keep in our repo. I am masking/obfuscating the names here and are to give you a general idea.
/pipelines
/pipelines/fo-nuget-build
/pipelines/payment-connector-build

/postman
/postman/*.postman_collection.json

/projects
/projects/*/*.sln and *.proj

/src
/src/Metadata/MyCustomModules
/src/PaymentConnector


A few things to note here:
  1. I could have moved the Postman and PaymentConnector into its own repos but I found it cleaner to have it together. 
  2. .gitignore - I just used whats out there and found this one to be working well form me PaulHeisterkam/d365fo.blog/.gitignore
  3. Build status - you will notice the build status badges I placed int he main readme. This gives clear visibility into the health of our pipelines. One that happens from time to time is getting a warning on the RSAT pipeline. We do have emails going to our team if the build fails too.

Branching

Our branching strategy is to have very short lived branches. 
  • main - The main branch which has a policy requiring an approval from another developer. Only way to get anything in is via a pull request
  • user/username/featurename - we like to place our dev branches under the developers (users) name. Easy to identify who is working on it and no one touches someone else's branch without communicating to them. Call it what ever you want, it can be called something generic like user/munib/dev. Its all yours and its all about creating frictionless development experience.
  • feature/featurename - this is a feature branch that is shared across multiple developers. It usually a large development that we may not release for multiple sprints. Give it something meaningful. As I am posting this, there are no feature branches in my current repo.
Currently, we don't have multiple releases. Only a single stream of development. If we had multiple release streams, I would make the main be in sync with BAU stream of work. Then create a release branch eg. release/Phase2

Symbolic link

We are using these powershell scripts for our symbolic links and works really well.

Build and Release piplelines

I have attempted to use GitHub workflow actions but it was a fair bit of work. Azure DevOps pipelines work really well with GitHub and there are already tasks that I can utilise. Where as in GitHub Actions, I would have had to write powershell scripts.

Jira and GitHub

Jira integrates with GitHub really nicely. When ever we commit in Git and put the issue number, it will automatically link the code change to the Jira issue.


Release notes

We create release notes via Jira. This is done by tagging the fixed version to the release. Nothing sophisticated here to avoid confusion. The process is simple and doesn't take that much effort.

Git commands

I am not a Git command person. I use a combination of commands and UI tools. I have experimented with the below and I still use a combination of them.
  • GitHub Desktop
  • VS Code - with Git extensions installed
  • Visual studio Git UI experience
  • Git command line
My advice to any developers is, use what is comfortable to you.

Onboarding developers

This is probably the biggest challenge in most companies. FinOps developers are so used to TFVC and its implicitly. Our daily ritual is Get latest, do some coding and checkin.
One way to overcome this is a good clean readme page. Simple instructions on how to get started. Assign a simple development task and walk them through it. 
Then the new ritual will be something like this
git checkout main
git fetch
git pull

git merge users/munib/dev main
git checkout users/munib/dev

Just build up slowly to more complex scenarios.

References

These links are super helpful

Asset Management Mobile App

$
0
0


Microsoft recently released a preview mobile app for Asset Management. The App gives 2 personas that you can use it for:

Installation

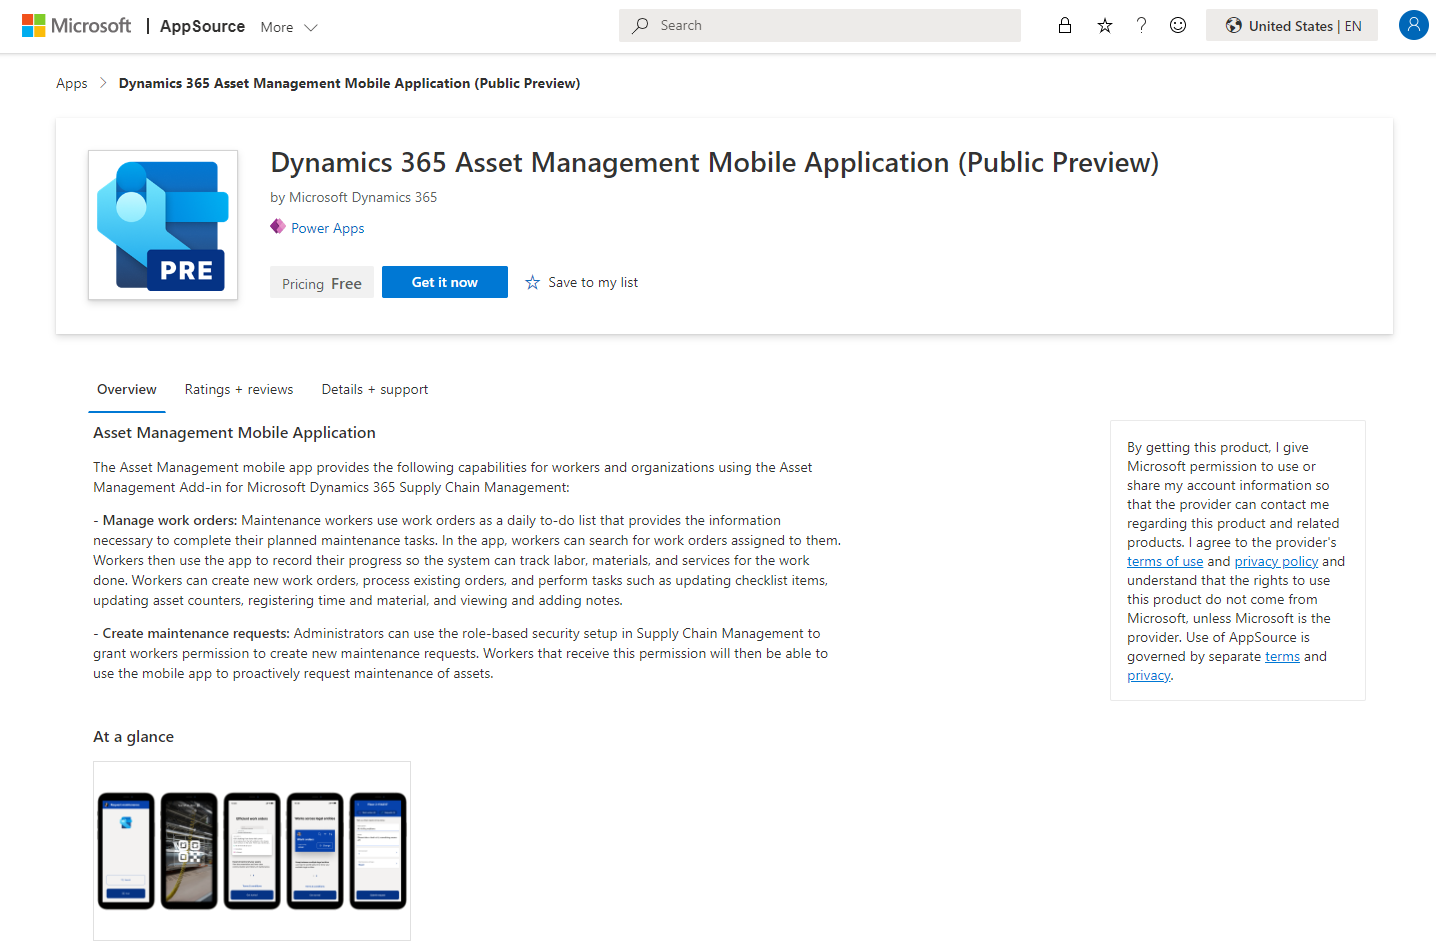
To install, go to AppSource to find the app Dynamics 365 Asset Management Mobile Application

Read the Onboarding doc page as there are prerequisites. Such as installing the Finance and Operations Virtual Entity solution.


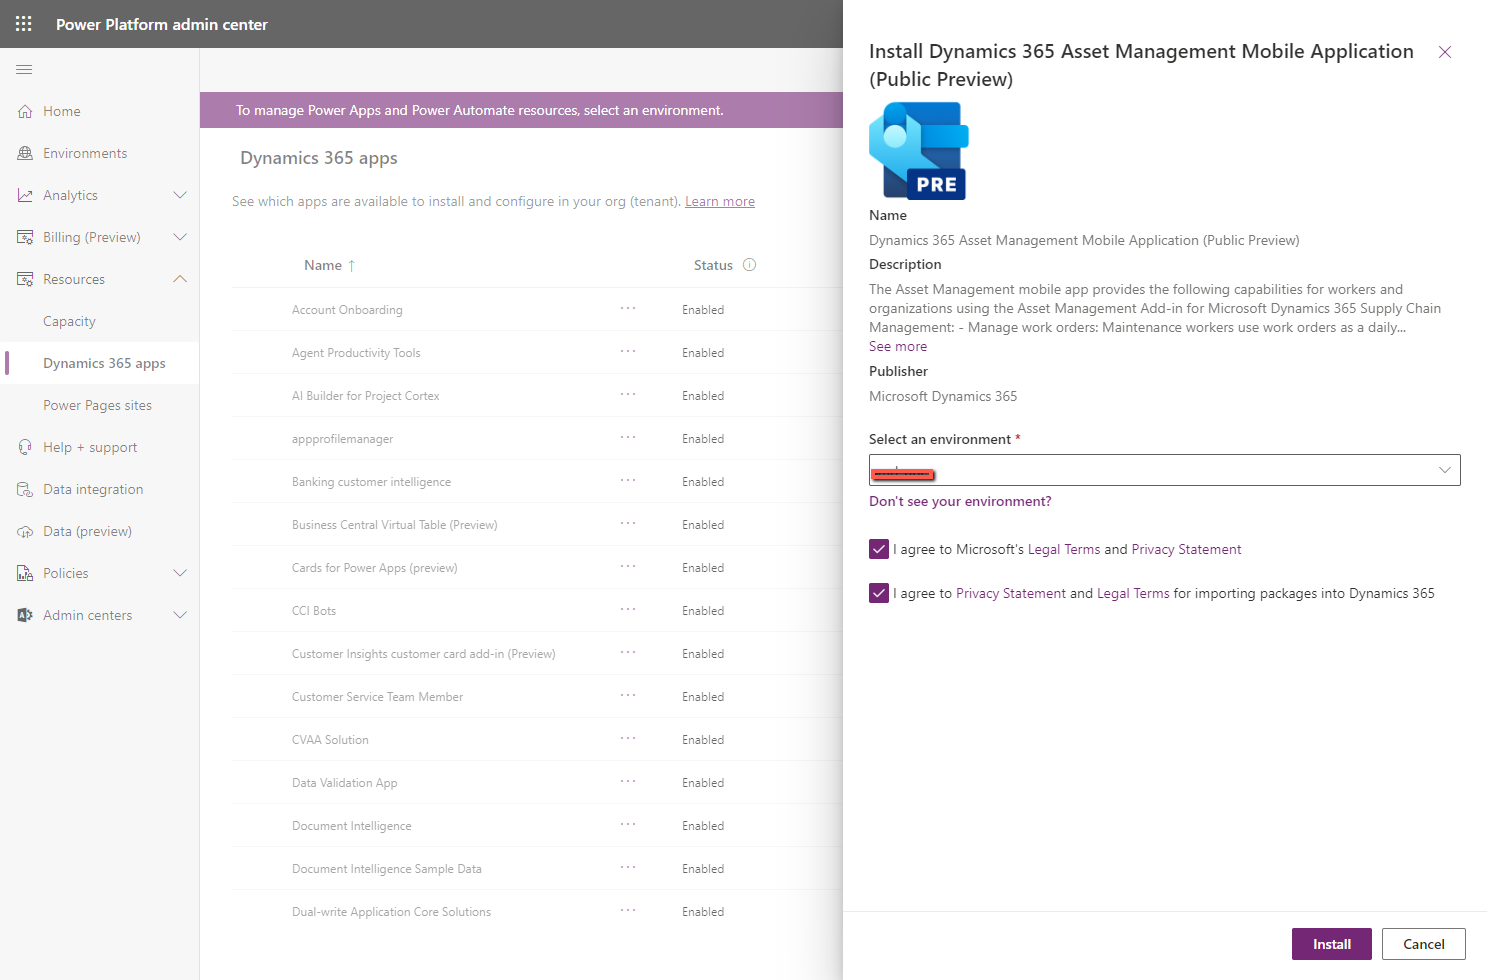
The install is pretty easy to follow. Accept the terms and click Install.


A Canvas App will be installed and the virtual entities will be enabled in the background. Go and open the Canvas App.
You might get stuck on this screen at this initial preview release. It is a known issue and documented here. You just need to edit the canvas app and publish it.


Maintenance Requester

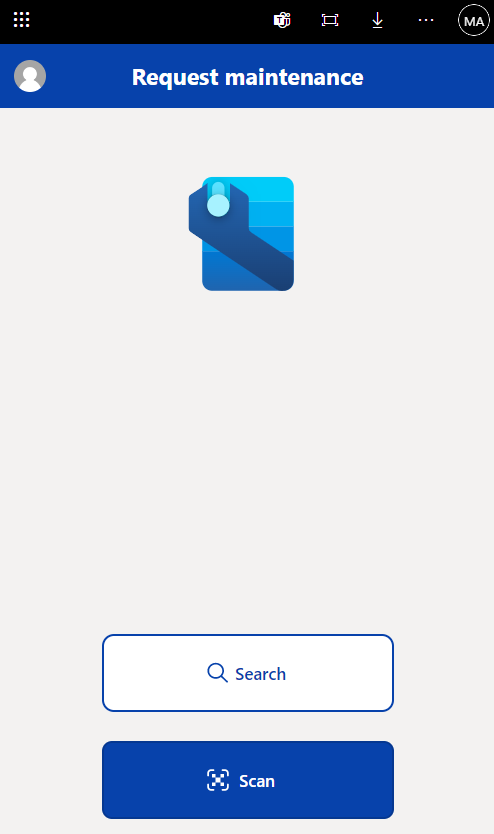
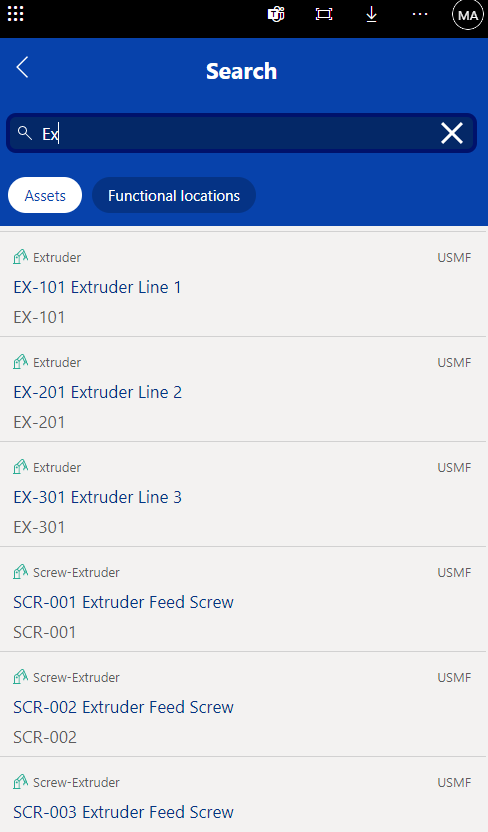
With the Maintenance Requester role, you will see the following screen. You can find your asset by searching or scanning. It looks like it will search on Asset Id and the Asset Type Id fields.


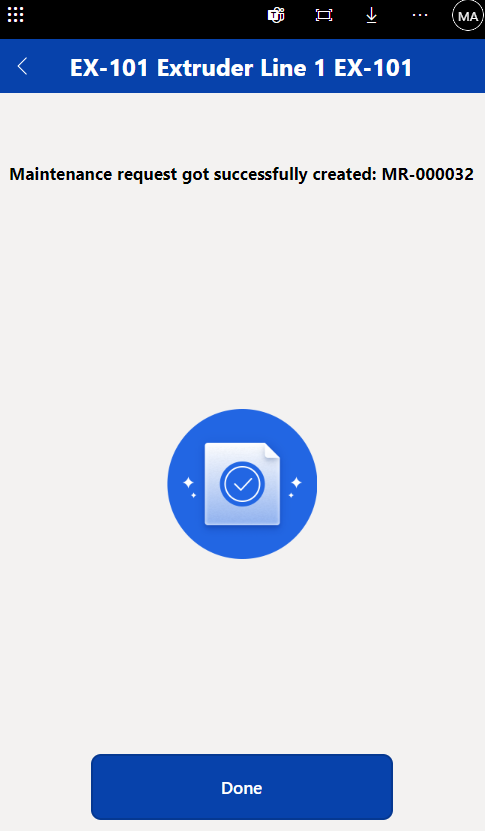
This is the create screen to enter a description and some notes.


Before you click, you can see the active work orders related to the asset.


Manage Work Orders

The functionality available (as per preview release in 24 March 2023) is to give feedback on a work order. 
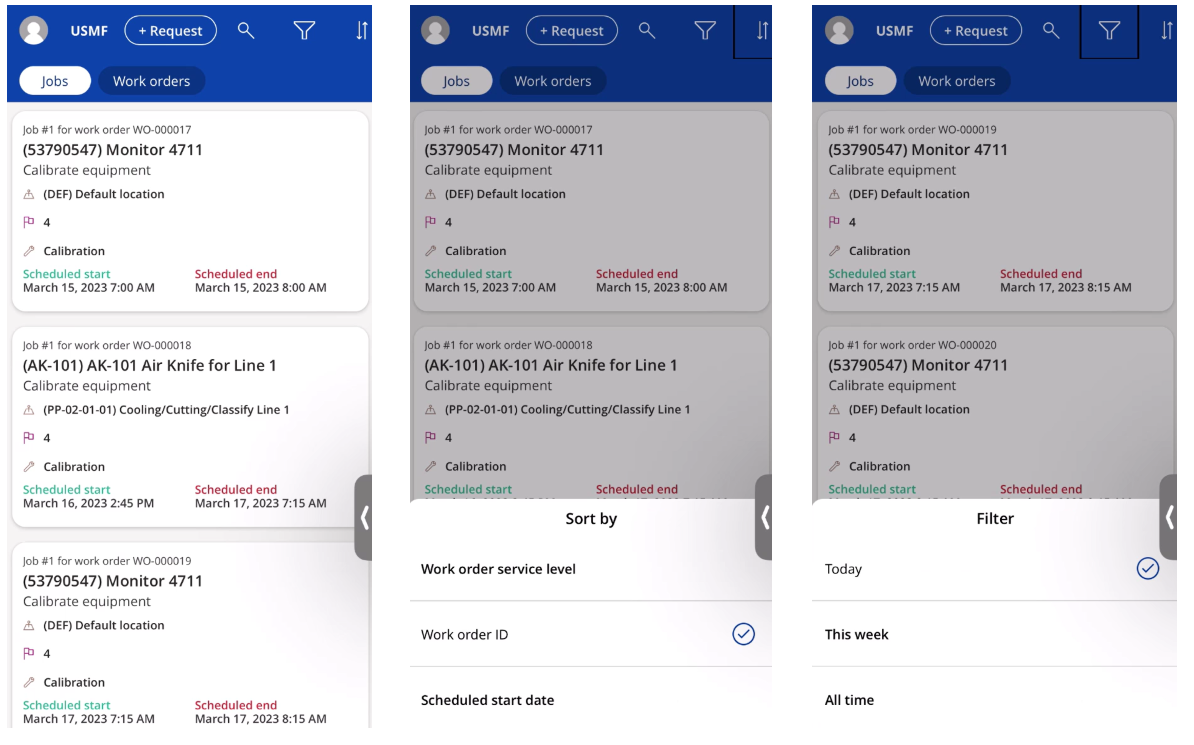
The list shows work orders and jobs that are assigned to you only.
Search will work on the Work order id, Asset Id, Functional location Id.
Filtering is available by Today, This week and All.
Sorting is available by Work order id, Service level and Start date.


A work order has to be scheduled to you for it to appear. I had to dig into the canvas app code to see the filtering applied. Because initially I couldn't see anything.


Overall, it looks really good. I will keep exploring. 


Dynamics 365 Invoice Capture Feature

$
0
0

Microsoft recently released the new Invoice Capture for Dynamics 365 Finance. I ran through installing and configuring it. 

From that experience, below is my brain dump and hopefully it can help with things that are not so obvious.

Three type of invoice captures

There are three invoice type paths that can be captured. These drive the screen layout and what kind of information is mandatory.

  • PO invoice
  • Header-only
  • Cost invoice
When an invoice comes in, you can select one of the three invoice types.


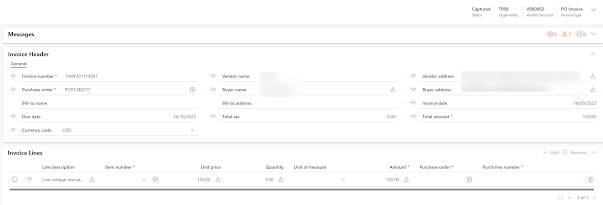
Below are the three screen layouts and differences.

PO invoice– Invoices of this type are associated with purchase orders. The purchase order details must be determined on each invoice line. Both the header and the lines must be reviewed in Invoice capture. This will create a pending vendor invoice.


Header-only– Invoices of this type are associated with purchase orders. The purchase order field on the invoice header is a mandatory field. If the Automatically create invoice lines feature is enabled, the invoice lines are automatically created from the purchase order in Finance, and users don't have to review the line details in Invoice capture. In addition, the line details aren't shown in the side-by-side viewer. This will create a pending vendor invoice.


Cost invoice– Invoices of this type contain non-stock items. Those items can be either service items or procurement category items. This can create either a pending vendor invoice or go straight to an invoice journal.


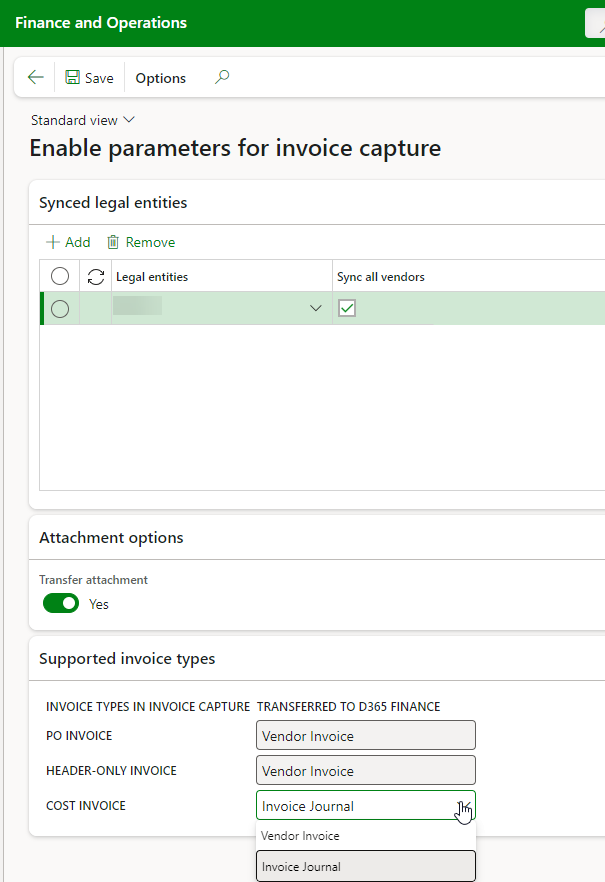
After you address the errors (mapping) and mandatory fields that need to be filled in. you can transfer to FinOps. The only one that can be routed to an invoice journal is the Cost invoice. Otherwise, all go through the pending vendor invoice path.


Upload files

Manual

You can upload files manually or use one of the managed flows. eg. SharePoint.
The status will go from Processing and will be set to Cancelled after it is recognised.


SharePoint

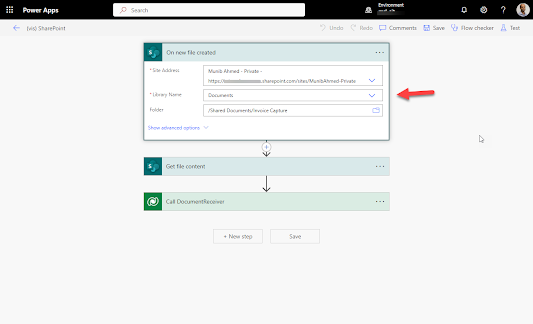
Enter the SharePoint site url and for the library/folder, just enter something to progress (it doesnt need to be a valid path just yet). It can be corrected by doing a look up in flow.


Click on Edit flow and authenticate. Then you can now lookup to the actual library and folder (to correct what ever you entered in previous step). Don't forget to save it.


Once you have saved it, go back to the channels page to sync it. This will refresh the setup screen to reflect what you changed in flow.


Other notes

Touch less transfer - fully automated

In this scenario, you can have the full automation from new file, to recognition to transfer to FinOps. This is done in 5 minute intervals by default. Under the process automation form, you can edit the time or check on any issues. Otherwise, they will appear in awaiting status.


Date time and local formats

For non CE/Power Platforms people, this might be one of the first things you fix in your environment. Under the system settings and personal settings, you can select a local format. 


Known Limitation:

Vendor synchronisation is currently manual and planned for future roadmap item. For now, you have to click sync every time you create a new vendor.

Found Limitation:

If you choose to go down the invoice journal path, note that it picks the first journal name with type vendor tax invoice recording.


I had to dig into the code to find why I couldn't find any configuration.


Copy Company and Number Sequence Issue

$
0
0
When it comes to setting up multiple companies, stream lining the process can save you time and effort. One effective strategy is to establish a template company or select a source company to replicate from. 

In this blog post, I won't go through how to use the copy company feature as there are many blogs out there and Microsoft has some good documentation.
https://learn.microsoft.com/en-us/dynamics365/fin-ops-core/dev-itpro/data-entities/copy-configuration

What I will explain is an issue I faced when using it. I found that the copy number sequence isn't working as expected. It throws an error when used as part of the copy company.

Number sequence feature:

There are two check boxes for number sequence copy:
  • Copy number sequence - this will add number sequence entities and when run, it will change company references in the staging table before processing to target.
  • Reset to smallest value - this resets the number sequence if it is used back to its smallest value. In most cases back to 0.

Issue:

If you use the V2 entities, you will notice that it will result an error (doesn't do the above behaviour). 

What I would do as a work around, is disable the V2 and use the original entities as they still work.


The reason for this behaviour is that it is hard coded to the original entity staging table name. 


See below how it looks at the constants specified above.


Exploring Analytical Options with Dynamics 365 Finance and Operations: Link to Fabric

$
0
0

I’ve recently been exploring various analytical options within Dynamics 365 Finance and Operations, and one that I’ve delved deeply into is Link to Fabric.

There is a walkthrough guide available on the Microsoft Fasttrack Github repo. See Hands-on Lab: Link to Fabric from Dynamics 365 finance and operations apps

This guide is an excellent starting point and should be one of the first things you try out. However, it’s important to understand that there are limitations to this approach that may not be suitable for all real-world scenarios. Lets discuss these items and what I have been exploring ...

Background

I want to join multiple tables to create my denormalised views that I can report on. My goal is to use Direct Lake mode in the semantic model. Specifically, I wanted to avoid the need to reimport data into Power BI for reporting. 

Key Limitations

The first limitation you’ll encounter is:

By design, only tables in the semantic model derived from tables in a Lakehouse or Warehouse support Direct Lake mode. Although tables in the model can be derived from SQL views in the Lakehouse or Warehouse, queries using those tables will fall back to DirectQuery mode.

FinOps is highly normalised and following the Microsoft lab which uses views would not work for me. 

Solutions

A solution to this problem is to create a delta table that I could load from the query/view.

Here are several ways to to do this:

1. Import Data Using a Data Pipeline: This method is easy to configure but can be slow and is not ideal for large volumes of data. Only works within the same workspace.

2. Import Data Using Dataflow Gen2: Also easy to configure, but the limitation is that the copy only works within the same workspace.

3. Import Using a Stored Procedure: Simple to set up but shares the same limitation as Dataflow Gen2, working only at the SQL analytics endpoint level and not across workspaces.

4. Import Using a Notebook: This method has a higher learning curve but offers the best performance and flexibility.


Scenarios

For me, I would lean towards using Notebooks. I have explored Spark SQL option as that was the lowest learning curve for the different languages you can use in a Notebook.

Below is a simple query to get you started. It assumes you have the tables already exporting in fabric.

Select statement with a join

A simple select query to get you started with your first notebook.
%%sql
SELECT
    party.recid AS PartyId
    ,party.name AS Name
    ,COALESCE(party.namealias, '') AS ShortName
    ,COALESCE(postal.countryregionid, '') AS Country
    ,COALESCE(postal.state, '') AS State
    ,COALESCE(postal.city, '') AS City
    ,COALESCE(postal.street, '') AS Street
    ,COALESCE(postal.zipcode, '') AS PostCode
    ,COALESCE(phone.locator, '') AS PhoneNumber
    ,COALESCE(email.locator, '') AS Email
FROM dirpartytable party
LEFTOUTERJOIN logisticspostaladdress postal ON postal.location= party.primaryaddresslocation
AND postal.validto >current_date() -- filters only valid(effective) addresses
LEFTOUTERJOIN logisticselectronicaddress phone ON phone.recid = party.primarycontactphone
LEFTOUTERJOIN logisticselectronicaddress email ON email.recid = party.primarycontactemail

You should see a table result showing below your query.


Create table if not exists

Next level is to create a new delta table and copy your selection into it.
%%sql
CREATETABLEIFNOTEXISTS fact_dirpartytable
USING DELTA AS
SELECT
    party.recid AS PartyId
    ,party.name AS Name
    ,COALESCE(party.namealias, '') AS ShortName
    ,COALESCE(postal.countryregionid, '') AS Country
    ,COALESCE(postal.state, '') AS State
    ,COALESCE(postal.city, '') AS City
    ,COALESCE(postal.street, '') AS Street
    ,COALESCE(postal.zipcode, '') AS PostCode
    ,COALESCE(phone.locator, '') AS PhoneNumber
    ,COALESCE(email.locator, '') AS Email
FROM dirpartytable party
LEFTOUTERJOIN logisticspostaladdress postal ON postal.location= party.primaryaddresslocation
AND postal.validto >current_date() -- filters only valid(effective) addresses
LEFTOUTERJOIN logisticselectronicaddress phone ON phone.recid = party.primarycontactphone
LEFTOUTERJOIN logisticselectronicaddress email ON email.recid = party.primarycontactemail

This is a one of copy and will not copy data if the table exists already.

Next blog post, I will cover a few different scenarios.


Fabric - Sample Notebook scripts for MSDyn365FO

$
0
0

This will be a fairly straightforward blog post covering different ways of copying data from a shortcut delta table into a delta table created automatically via a notebook.

Select statement with a join

%%sql
SELECT
    party.recid AS PartyId
    ,party.name AS Name
    ,COALESCE(party.namealias, '') AS ShortName
    ,COALESCE(postal.countryregionid, '') AS Country
    ,COALESCE(postal.state, '') AS State
    ,COALESCE(postal.city, '') AS City
    ,COALESCE(postal.street, '') AS Street
    ,COALESCE(postal.zipcode, '') AS PostCode
    ,COALESCE(phone.locator, '') AS PhoneNumber
    ,COALESCE(email.locator, '') AS Email
FROM dirpartytable party
LEFTOUTERJOIN logisticspostaladdress postal ON postal.location= party.primaryaddresslocation
AND postal.validto >current_date() -- filters only valid(effective) addresses
LEFTOUTERJOIN logisticselectronicaddress phone ON phone.recid = party.primarycontactphone
LEFTOUTERJOIN logisticselectronicaddress email ON email.recid = party.primarycontactemail

You should see a table result showing below your query.


Create table if not exists

This is a one of copy and will not copy data if the table exists already.
%%sql
CREATETABLEIFNOTEXISTS fact_dirpartytable
USING DELTA AS
SELECT
    party.recid AS PartyId
    ,party.name AS Name
    ,COALESCE(party.namealias, '') AS ShortName
    ,COALESCE(postal.countryregionid, '') AS Country
    ,COALESCE(postal.state, '') AS State
    ,COALESCE(postal.city, '') AS City
    ,COALESCE(postal.street, '') AS Street
    ,COALESCE(postal.zipcode, '') AS PostCode
    ,COALESCE(phone.locator, '') AS PhoneNumber
    ,COALESCE(email.locator, '') AS Email
FROM dirpartytable party
LEFTOUTERJOIN logisticspostaladdress postal ON postal.location= party.primaryaddresslocation
AND postal.validto >current_date() -- filters only valid(effective) addresses
LEFTOUTERJOIN logisticselectronicaddress phone ON phone.recid = party.primarycontactphone
LEFTOUTERJOIN logisticselectronicaddress email ON email.recid = party.primarycontactemail


Create table if not exists - use merge

This does a copy similar to the above but uses a merge to match the records
%%sql

-- Step 1: Create Delta table
CREATETABLEIFNOTEXISTS fact3_dirpartytable (
    PartyId LONG,
    Name STRING,
    ShortName STRING,
    Country STRING,
    State STRING,
    City STRING,
    Street STRING,
    PostCode STRING,
    PhoneNumber STRING,
    Email STRING
) USING delta;

-- Step 2: Create temporary view
CREATEORREPLACETEMPORARYVIEW temp_dirpartytable AS
SELECT
    party.recid AS PartyId
    ,party.name AS Name
    ,COALESCE(party.namealias, '') AS ShortName
    ,COALESCE(postal.countryregionid, '') AS Country
    ,COALESCE(postal.state, '') AS State
    ,COALESCE(postal.city, '') AS City
    ,COALESCE(postal.street, '') AS Street
    ,COALESCE(postal.zipcode, '') AS PostCode
    ,COALESCE(phone.locator, '') AS PhoneNumber
    ,COALESCE(email.locator, '') AS Email
FROM dirpartytable party
LEFTOUTERJOIN logisticspostaladdress postal ON postal.location= party.primaryaddresslocation
AND postal.validto >current_date() -- filters only valid(effective) addresses
LEFTOUTERJOIN logisticselectronicaddress phone ON phone.recid = party.primarycontactphone
LEFTOUTERJOIN logisticselectronicaddress email ON email.recid = party.primarycontactemail;

-- Step 3: Merge into delta table
MERGEINTO fact3_dirpartytable AS target
USING temp_dirpartytable AS source
ON target.PartyId = source.PartyId
WHENMATCHEDTHEN
  UPDATESET target.Name = source.Name, target.ShortName = source.ShortName
WHENNOTMATCHEDTHEN
  INSERT (PartyId, Name, ShortName) VALUES (source.PartyId, source.Name, source.ShortName);

This will do an update, insert but will not handle deletes.


Create table, Delete and Insert data

This creates the table, then deletes the data in full and inserts it all again.
%%sql

-- Step 1: Create Delta table
CREATETABLEIFNOTEXISTS fact4_dirpartytable (
    PartyId LONG,
    Name STRING,
    ShortName STRING,
    Country STRING,
    State STRING,
    City STRING,
    Street STRING,
    PostCode STRING,
    PhoneNumber STRING,
    Email STRING
) USING delta;

-- Step 2: Delete data from the Delta table
DELETEFROM fact4_dirpartytable;

-- Step 3: Create temporary view
INSERTINTO fact4_dirpartytable
SELECT
  party.recid AS PartyId
  ,party.name AS Name
  ,COALESCE(party.namealias, '') AS ShortName
  ,COALESCE(postal.countryregionid, '') AS Country
  ,COALESCE(postal.state, '') AS State
  ,COALESCE(postal.city, '') AS City
  ,COALESCE(postal.street, '') AS Street
  ,COALESCE(postal.zipcode, '') AS PostCode
  ,COALESCE(phone.locator, '') AS PhoneNumber
  ,COALESCE(email.locator, '') AS Email
FROM dirpartytable party
LEFTOUTERJOIN logisticspostaladdress postal ON postal.location= party.primaryaddresslocation
AND postal.validto >current_date() -- filters only valid(effective) addresses
LEFTOUTERJOIN logisticselectronicaddress phone ON phone.recid = party.primarycontactphone
LEFTOUTERJOIN logisticselectronicaddress email ON email.recid = party.primarycontactemail;

This runs fast but however not what you may want to do on a regular basis.


Create a temporary view and use SinkModifiedOn 

Create a temporary view within your notebook to use as part of complex queries.
This query joins 4 tables together and each table has its own SinkModifiedOn field. I wanted to create a view that gave me the greatest (max) SingModifiedOn date time. This is to later allow me to do an incremental update.
CREATEORREPLACETEMPORARYVIEW temp_dirpartytable AS
SELECT
    party.SinkModifiedOn AS party_SinkModifiedOn,
    postal.SinkModifiedOn AS postal_SinkModifiedOn,
    phone.SinkModifiedOn AS phone_SinkModifiedOn,
    email.SinkModifiedOn AS email_SinkModifiedOn,
    GREATEST(party.SinkModifiedOn, postal.SinkModifiedOn, phone.SinkModifiedOn, email.SinkModifiedOn) AS SinkModifiedOn,
    party.recid AS PartyId
    ,party.name AS Name
    ,COALESCE(party.namealias, '') AS SearchName
    ,COALESCE(postal.countryregionid, '') AS Country
    ,COALESCE(postal.state, '') AS State
    ,COALESCE(postal.city, '') AS City
    ,COALESCE(postal.street, '') AS Street
    ,COALESCE(postal.zipcode, '') AS PostCode
    ,COALESCE(phone.locator, '') AS PhoneNumber
    ,COALESCE(email.locator, '') AS Email
FROM dirpartytable party
LEFTOUTERJOIN logisticspostaladdress postal ON postal.location= party.primaryaddresslocation
AND postal.validto >current_date() -- filters only valid(effective) addresses
LEFTOUTERJOIN logisticselectronicaddress phone ON phone.recid = party.primarycontactphone
LEFTOUTERJOIN logisticselectronicaddress email ON email.recid = party.primarycontactemail;

SELECT*FROM temp_dirpartytable
WHERE SinkModifiedOn >='2024-09-03T02:39:16Z';

This would be good for a transactional table where there are no deletes. You get the last SinkModifiedOn date time field for all the related table. Then filter based on the last run you have in your destination table. You could then do incremental updates.


Fabric - See history of parquet files

$
0
0
One advantage with parquet files is that it keeps history. Run the below script and it will give you the history. 
%%sql

DESCRIBE HISTORY dirpartytable;

Below is an example I have in my environment.


Use "VERSION AS OF" 

Now that you have the history, you can use the VERSION AS OF statement. This will give you the previous values for the record. 
%%sql

SELECT partynumber, primarycontactphone, primarycontactemail FROM dirpartytable WHERE partynumber ='000001702';
SELECT partynumber, primarycontactphone, primarycontactemail FROM dirpartytable VERSION ASOF2WHERE partynumber ='000001702';

The below example is when I deleted the primary contact phone number.


Viewing all 219 articles
Browse latest View live