Quantcast
Channel: Dynamics NAVAX
Viewing all 219 articles
Browse latest View live

The given value of type String from the data source cannot be converted to type nvarchar of the specified target column.

$
0
0

If you are upgrading to a later cumulative update and try to import a model you may get this error if you haven’t followed the steps.

2014-02-10_1309

You have to run the powershell command before you start the imports. This updates the model store schema to accept new models.

Initialize-AXModelStore

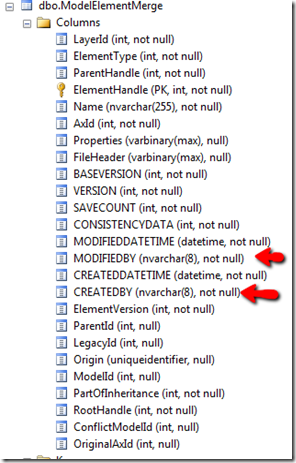
I wanted to find out what was changed in SQL. So, I ran an SQL trace to see which table caused the problem. Then I found that the ModifiedBy and CreatedBy fields where extended from 5 characters to 8 characters.

Before (CU6)After (CU7)
2014-02-10_13102014-01-27_1054

User security role assignment report [AX 2012]

$
0
0

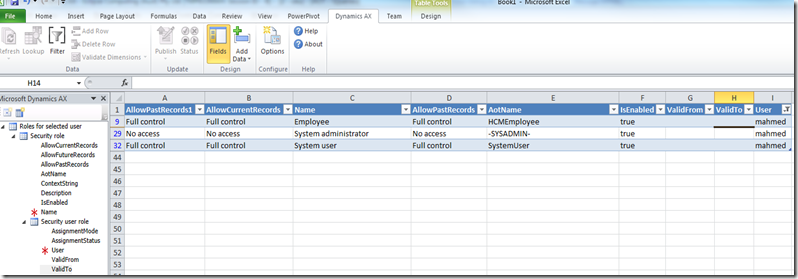
There isn’t a report that lists the users and their security roles. You can get this information fairly quickly through Excel add-in.

1. Go to the AOT and find the Query SysSecRolesForUser.

2. Duplicate it and remove the code (it has code in the init method to filter by current user).

Then just go the organization > “Document data sources”. Select your query and activate it.

3. In Excel select the service, select the fields and run.

You should see a nice list of user and their roles.

2014-02-10_1455

Dynamics AX 2012 and Esri’s ArcGIS (Mapping)

$
0
0

Original post: http://daxeamproduct.blogspot.com/2014/02/dynamics-ax-2012-and-esris-arcgis.html

We have been busy recently, working on developing a GIS solution for Microsoft Dynamics AX 2012.

Esri’s ArcGIS is a geographical information system (GIS) solution for working with maps and geographical information. It is used for creating custom maps for viewing, editing, querying. For example, your local town or city will have a GIS solution that shows your housing plan, where the gas pipes are, where you water mains are, the roads, the traffic lights etc. The list is endless. A mining company may have a GIS solution to show where their Assets are, drawings of the mine site, their plant etc.

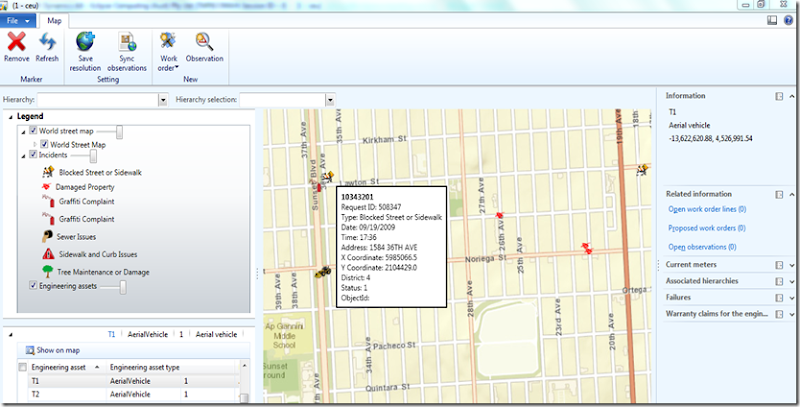
ArcGIS maps work as layers; you have your base layer which is a street map in my example below. Then you have feature layers, below I have an incidents feature layer showing where incidents have been reported, then a third feature layer plotting where the assets are.

2014-02-27_1921

I am not going to give away too much today. Convergence is just around the corner. My team will be at convergence at booth 2242 and also running a session. Below is some detail on what we are going to present.

SSAX009: Daxeam presents: Implement your equipment maintenance strategy with Microsoft Dynamics AX

Wednesday, March 5th from 12:30 pm - 1:30 pm    Room: A307

Speaker(s): Alan Flanders

Join us to see how implementing Daxeam for Microsoft Dynamics AX will improve the effectiveness of your maintenance department within an asset intensive organization. Learn how shifting from reactive maintenance to a reliability centered approach will reduce unplanned downtime and costs, minimize risks, manage inventory levels, and create more predictability within your maintenance department; and, explore how GIS integration can help implement a strategy to maintain assets spread out over large areas.

300 - Experienced

Audience: Business Decision Maker, End User, Power User, Prospect, Technical Decision Maker

Product: Microsoft Dynamics AX

Key Learning 1: Realize the benefits of GIS (mapping) integration

Key Learning 2: Learn more about maintenance strategies and approaches

Key Learning 3: Explore RCM - Reliability Centered Maintenance

AX 2012 R2 and TFS online

$
0
0

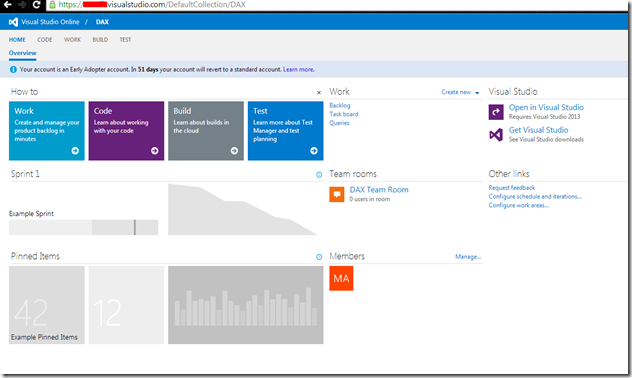
Just today, I tried setting up TFS online.

This is a good blog to get started.

http://blogs.msdn.com/b/axinthefield/archive/2014/02/24/efficient-dynamics-ax-application-lifecycle-management-approaches-with-team-foundation-server-in-the-cloud.aspx

First, sign up with www.visualstudio.com

Setup a new project.

2014-03-17_1600

As per the blog article mentioned above.

Install this.

Visual Studio versionTeam Explorer versionRequired software
Visual Studio 2010Team Explorer 2010Requires SP1 and Compat GDR.

Important: Make sure to restart your AOS.

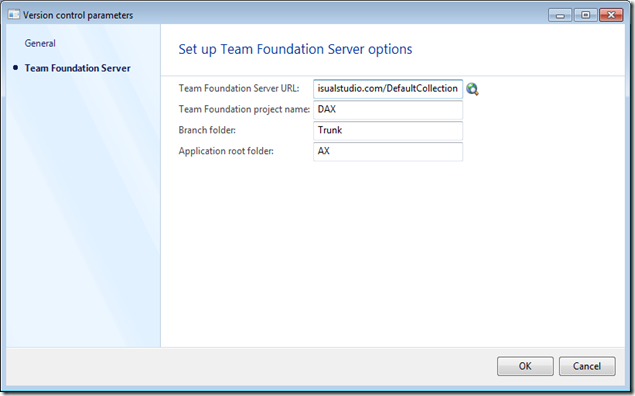
Go to AX and set up your version control parameters.

2014-03-17_1554

If you are logged in already via browser or the pop up dialog in AX, it won’t prompt for a log in. Otherwise, it will pop up with a dialog to log in.


Troubleshoot:

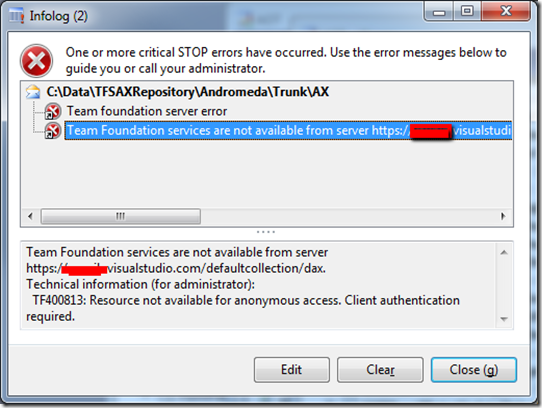
Error 1: TF400813: Resource not available for anonymous access. Client authentication required

2014-03-17_1453

Resolution:

Install SP1 as recommended above.


Error 2: TF30064: You are not authorized to access the server.

2014-03-17_1608

Resolution:

You probably installed SP1 but did not restart your AOS. Restart your AOS for change to take affect.

Microsoft Project Add-in overview [AX 2012]

$
0
0

Today I will cover on how the Microsoft project add-in works in AX 2012 R2 CU7.

Setup the service

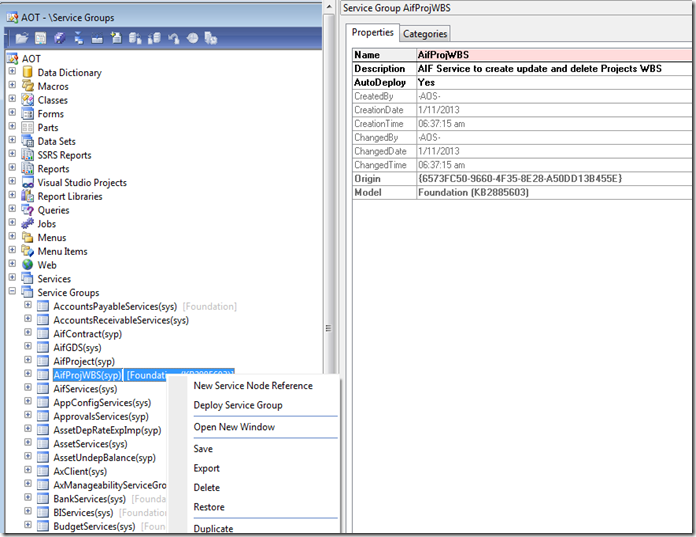
To setup the service first time, go to the AOT and publish the Service group.

Right click and Deploy Service Group

2014-03-24_1546

Setup parameters

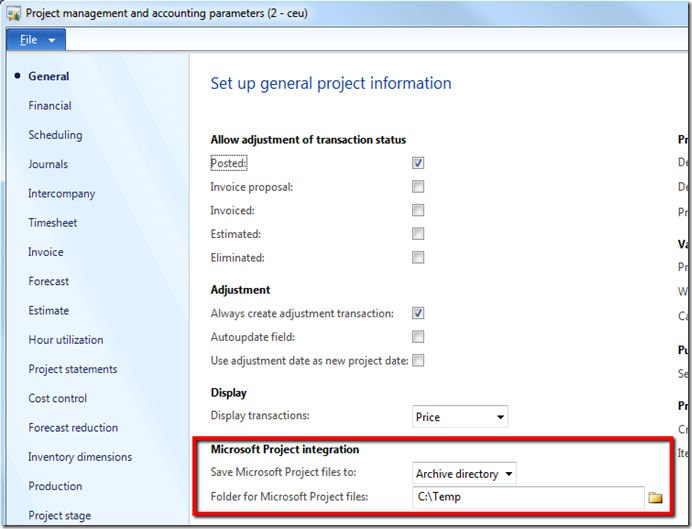
Go the Project parameters fill in the Microsoft Project integration field group.

In this example I will use Archived directory. Other option is SharePoint.

Specify a folder – I would use a network shared path rather than your local drive.

2014-03-24_1547

Setup the project

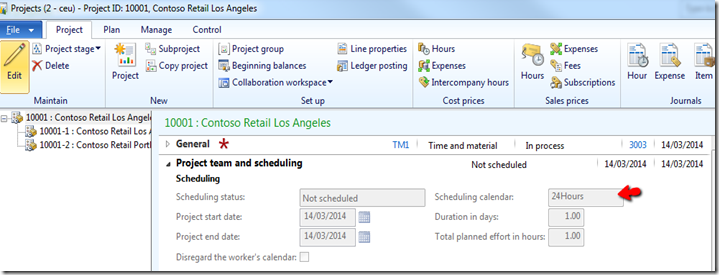
Create a project but make sure to specify the calendar.

2014-03-24_1548

Launch Microsoft project add-in

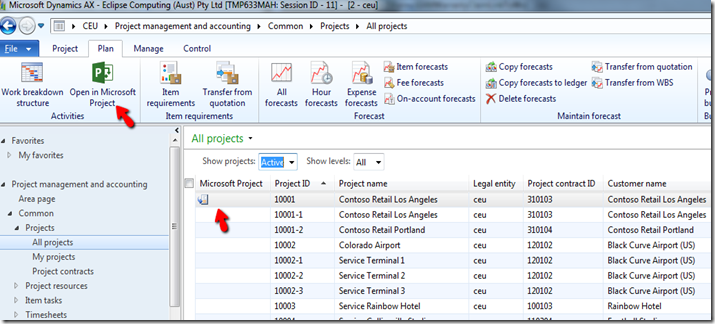
On the Project list page, you will see a button to open in in Microsoft project. You will also see a new column called Microsoft Project – this indicates if it is linked to a Microsoft project file.

2014-03-24_1547_001

When you open it in Microsoft project, you will see the Dynamics AX add-in.

2014-03-24_1549

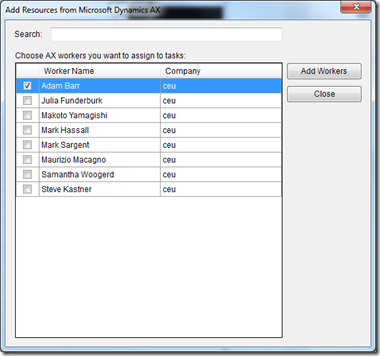
If you click on Add resources – you will get this dialog pop up.

2014-03-24_1550

The Publish has a few options:

  • Publish – It updates the linked Project.
  • Publish New Project – Will allow you to enter a new project id. This will generate a new project and the work breakdown.

2014-03-24_1550_001

  • Replace Existing Project – Be careful with this one. It does exactly what it says – REPLACE. It will replace the activities – assigning new numbers to them.

2014-03-24_1555

  • Save a Template – This will create a new project template.

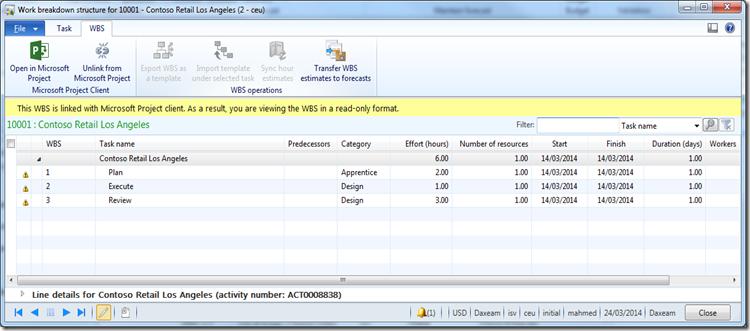
Remember, once it is linked to Microsoft project, you wont be able to modify it from AX. You have to use Microsoft Project.

But you will notice a new Unlink from Microsoft Project on the Work breakdown structure form. This is to break the link between AX and the file generated.

2014-03-24_1609

Reference:

http://technet.microsoft.com/en-us/library/dn528663.aspx

Microsoft Project Add-in technical deep dive [AX 2012]

$
0
0

Last post I cover how the Microsoft project add-in worked. This post I will look into how it looks from a technical perspective.

First thing we had to do was deploy the service, this is because the add-in uses a specific service called ProjWBSService.

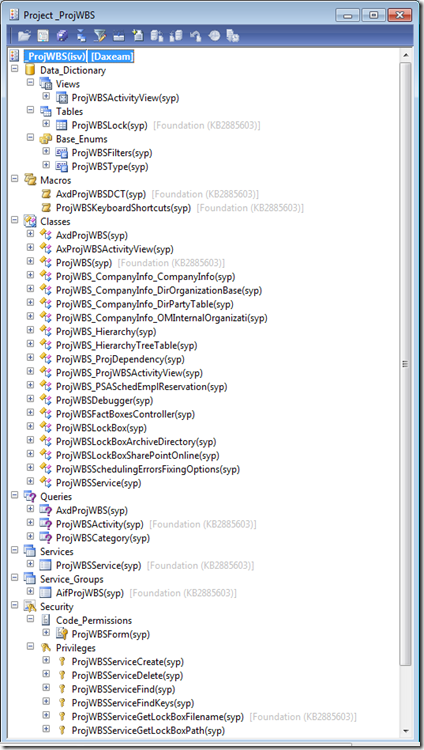
I created an AOT project (*ProjWBS*) to show what the components make up the service. You will notice it is a document service.

2014-03-24_1626

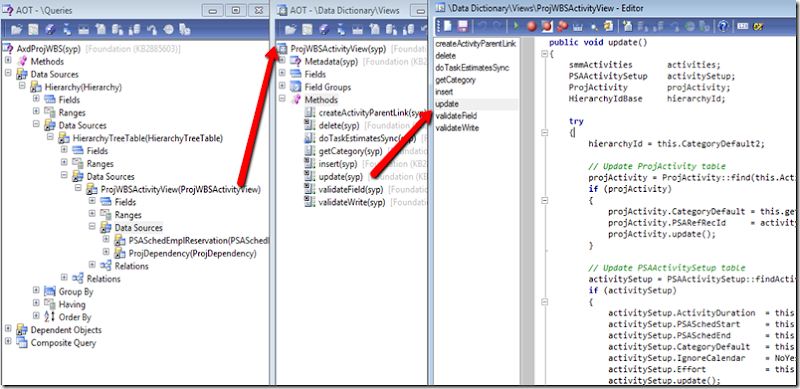
What is interesting how ever is how the updates are done. The query contains a view ProjWBSActivityView. Then the update, insert, delete methods are overridden to perform a custom update.

2014-03-28_1554

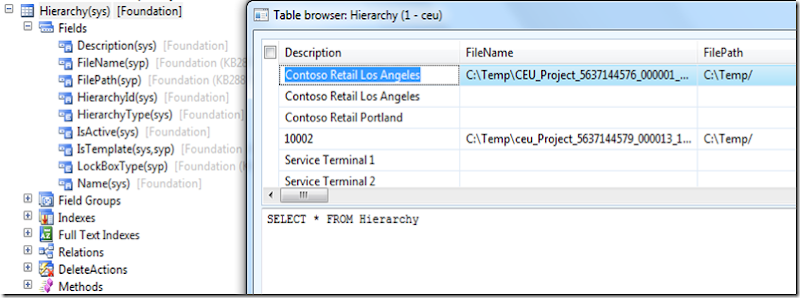
The the file is reused and file path is stamp on the Hierarchy table. So, when you try to click on the button it either creates or just opens the one it is pointing to.

2014-03-28_1605

That is it for now.

Spell checker [AX 2012]

$
0
0

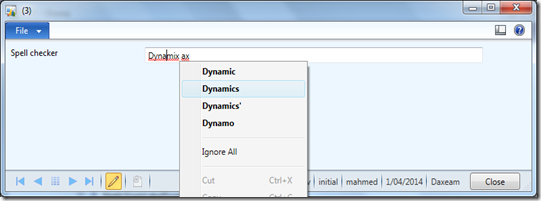
This post I will show how easy it is to use managed hosted controls (wcf). We will look at incorporating a text control with a spell checker enabled.

We will work backwards, final result looks like this.

2014-04-01_1852

Now lets go though it.

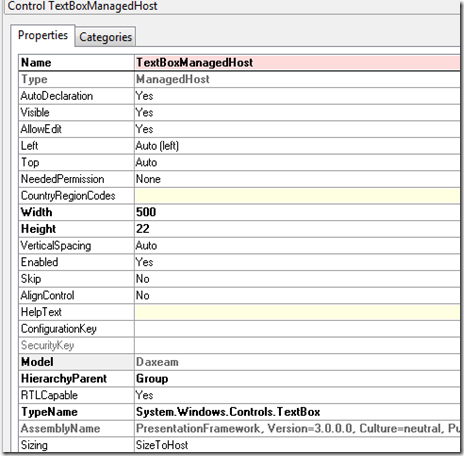
Right click on your form and add a managed host.

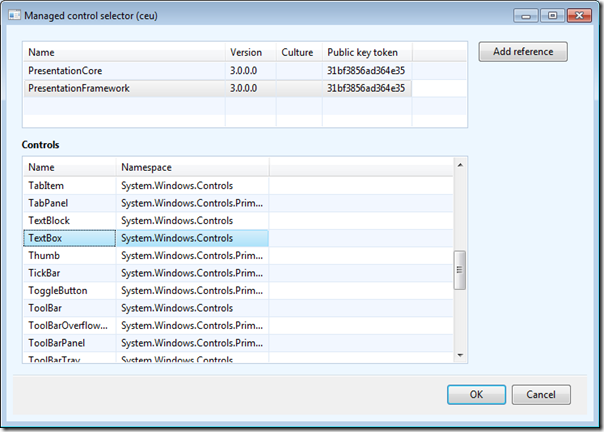
Select PresentationFramework and then the Textbox control.

2014-04-01_1857

2014-04-01_1854

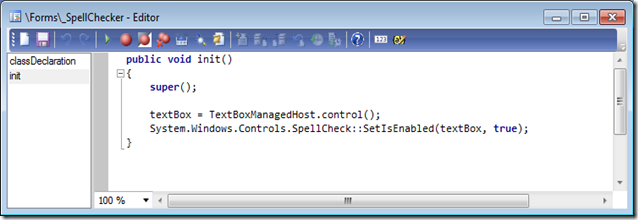
On the init method, enable the spell check.

2014-04-01_1911

xpo can be downloaded from here for an example.

http://goo.gl/fS2Stq

Release products using Data import export framework [AX 2012]

$
0
0

This is a question I hear quite often. When you import products how do you release the product to your multiple companies. Do you have to import it?

The answer is quite simple but well hidden. No – you don’t have to import to the other companies.

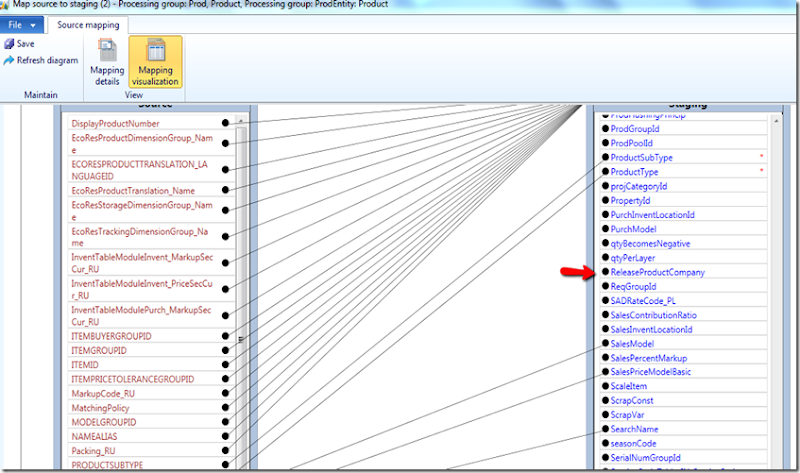
There is a field in the staging table called ReleaseProductCompany. If you pass the company name with a separator. Then on insert or update it will release it to those companies.

P2014-04-12_1656

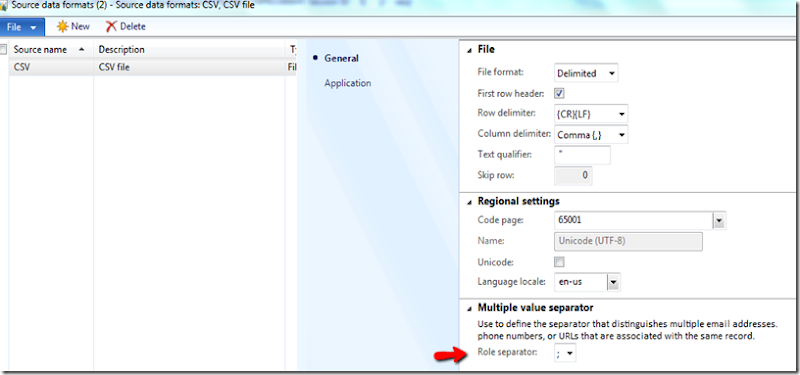
The separator can be found on the Source data formats.

S2014-04-12_1650

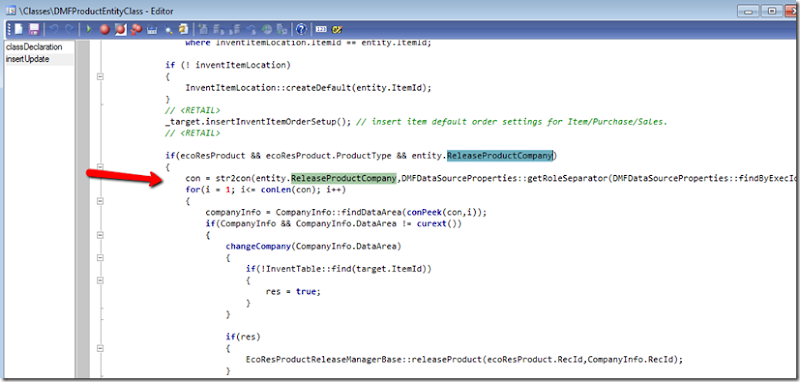
Finally here is a screenshot of the code that releases the product into the companies.

C2014-04-12_1647


Tips to improve Ledger journal import performance [AX 2012]

$
0
0

There are a number of ways of importing ledger journals but with most you will realise it is quite slow with a lot of lines (100 plus lines).

I have put a couple of tips to boost the performance. Remember these are bulk creation of journals and not posting issues. That is a whole other topic.

Tip 1.

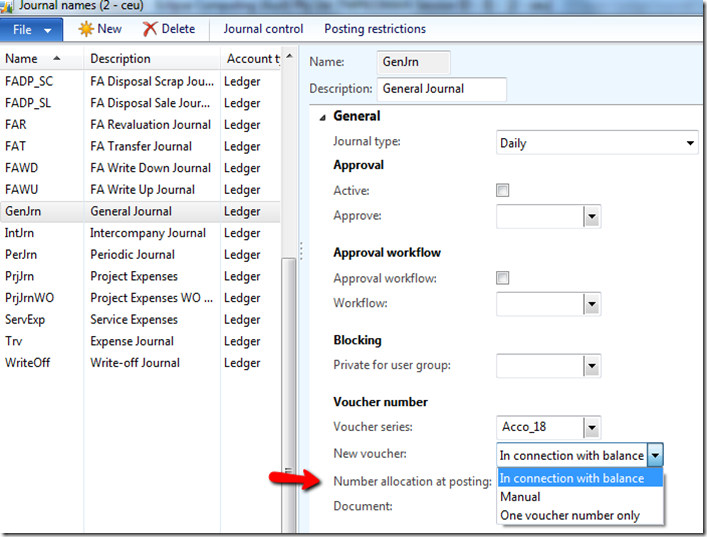
Obvious but often forgotten. Remember that journal name setup – you have a number of options to generate the voucher number.

If you leave it to generate when it balances – then this will kill your performance.

V2014-04-12_1735

Tip 2.

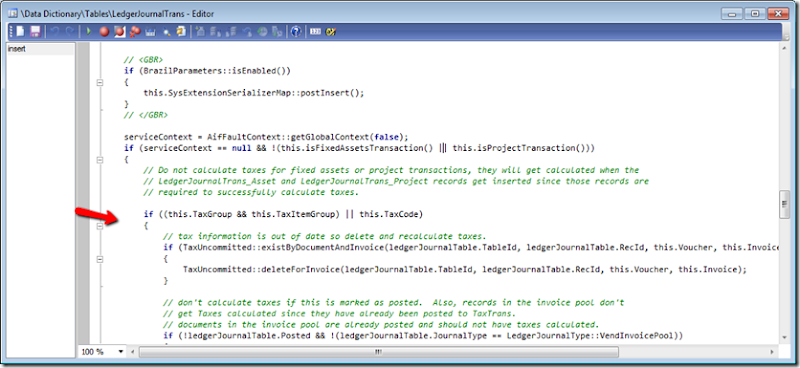
On the insert method you will there is tax calculations which are deleted and recalculated every time you insert. If you can avoid calling this method and call it only for the last line per unique journal number, voucher number, and invoice.

L2014-04-10_1536

I won’t go into detail on how to code it.

option 1: You can add a parameter and check that.

option 2: Or you can write your code so the tax is not set – do your insert. Then set the tax groups after. But remember you will have to recalculate it for the unique journal,voucher,invoice.

eg.
ledgerJournalTrans.insert();

ledgerJournalTrans.TaxCode            = _ledgerJournalTrans.TaxCode;
ledgerJournalTrans.TaxGroup           = _ledgerJournalTrans.TaxGroup;
ledgerJournalTrans.TaxItemGroup       = _ledgerJournalTrans.TaxItemGroup;
// need to set the tax codes after the insert because the taxes are calculated during the insert if the tax codes are set.
ledgerJournalTrans.doUpdate();

--------------

These are a couple of simple tips that will have an impact on the performance of your imports.

Open source Exchange rate provider on Codeplex [AX 2012]

$
0
0

Way back I had created an exchange rate provider using Yahoo! Finance services. So, today I thought I would share this code that has been sitting with me for a long time. I have created a Codeplex project to start the sharing. I want to also encourage others to start sharing if they have developed their own exchange rate provider using other services.
I am more than happy to add anyone who wants to contribute as a developer or I can upload it for them (and mention their name on the main page). I think we can all benefit from these being freely available or if Microsoft can include it in their product eventually as standards.

Visit: Exchange rate provider on Codeplex

Download the Yahoo! Finance exchange provider class xpo, import it into your environment, compile + CIL compile, restart your client and start using it.
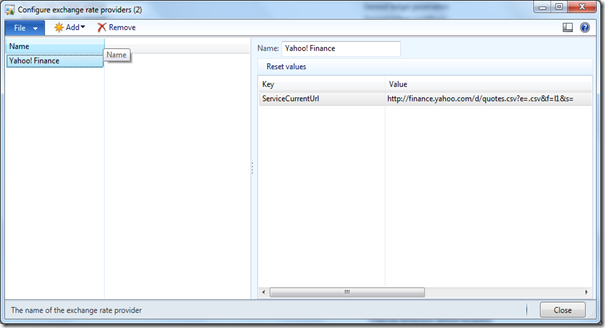
Once you have done the right thing. It should be available for configuring.
2014-04-27_1941

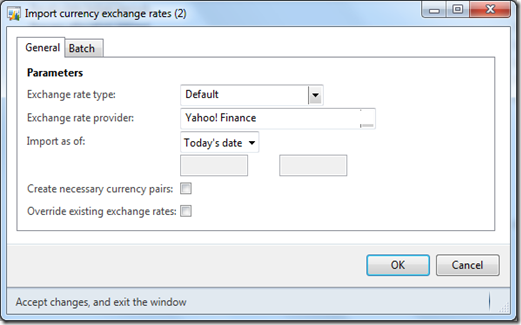
Then, you should be able to run it.

2014-04-27_1947

More information to get you started:

To learn on how to use the exchange rates, this is a nice user guide that Murray Fife has written up.
http://atinkerersnotebook.com/2013/09/21/configuring-automatic-exchange-rates-in-dynamics-ax-2012/

This is a good whitepaper to get developers started on developing. Creating Exchange Rate Providers for Microsoft Dynamics AX 2012

At the end of the day – it is single class that you have to write to develop new exchange rate providers.


ps.

It would be nice to also get some tester on this project. Feedback would be appreciated.

Final disclaimer: I take no responsibility for this. Use at your own discretion.

Step by Step: Deploy AX 2012 R3 on Azure via Life Cycle Service

$
0
0

AX 2012 R3 is finally here. With that they have made the demo environment available on Azure and can be deployed using Life Cycle Service.

There are a few posts out there detailing but I thought I do a quick screenshot step by step guide on how to deploy AX 2013 R3 on Azure via Life Cycle Service.

http://blogs.msdn.com/b/axinthefield/archive/2014/05/01/setting-dynamics-ax-2012-r3-demo-with-lcs-and-azure.aspx

http://technet.microsoft.com/en-us/library/dn741581.aspx

1. Log on to LCS and create

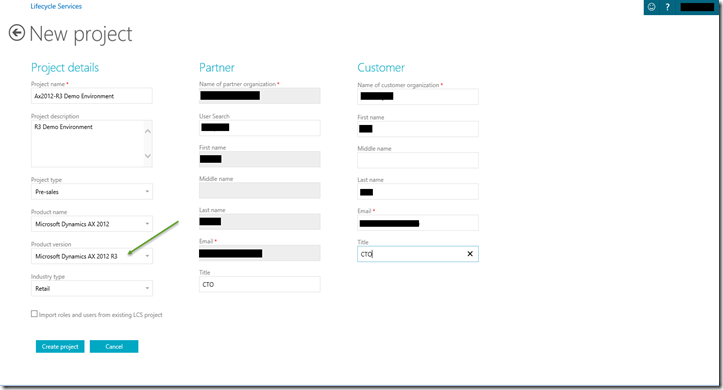
2. Create a new project and fill in the required details.

02-R3 New Project

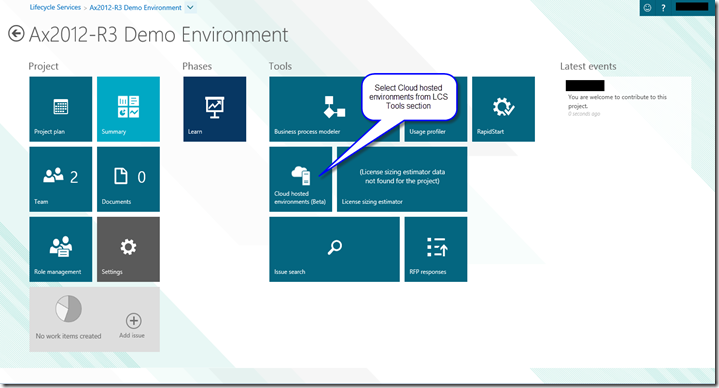
3. Once the project is created click on the “Cloud hosted environment” icon.

03-R3 ProjectMain

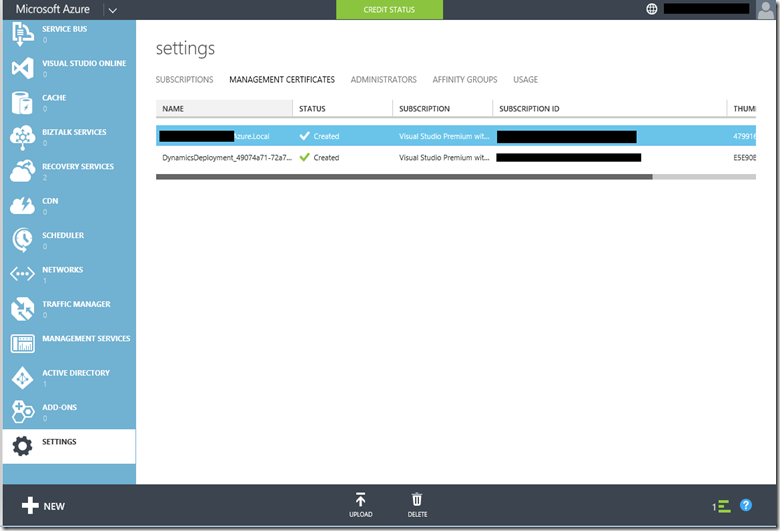
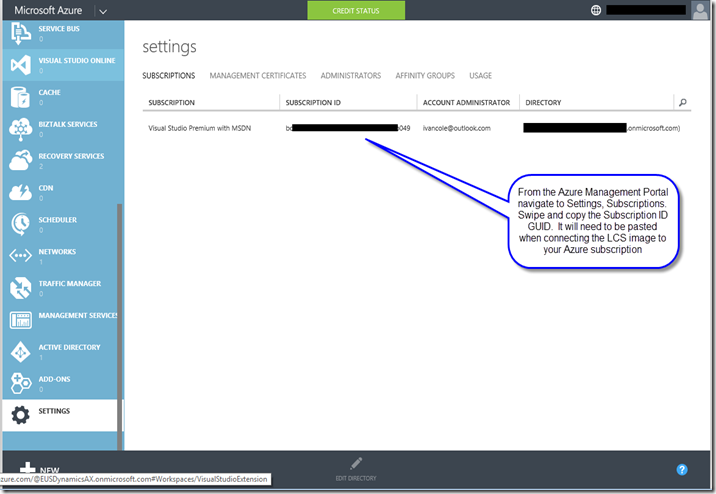
4. Now go to Azure portal and grab your subscription ID. You will need it for the next step. It is a GUID.

04-AzureSubscription

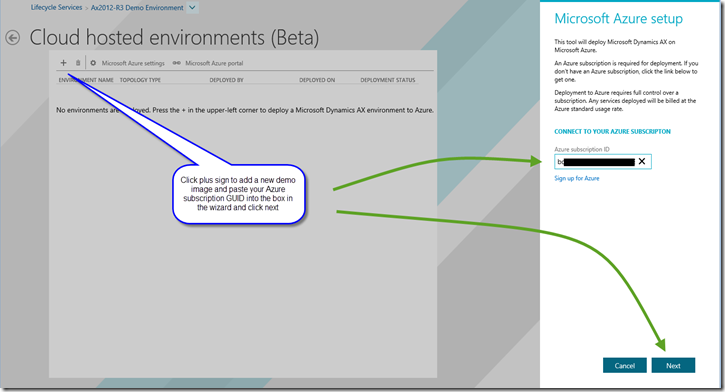
5. Back in LCS portal – you click the add button. You will need your Azure Subscription GUID.

05-AzureConnection

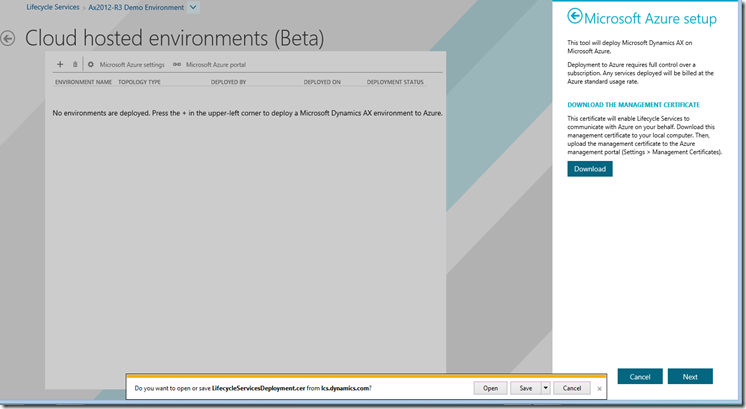
6. Now it will give you a certificate to download.

07-AzureDownloadsaveCert

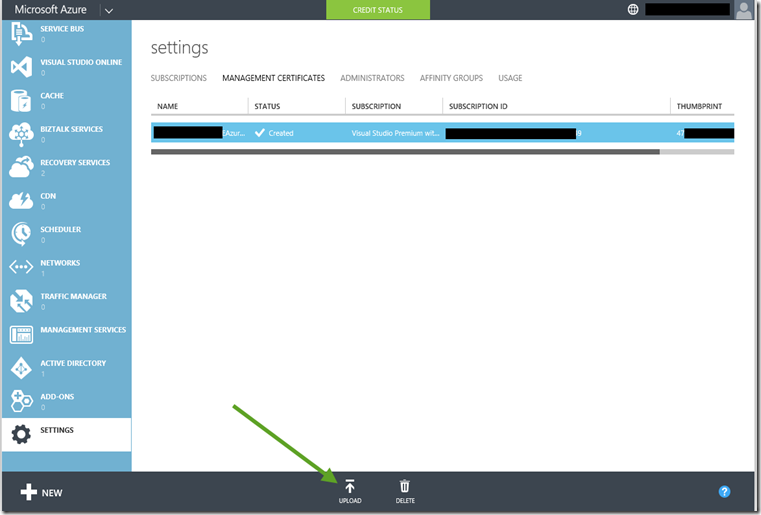
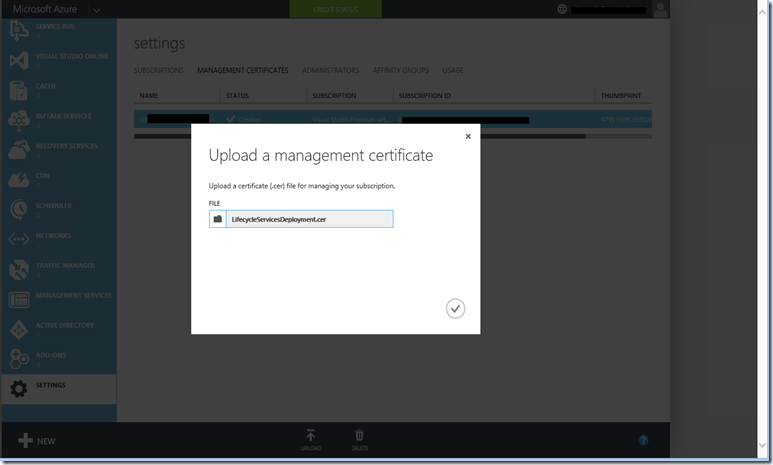
8. In Azure portal click on Settings and upload the certificate.

08-AzureMgmtCert

09-AzureMgmtCertUpload

9. It should show up as loaded with the subscription id.

10-AzureMgmtCertUploadAdded

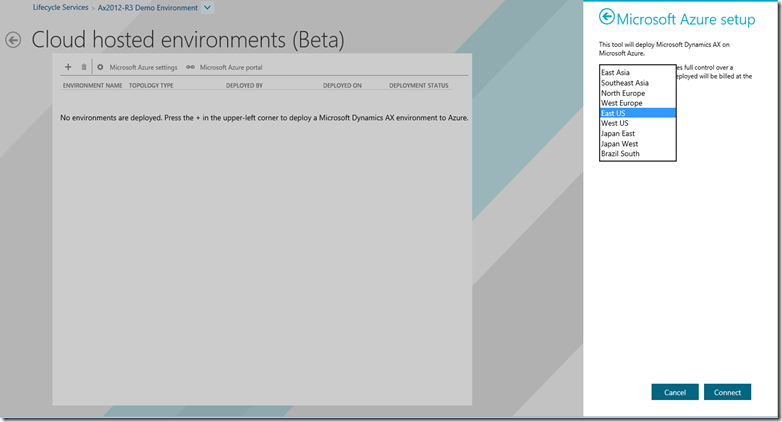
10. Now in LCS you can select where you want to host your server.

11-AzureAssignRegion

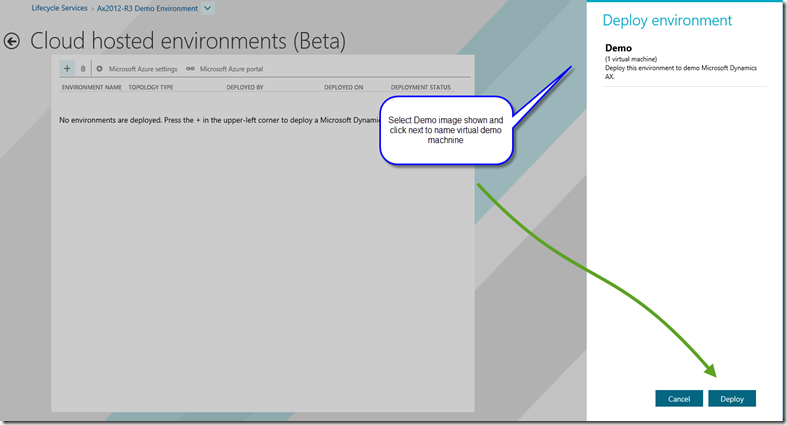
11. Follow the wizard and click on Deploy.

13-AzureDeplyDemo

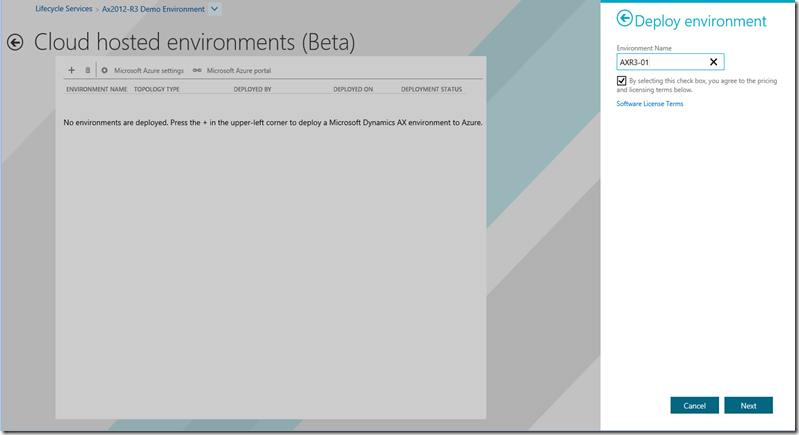
12. Enter the name of your environment and click next.

14-AzureEnvirName

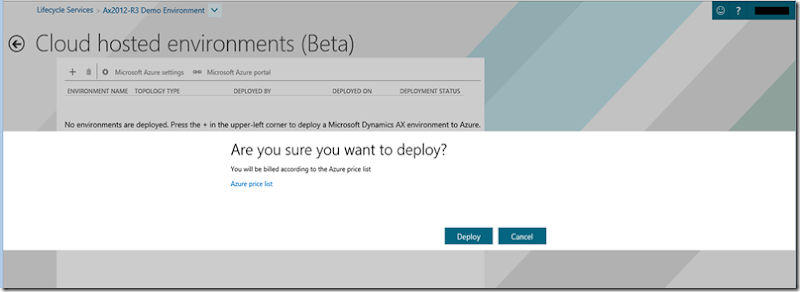
13. Click on Deploy.

15-Areyousure

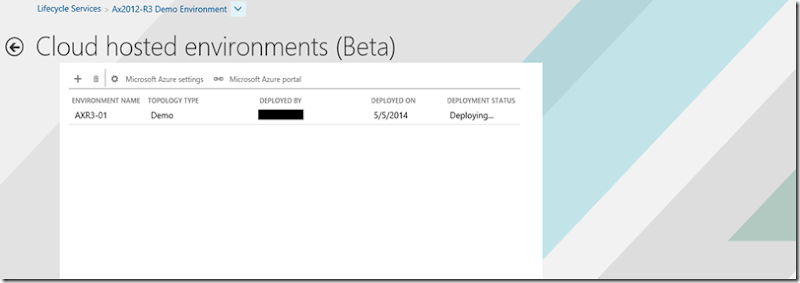
14. It will come up with status of Deploying…

Give it a couple of hours or so.

16-DeployingStart9-35amEST

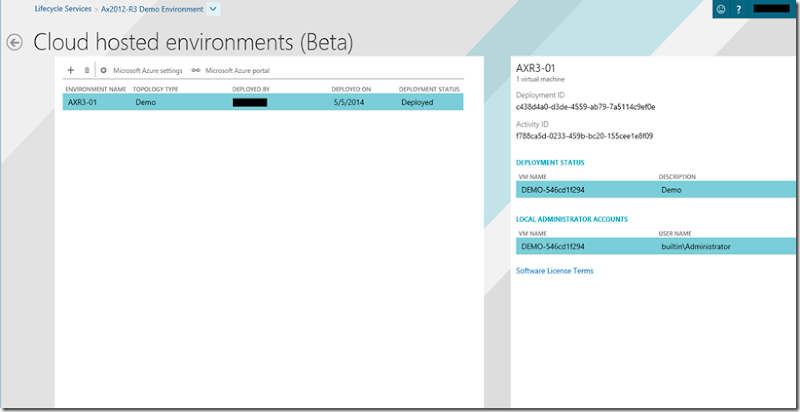
15. Status will come up as Deployed.

17-DeployingFinish10-40amEST

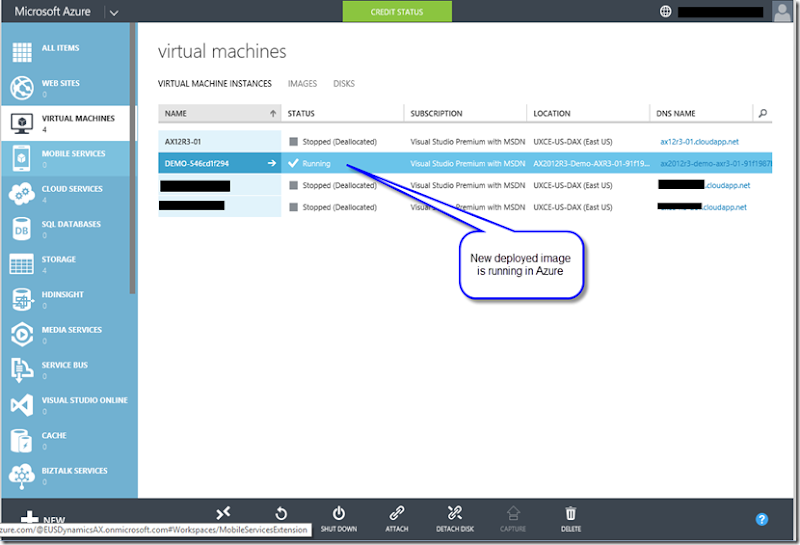
16. Go to Azure portal and now you should have an image with status of Running.

18-ImageDeployedinAzure

16. Just click on the connect button. It will download an mstc file you can jump into.

Server has everything you need deployed from AX, to Management reporter, EP etc.

19-LogintoImage

You can stop and configure it to allocate more resources but for me it ran pretty smooth for the work I was doing.

Enjoy.

AX 2012 R3 License types (CAL) for security roles

$
0
0

Below is the list of security roles and what license type they are.

Role

License type

Accountant

Enterprise Users

Accounting manager

Enterprise Users

Accounting supervisor

Enterprise Users

Accounts payable centralized payments clerk

Enterprise Users

Accounts payable clerk

Enterprise Users

Accounts payable manager

Enterprise Users

Accounts payable payments clerk

Enterprise Users

Accounts payable positive payment clerk

Enterprise Users

Accounts receivable centralized payments clerk

Enterprise Users

Accounts receivable clerk

Enterprise Users

Accounts receivable manager

Enterprise Users

Accounts receivable payments clerk

Enterprise Users

Budget clerk

Enterprise Users

Budget manager

Enterprise Users

Buying agent

Functional Users

Chief executive officer

Enterprise Users

Chief financial officer

Enterprise Users

Collections agent

Enterprise Users

Collections manager

Enterprise Users

Compensation and benefits manager

Enterprise Users

Compliance manager

Enterprise Users

Cost accountant

Enterprise Users

Cost clerk

Enterprise Users

Customer (external)

Enterprise Users

Customer self-service administrator (external)

Enterprise Users

Customer service manager

Functional Users

Customer service representative

Functional Users

Data import/export framework administrator

Enterprise Users

Dispatcher

Task Users

Employee

Self Serve Users

Environmental clerk

Functional Users

Environmental manager

Functional Users

Field service technician

Task Users

Financial controller

Enterprise Users

Human resource assistant

Functional Users

Human resource manager

Enterprise Users

Information technology manager

Enterprise Users

Logistics manager

Functional Users

Machine operator

Task Users

Manager

Functional Users

Marketing coordinator

Functional Users

Marketing manager

Functional Users

Master data management

Enterprise Users

Materials manager

Enterprise Users

Payroll administrator

Enterprise Users

Payroll manager

Enterprise Users

Process engineer

Enterprise Users

Process engineering manager

Enterprise Users

Product design manager

Enterprise Users

Product designer

Enterprise Users

Production manager

Enterprise Users

Production planner

Enterprise Users

Production supervisor

Enterprise Users

Project accountant

Enterprise Users

Project assistant

Functional Users

Project manager

Functional Users

Project manager - Public Sector

Functional Users

Project supervisor

Enterprise Users

Project timesheet user

Task Users

Purchasing agent

Functional Users

Purchasing Agent - Public Sector

Functional Users

Purchasing manager

Enterprise Users

Quality control clerk

Functional Users

Quality control manager

Functional Users

Receiving clerk

Task Users

Recruiter

Functional Users

Retail catalog manager

Functional Users

Retail merchandising manager

Functional Users

Retail operations manager

Functional Users

Retail store manager

Functional Users

Retail warehouse clerk

Functional Users

Sales clerk

Functional Users

Sales manager

Enterprise Users

Sales representative

Functional Users

Security administrator

Enterprise Users

Service delivery manager

Functional Users

Shipping clerk

Task Users

Shop supervisor

Functional Users

Tax accountant

Enterprise Users

Training manager

Functional Users

Transportation coordinator

Task Users

Treasurer

Enterprise Users

Vendor (external)

Enterprise Users

Vendor (external) - Public sector

Enterprise Users

Vendor account manager

Functional Users

Vendor portal administrator (external)

Enterprise Users

Vendor portal administrator (external) - Public sector

Enterprise Users

Vendor prospect (external)

Functional Users

Warehouse manager

Enterprise Users

Warehouse planner

Functional Users

Warehouse worker

Task Users

Waterspider

Task Users

Click on this link to download an excel file that will allow you to drill down to each role and find out what menu items make up the license type.

http://1drv.ms/1nvGoid

Below are some screenshots of what the file contains. A pivot table, the raw data and the list above.

Tab12014-05-09_2042

Double click on the numbers in the pivot table and you will get a list of menu items that make it.

2014-05-09_2048

For details on how I got this data, see one of my earlier posts in 2012.

http://dynamicsnavax.blogspot.com.au/2012/09/analyse-license-types-ax-2012.html

Migrating from GP to AX using DIEF [AX 2012]

$
0
0

Today I found a hidden gem that I never noticed. It is actually in AX 2012 R2 CU7 and also in AX R3 (unchanged from the look of it).

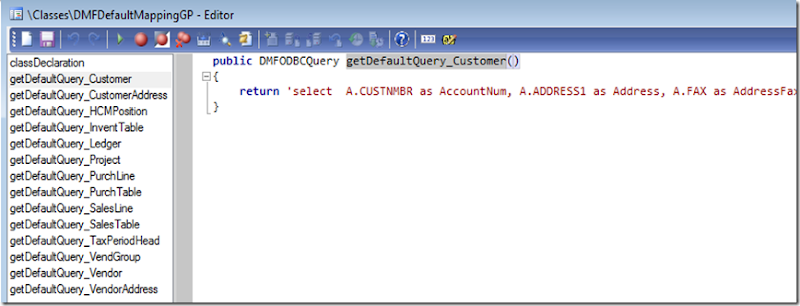
I was going to through some DMF classes and I stumbled across this interesting class DMFDefaultMappingGP.

2014-05-22_2042

It has a number of select statements you can use to query GP to import into AX. Naming of the fields seem to have been done nicely, it should automatically map to the staging automaticly. I found nothing that calls these methods – only way I can think of is to copy the string and paste it into DIEF query. You will see some of the queries like InventTable and Project are empty. Either Microsoft started this and stopped after a while.

I can see the vision Microsoft started off here.

I will do some experimenting and see how it works out.

Upgrade analysis using Lifecycle Services (LCS) [AX 2012]

$
0
0

The nature of software is that you will have to upgrade or implement at some point. Dynamics AX is no different from any other software system out there. With Microsoft working hard on Lifecycle Services (LCS) site, doing an upgrade analysis has gotten a lot easier. Below is a diagram illustrating the process to produce your analysis report (Excel file).

Below are steps on how to use LCS to produce the upgrade analysis file.

1. Go to LCS site (https://lcs.dynamics.com)

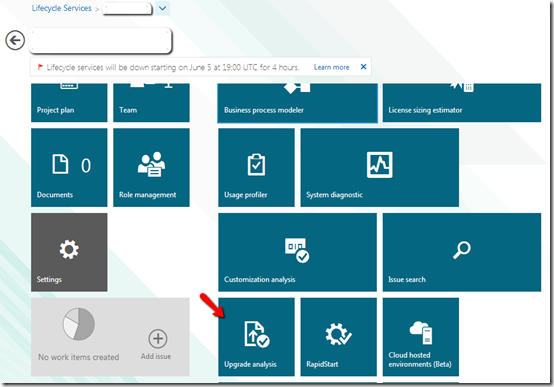
2. Create a new project and click on the Upgrade analysis

2014-05-30_1534_Home

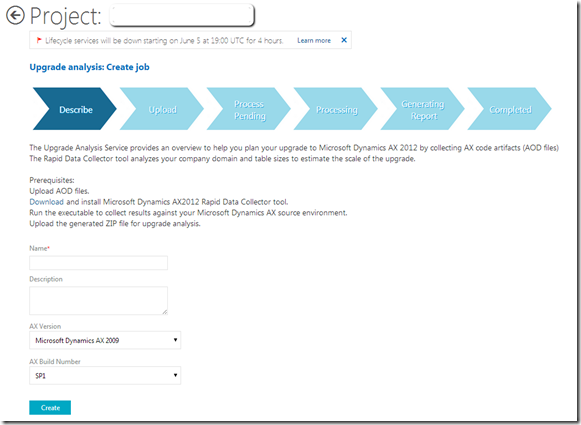
3. Enter the project name and select the AX version. Currently in the list there are 2009 SP1 and AX4SP2.

Before you click on the Create button. Make sure to click on the Download link to download the Rapid Data Collector tool.

2014-05-30_LCS_1

4. Now that you have created your project, go and install the Rapid Data Collector (do not run against your production – take a copy).

5. Install the Rapid Data Collector and it should be a simple executable that you can run.

2014-05-30_RSC_1

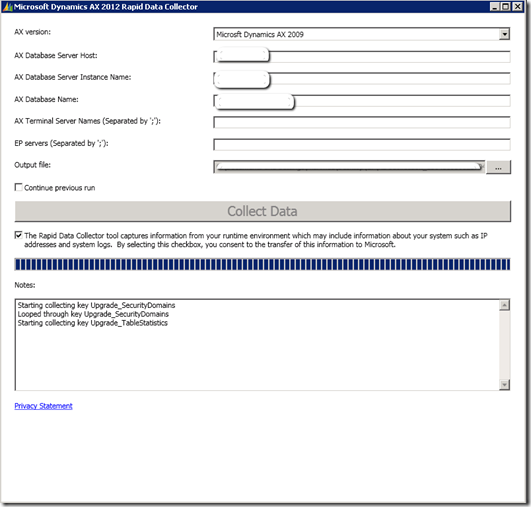
6. Once you run it you will get the dialog below. Enter the database server and database name. Accept the agreement and click Collect Data.

This will produce a zip file with the collected stats. Such as table data, usage data, security data. This may take 20minutes for a small one to hours for a large layer.

2014-05-30_RapidDataCollector

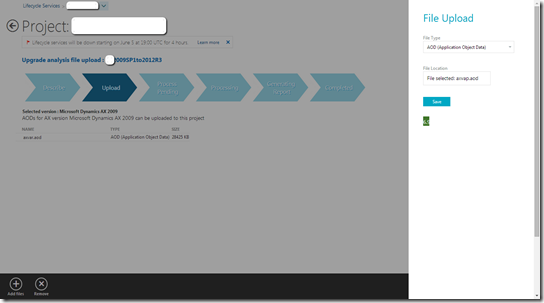
6. Now back on LCS follow the wizard from step 3 and upload the *.aod file and the Rapid data collection zip file.

2014-05-30_LCS

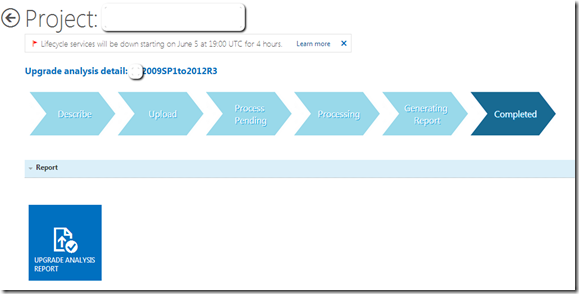
7. Click on the Analyse button on the bottom right hand. You can leave it and come back whenever to see it complete.

You should see an excel file that you can download.

2014-05-30_LCS_3

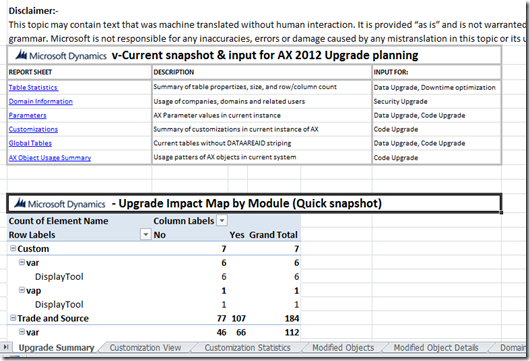
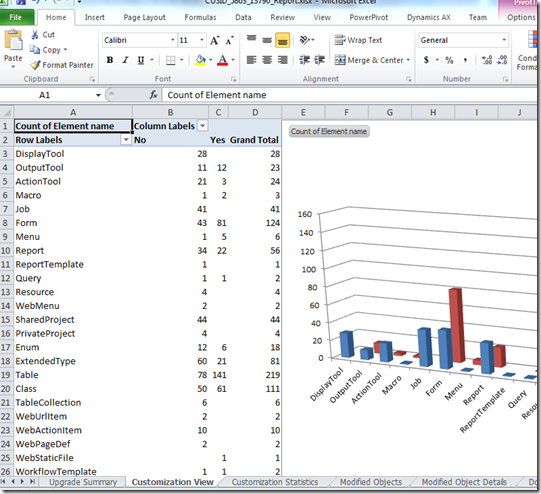
8. The excel file will have details on what objects have been modified.

2014-05-30_1553_001

Stats on affected objects, stats on data usage etc.

2014-05-30_1553

You can use this as the basis of your upgrade estimate. Estimates are always part science and part experience.

Reference:

http://technet.microsoft.com/en-us/library/dn268611.aspx

Security Global Address Book by Legal entity[AX 2012]

$
0
0

There is enough detail on msdn regarding this topic. But what I wanted to make clear is what actually happens in the background.

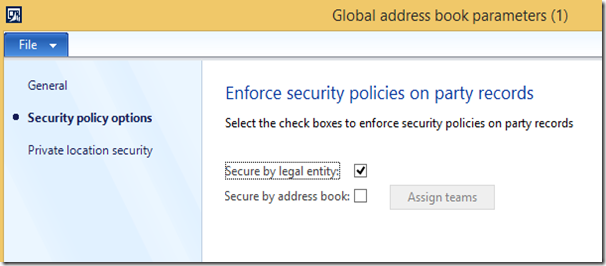
MSDN tells you to tick the Secure by legal entity or by address book.

http://technet.microsoft.com/en-us/library/gg731852.aspx

GAB_Parameters2014-06-25_0921

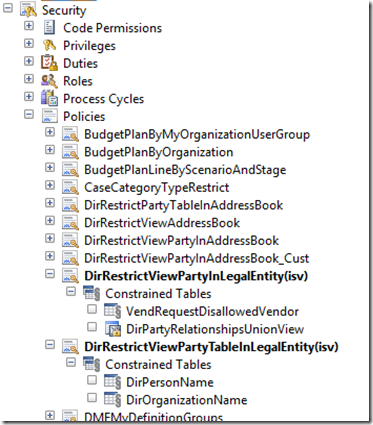
This triggers a change in the AOT by enabling two policies.

AOT2014-06-25_0921 

The reason I mention this is – if you happen to do this in the usr layer. Remember to move it to a layer that will be part of the release.


Manipulate the controls on a list page [AX 2012]

$
0
0

With list pages in AX 2012 where there is no code on the form. The right way is to have the code in the ListPageInteraction class. With the ListPageInteraction class – manipulating controls is a little hard because there is no obvious formRun or controls to manipulated. You can do basic enabling/disabling but not full control. Below I will show how you can get the formRun.

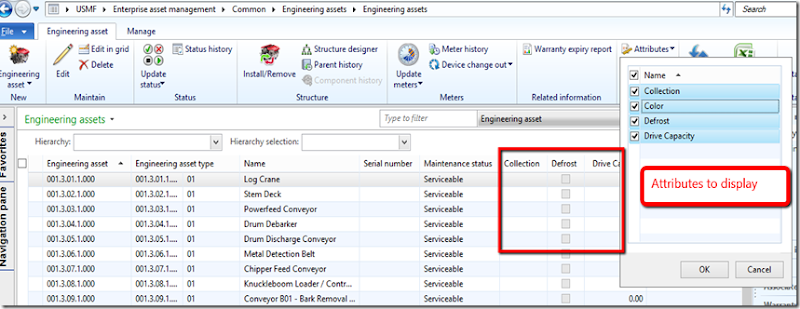
Below screenshot is what I had developed recently - where I added attributes dynamically to a list page. So, that it can be sorted and filtered on.

A2014-06-25_1800

I won’t give out the full code just yet. I might do it at a later time. :-)

But I will give code snippets on how I manipulated the list page.

I created a Display menu item that calls a class to launch the list page. Then in that method I called my newly created formInitialize method.

A typical way to launch a list page through a class is like this.

Code:
formRun = SysListPageHelper::runFormWithModeledQuery(formName, querystr(MyListPage), "My new list page", _args);


If you jump into the runFormWithModeledQuery method – you will see that it uses a formRun method. Which we can control. So I simplified it by doing it myself. Just add your controls/manipulate your controls in the commented area once the formRun is initialised.


Code:
formRun = this.formInitialize(formName, "My new list page", _args, querystr(MyListPage)); 

//now that I have the formRun I can manipulated the controls
formRun.run();
formRun.detach();


Code:
privatestaticFormRun formInitialize(str _formName, str _formCaption, Args _callingArgs, str _modeledQueryName = '')
{
FormRun formRun;

if (formName)
{
callingArgs.name(_formName);

formRun = ClassFactory::formRunClassOnClient(_callingArgs);

if(_modeledQueryName)
{
formRun.modeledQueryName(modeledQueryName);
}

formRun.init();

if (formRun && _formCaption)
{
formRun.design().caption(_formCaption);
}
}

return formRun
}


Debugging when debugger isn’t installed

$
0
0

This is an old trick I have been using for a while and thought it might be useful for others.

Usually on production servers I avoid installing the debugger. So I get asked every now and then - “what if I need to debug something?”.

I answer with – why don’t you debug in the TEST environment but in those unique circumstances you have to do it in PROD.

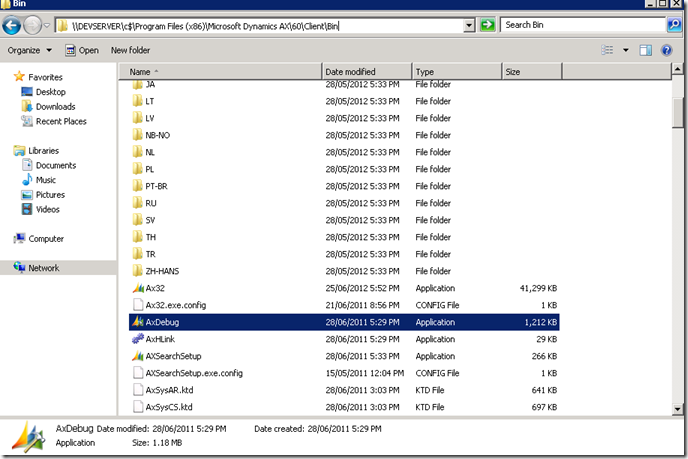
Then, just open up file explorer and navigate to another server or where the installation files are sitting. Just run the AxDebug.exe.

Debugger2014-06-25_1223

Debugger should stop at a breakpoint.

How to debug xslt transformation using visual studio [AX 2012]

$
0
0

Dynamics AX 2012 has introduced the ability to transform an xml message using xslt. Refer to the technet article for more information on transformation of inbound ports http://technet.microsoft.com/en-us/library/hh352243.aspx

Also see this nice blog post on importing bank reconciliation files using standard BAI formats  http://blogs.msdn.com/b/axsupport/archive/2014/05/20/advanced-bank-reconciliation-setup-in-ax-2012-r2.aspx

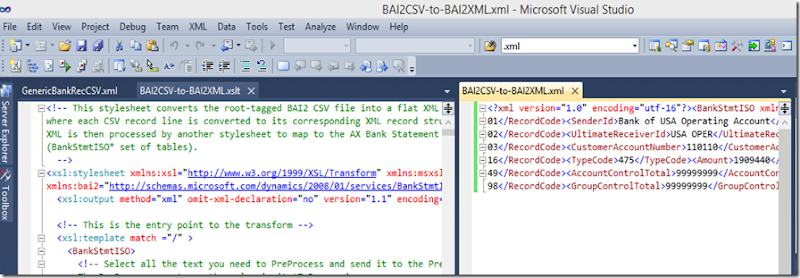
Back to the topic - In this post I will show you how to debug and run the transformation in visual studio 2010.

First thing you do is open up the xslt file with Visual Studio. You will see the xml editor tools on the toolbar. If you dont see it, then just right click the toolbar and add it by selecting the “XML Editor”.

xml2014-07-25_1539

Now you can place a breakpoint in the document and click the start xslt debugging button (Alt +F5).

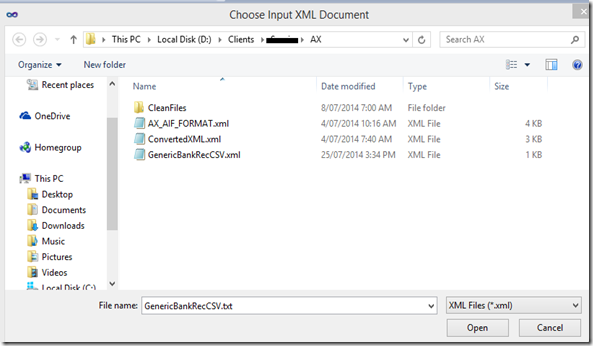
First time you run it you will get to choose the input file.

xml2014-07-25_1547

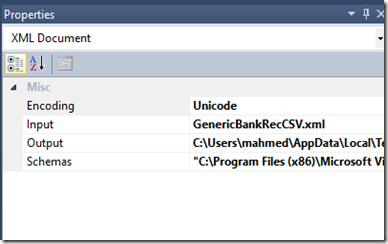
If you have run it before this will be defaulted. You can change it by going to the property of the file.

2014-07-25_1549

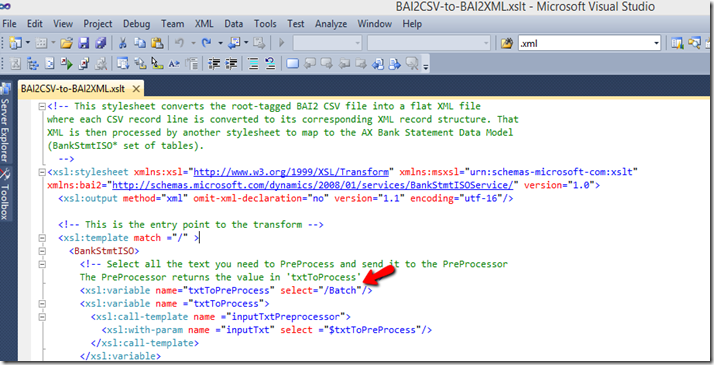
Now lets debug the Bank Reconcilliation files. Looking at the xslt you will notice that the expected root node is Batch.

2014-07-25_1550

So, lets tag the root note around the csv file. I saved it as an xml.

2014-07-25_1552

Run the debugger and you will see the output file on the right hand side.

2014-07-25_1554

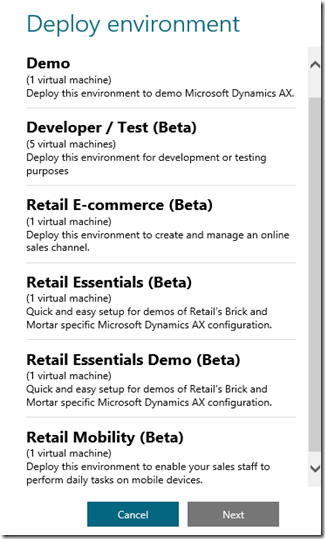
LCS has new Virtual Machines

Data Import/Export Framework for Integration

$
0
0

Data Import/Export Framework (DIXF) is more than just initial data load tool. We have seen in the recent R3 release that Microsoft has extended the capability to include Master Data Management (MDM).

Now I will talk about a common request.

Request:

CSV file is generated every day and saved to a directory. We need to process these files by importing them into AX. If it is successful move it to the Success folder, if it fails move it to the failed folder.

Old solution without DIXF:

Create a class that is batchable that reads from the folder and do all the coding for moving the file around etc.

New solution with DIXF:

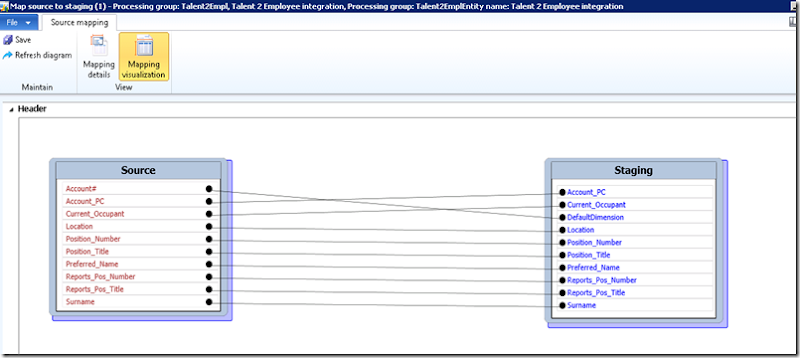
Create a new DIXF entity to process the file. Make sure the Source and Staging fields line up.

 2014-08-15_1608

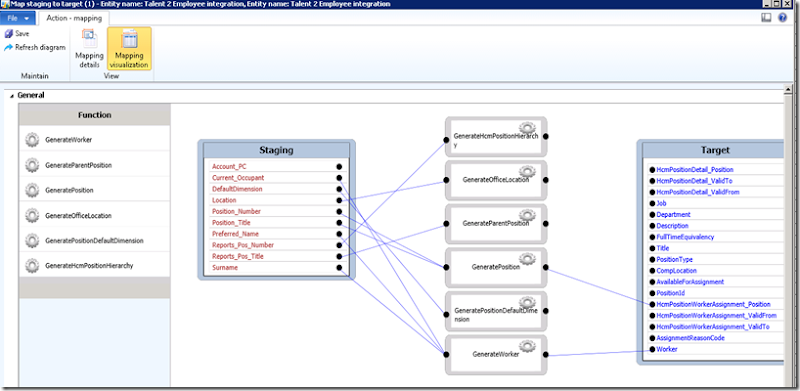
In your staging to target – do all the work in the Generate method.

2014-08-15_1609 

Then when you process the entity you can configure it to run on a directory.

2014-08-15_1614

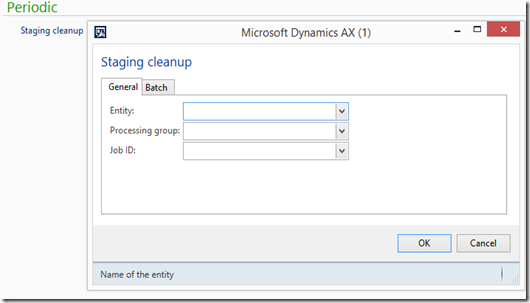
Lastly, schedule the staging clean up job. This ensures the staging tables are cleared up and it doesn't grow too much.

2014-08-15_1632

PROS:

  1. It is some what configurable to allow multiple sources. ODBC, CSV, Excel
  2. The mapping is configurable – depends on how you develop it though
  3. Leverage the existing framework – batchable, multi threading etc.

CONS:

  1. It does a full insert/update – even if there are no changes in the records. This how ever could be done via code. No different if you where building this from scratch.


I hope this is an idea that catches on and Microsoft develops DIXF to support these types of scenarios. As I believe DIXF is really much more than just importing data before go live and forgetting about it. It is a framework that could be used for EDI solutions, it is a framework that can be used to solve our common data import issues.

Viewing all 219 articles
Browse latest View live