Quantcast
Channel: Dynamics NAVAX
Viewing all 219 articles
Browse latest View live

Idea: Data Import Export Framework for importing journals

$
0
0

This is an Idea and not something inside standard.

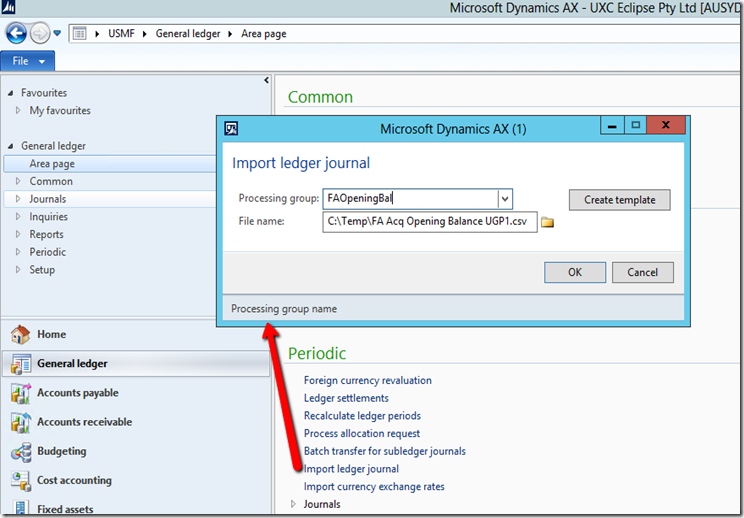
Most people have used Data Import/Export Framework for importing journals. It has been a big help and in this post I will discuss an idea that I think Microsoft should consider to develop. I leverage the DIXF framework for importing a general journal and making it flexible.

Below is a screenshot of how simple it looks. I got dialog front end that has been created to run DIXF entities both import from source to staging, then staging to target in one shot. 

2014-09-08_0843

These are some additional considerations here for this to work:

  1. Default journal name  - this can be done by configuring the mapping from source to staging
  2. Default journal number – this is something to be done in code
  3. Default line number – this is something to be done in code
  4. Default currency from the company – this is something to be done in code or configuration. I prefer to do it in code.
  5. Default the dimensions – this is something to be done in code
  6. Clean up periodic job to be run on a regular basis for DIXF staging clean up
  7. Error/info messages can be a little more friendly – i used the log table information and display that in an infolog


For more information to use DIXF for importing general journals you can refer to a recent blog post.

http://blogs.msdn.com/b/axsupport/archive/2014/07/17/importing-a-general-journal-using-data-import-export-framework-ax-2012.aspx


Filter customers by dimension using security policy [AX 2012]

$
0
0

I will start backward. Show what the result is and then will go into what I did to achieve this.

Lets say you want to filter the customer records based on the department dimensions that are assigned to the user logged in. This might include restricting the sales orders too based on those customers.

Result

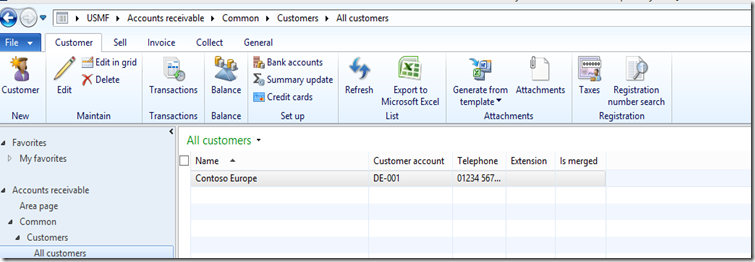
2014-09-19_0653

Setup

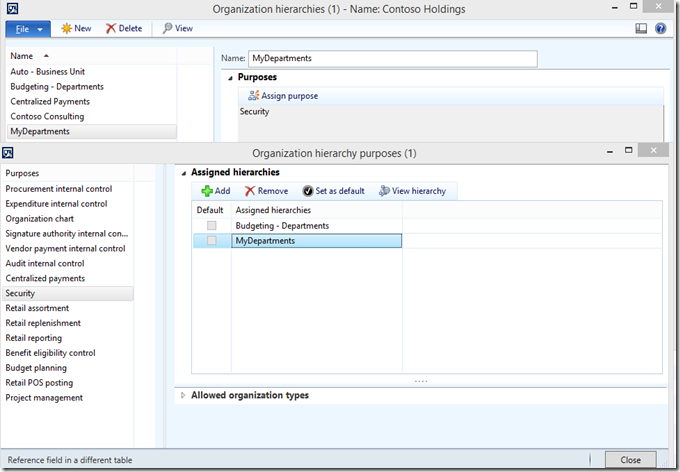
Create a new Organization hierarchy with the Security purpose assigned.

2014-09-19_0646

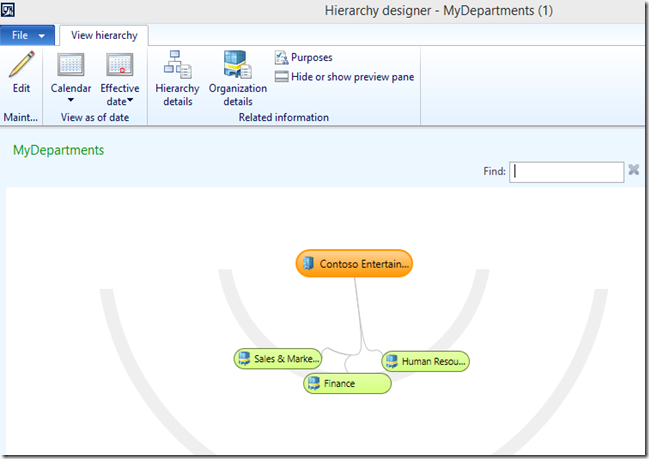
Edit the hierarchy and add the departments you plan on using.

2014-09-19_0649

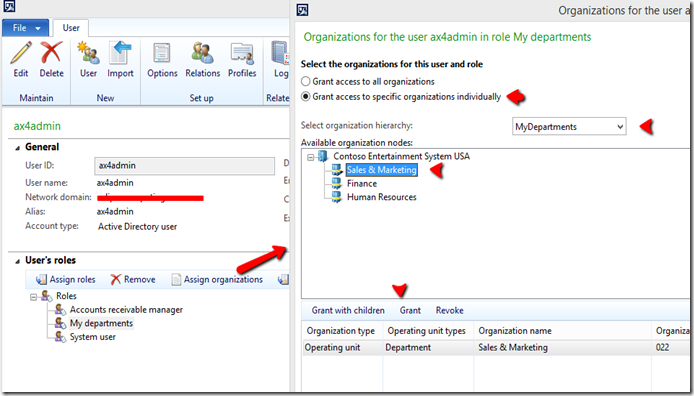
Create a new security role and assigned organizations by specifically granting access to the departments.

2014-09-19_0651

Technical

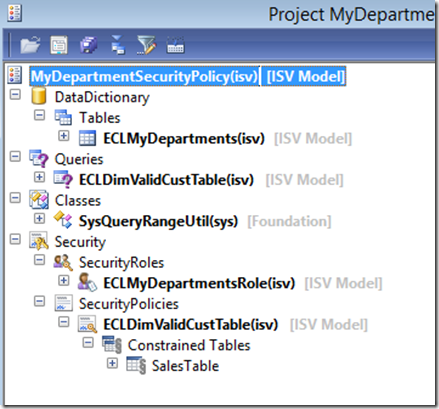
Now for the technical aspects of this. I used security policies to achieve this result.

  • xds temp table which I have a the code to build (explode) the departments into the temp table.
  • Query which joins the customer table to the dimension tables so we can specifically get the Department dimension
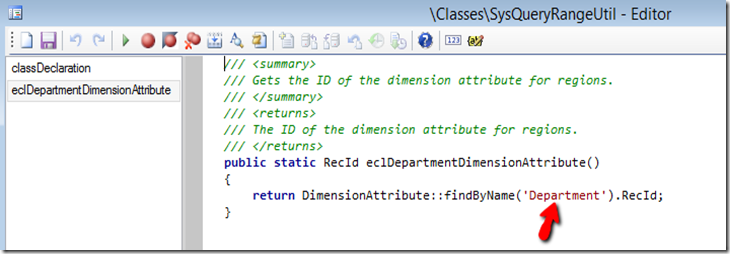
  • Class created a method to retrieve the Department dimension attribute recId
  • New role which is a main driver of the roles and linked that to the policy
  • The policy with the main table and constrained tables

2014-09-19_0656

If you are using a different dimension. Make sure the change the dimension name that is coded here. This method is being used in the query range.

2014-09-19_0706

Summary

A few things to note:

  • When the user creates a customer – it disappears from view as the dimension is blank initially. You have the option of extending the query to show blank dimensions or another user that has full access creates the customer or you somehow default the dimension (by code).
  • There is a whitepaper that explains in detail how to restrict the user to the dimensions. Then in the later section explains how to use the these types of queries. Instead of using the workers position and assigned departments – I chose to do it in a simpler way using the users security role.


Must read Whitepaper: Securing Data by Dimension Value by Using Extensible Data Security (XDS)

http://www.microsoft.com/en-au/download/details.aspx?id=26921

Above example as an XPO to download

https://drive.google.com/file/d/0B1mVzLORe7KKSUZNQmJ0VUpmdWM

Remember Index Hint is deprecated [AX 2012]

$
0
0

I still see code around that uses the Index Hint. We have to remember that it has been deprecated for a long time now and is ignored.

http://technet.microsoft.com/en-us/library/dn507158.aspx

Item

Description

Reason for deprecation

This feature was rarely used. This feature began to create complications in the evolving development environment, so the feature was removed.

Replaced by another feature

No. There is no supported replacement for this feature.

Modules affected

This feature was not particular to any application module.

Changes to installation

This change does not affect application installation.

Changes to upgrade

Any legacy custom X++ code that uses the index hint clause still compiles and runs in Microsoft Dynamics AX 2012.

Advanced bank reconciliation [AX 2012 R3]

$
0
0

This is only my opinion but I feel Advanced bank reconciliation has caused a lot of confusion. This is because Microsoft has made it very technical (very cool but a bit painful first time). Also, I feel some of the documentation is lacking in detail.

Below is my quick summary for anyone who wants to start with this topic.

To import a statement file:

Official Microsoft Links

http://blogs.msdn.com/b/axsupport/archive/2014/05/20/advanced-bank-reconciliation-setup-in-ax-2012-r2.aspx

Supported formats are very limited. But the big one is the BAI2 is very common but not all banks use it.

Good non Microsoft Links

Same as the Microsoft one but with screenshots.

http://andym62.blogspot.com.au/2014/06/ax2012-r2-import-bai2-bank-statement_30.html

For developers who want to support different file formats. I would recommend using transformation class, rather than xslt.

Follow this step by step in detail. You will want to extend on it to include additional fields etc but a very good start.

http://dawsb.blogspot.com.au/2014/06/import-bank-statement-csv-format-ax.html


To reconcile (Auto and manual)

Official Microsoft Links

http://blogs.msdn.com/b/axsupport/archive/2013/09/09/ax-content-advance-bank-reconciliation-for-microsoft-dynamics-ax-2012-r2.aspx

http://technet.microsoft.com/en-us/library/aa572690.aspx

Good non Microsoft Links

http://andym62.blogspot.com.au/2014/06/ax2012-r2-perform-advance-bank.html

http://www.stoneridgesoftware.com/how-to-use-advanced-bank-reconciliation-matching-rule-sets-in-ax-2012/


FAQ

This is a great post which talks about some consideration before turning on Advanced bank reconciliation.

http://dynamicsaxandme.blogspot.com.au/2014/08/details-to-consider-before-turning-on.html

For developers you can debug xslt as per my previous post.

http://dynamicsnavax.blogspot.com.au/2014/07/how-to-debug-xslt-transformation-using.html

If you need to write one for a different file format I would recommend a transformation class as opposed to xslt. xslt is a pain to write and debug.

This is a great link:

http://dawsb.blogspot.com.au/2014/06/import-bank-statement-csv-format-ax.html


BAI2 Issues and bugs

Because it is BAI2 don’t think it is the same for every country. Some countries might do slight different things.

In Australia – there was a mandatory field that was missing in the file, the bank number string format is different. The date I found YYYYMMDD and YYMMDD.

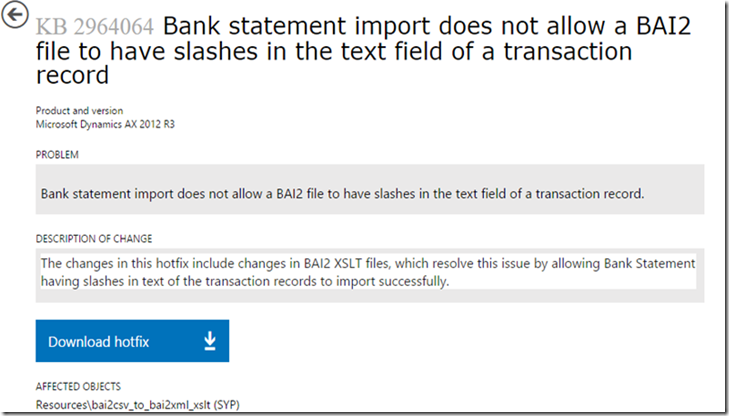
Lastly, this bug is very annoying to figure out. I found a KB that you must download for R3.

https://fix.lcs.dynamics.com/Issue/Resolved/616114?kb=2964064&bugId=1690163&qc=1b943f37531d2577142e97636270aa85

2014-10-29_1513 

Next time I will try to discuss the matching rules and how they work – both the good and bad.

Deep dive - bank reconciliation matching rules [AX 2012 R3]

$
0
0

I am going to go into some basics of Bank reconciliation matching rules and dive into both functional/technical detail.

In my previous post I did a summary and provided some useful links.

http://dynamicsnavax.blogspot.com.au/2014/10/advanced-bank-reconciliation-ax-2012-r3.html

There are two main parts to setting up bank reconciliation matching rules.

Step 1: Find statement lines – this allows you to filter down on the statement lines you want to match for.

image

Step 2: Find bank documents allows you to both filter and match against the bank documents (bank/cheques transactions).

Notice how there is Basic criteria which allows you to set up quick/basic rules for matching. In the background it actually inserts a record in the bank rules. You could set some of those flags manually by adding them to the grid.

image

If we go to the backend and look browse the table BankReconciliationMatchRuleLine, you will see that setting a basic criteria has inserted a system generated record type. This is just shown as a flag or field on the form but it is an actual record in the table.

image

When the auto matching is run – it does a dynamic query which does a join between the statement line and the bank document line. Also any range filters, such as the day difference or the penny difference.

FAQ

  1. You can only match 1 statement line to 1 document line. Microsoft does have a plan to allow 1 to many matching. No release date has been announced.
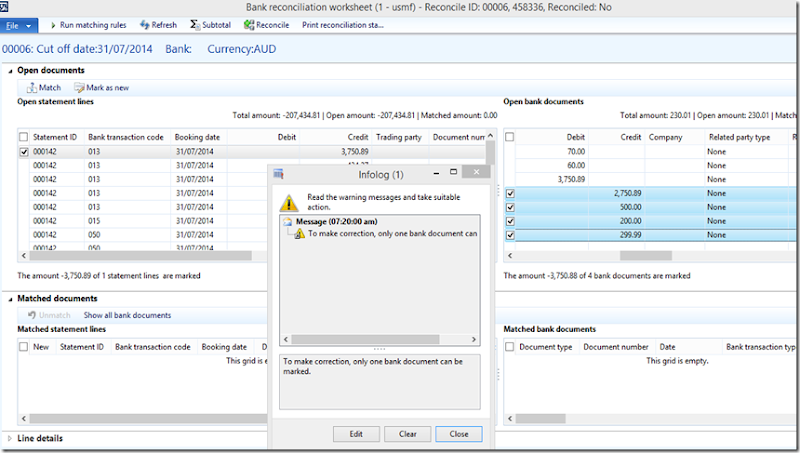
  2. When you are manually matching 1 statement to multiple document lines – it has to be a perfect amount match. No penny difference is allowed.

“To make correction, only one bank document can be marked”. You can however comment that line at your own risk – the penny difference goes to the first line on the bank document side.

MatchError2014-10-23_0720

     3. If you are doing auto match and there is a penny difference – make sure you have set up the Allowed penny difference on the Bank account form.

     4. If you are using bank reconciliation for multi company, make sure to create an inbound port for each company. Set the Restrict to company field.

        Otherwise, you will have it try to import to the BC proxy accounts default company.

image

     5. If your file/s contain more than one bank account statement – then make sure in the dialog you set the statement format but leave the bank account field empty. Otherwise, it will set the bank account to the one specified in the dialog.

image

When you leave the bank account field empty in the dialog it tries to resolve the Bank account from the file by the following order:

It does the search in the following order.

i. Bank name in Statement with bank account number; - ie. Use bank account number and name from the file. Name isn’t being imported in the some bank formats.

ii. Routing code or SWIFT code or IBAN with bank account number; In most of my implementation this isn’t set – usually set when doing international dealings.

iii. Bank account number ie. Bank account number from the file. Probably the most common way of resolving it.

iv. Bank name in statement, or Routing code or SWIFT code or IBAN

The method that does the search is here:

\Classes\BankStatementBankAccountIdentify\doSearch
How to find out why a cube based report isn’t working [AX 2012]

$
0
0

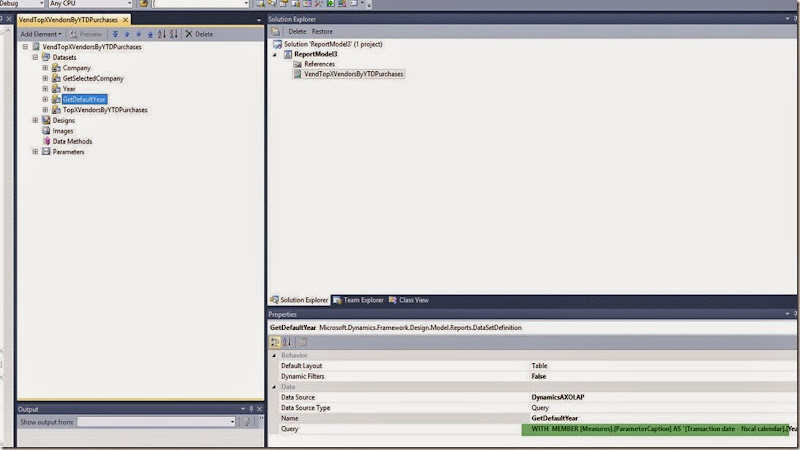
Lets say the Vendor top 10 report is throwing an error and you find out that it is based of the OLAP. You are sure you have deployed your cube and it is working.

Open up the report in visual studio and go to the datasets. You will see the data source is DynamicsAXOLAP and there is a query. Copy the query.

clip_image002

Go to SQL management studio and create a new query (mdx query – by connecting to your cube database).

Paste the query and change any parameters – in this case I changed the company and the date (hard coded it in the query).

Then Execute the query – you should see a result at the bottom. You will see some of the reports are depended on multiple cubes. Even though you were not using the General ledger cube the report uses it to retrieve the dates.

clip_image002[6]

Change tracking [AX 2013 R3]

$
0
0

I came across this last week http://www.k3technical.com/change-tracking-in-ax2012-r3/

Great blog post talking about change tracking in AX 2012 R3. I decided to give it a go and see how to leverage it for an integration project I am working on.

When you run the first job, you enable database tracking. In here you can define a retention period and if it should clean up automatically.

EnableChangeTrackingOnDatabase

The next piece is to enable change tracking on the table.

EnableChangeTrackingOnTable

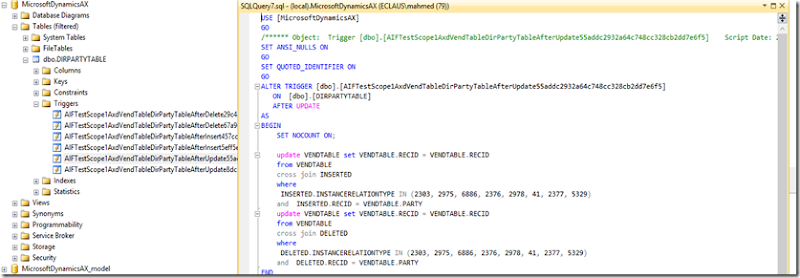
Related tables get triggers to update the parent to tell it there was a change.

TriggerOnChildTable

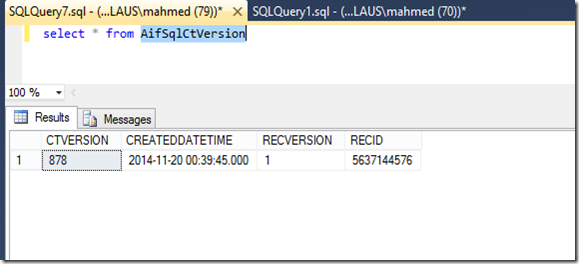
A change tracking version is maintained in AX. Every time you reset a new version is inserted.

AifSqlCtVersion

If you run a basic select statement to see what is in change control. Below is the result.

SELECT *
FROM CHANGETABLE(CHANGES dbo.VendTable, 0) ct
JOIN dbo.VendTable c ON c.AccountNum = ct.AccountNum;

ChangesInSQL

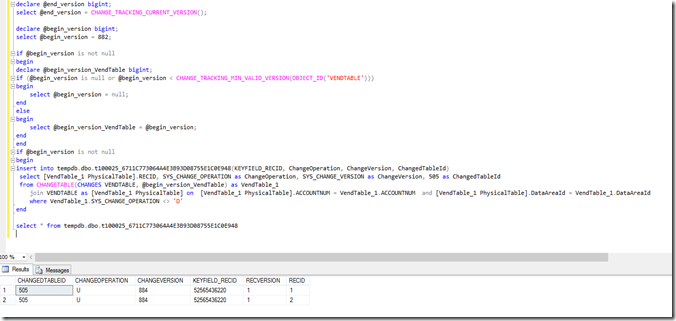
When you run the last job – returns a result set. This is actually a sql query that is run.

changeSQL

SELECT *
FROM CHANGETABLE(CHANGES dbo.VendTable, 0) ct
JOIN dbo.VendTable c ON c.AccountNum = ct.AccountNum;

declare @end_version bigint;
select @end_version = CHANGE_TRACKING_CURRENT_VERSION();

declare @begin_version bigint;
select @begin_version = 882;

if @begin_version is not null
begin
declare @begin_version_VendTable bigint;
if (@begin_version is null or @begin_version < CHANGE_TRACKING_MIN_VALID_VERSION(OBJECT_ID('VENDTABLE')))
begin
    select @begin_version = null;
end
else
begin
    select @begin_version_VendTable = @begin_version;
end
end
if @begin_version is not null
begin
insert into tempdb.dbo.t100025_6711C773064A4E3B93D08755E1C0E948(KEYFIELD_RECID, ChangeOperation, ChangeVersion, ChangedTableId)
select [VendTable_1 PhysicalTable].RECID, SYS_CHANGE_OPERATION as ChangeOperation, SYS_CHANGE_VERSION as ChangeVersion, 505 as ChangedTableId
from CHANGETABLE(CHANGES VENDTABLE, @begin_version_VendTable) as VendTable_1
    join VENDTABLE as [VendTable_1 PhysicalTable] on  [VendTable_1 PhysicalTable].ACCOUNTNUM = VendTable_1.ACCOUNTNUM  and [VendTable_1 PhysicalTable].DataAreaId = VendTable_1.DataAreaId
    where VendTable_1.SYS_CHANGE_OPERATION <> 'D'
end

/select * from tempdb.dbo.t100025_6711C773064A4E3B93D08755E1C0E948

Data import export framework cleanup job explained [AX 2012]

$
0
0

Data import export framework has a clean up job in periodic menu. I hardly see people running it to clean up old staging table data.

One thing people are worried about is deleting something that may not have been processed. Below are the conditions for the status.

image


Import exchange rate from files [AX 2012]

$
0
0
Last year I showed how easy it was to extend the exchange rate provider framework by using Yahoo!’s currency web service.
Open source Exchange rate provider on Codeplex [AX 2012]
Now I will show how you can use the same framework to import from a folder. I didn’t want to modify the dialog for allowing a file. I wanted to have a low code foot print and decided to go with the folder import option.
Lets see how it work.
1. Set up the Configure exchange rate providers form. You will see some key value pairs to used as parameters. They are self explanatory.


2. Drop the csv file in the Inbound folder. If it is successfully imported, it will move the complete folder. If it is failed to import, it will move to the failed folder.
3. Run the import. It is not completely respecting the parameters. I haven’t coded that yet. But you get the idea.


Once again, I xpo is available on codeplex as a patch.
https://www.codeplex.com/Download?ProjectName=ax2012exchangerateproviders&DownloadId=982682

Management reporter - increasing performance

$
0
0

Thanks to a colleague of mine who had gone through this with a large data customer and Microsoft support.

When using Management reporter try to separate the SQL instance from the AX database. This is because AX has the best practice of setting the max. degree of parallelisation in SQL server to 1. MR does not deal with this that well, it is recommended to leave it as the default value of 0.

Since this setting is at server level. The only solution is to have 2 SQL server instances.

Dynamics AX 2012 Cumulative update 8 Install Explained

$
0
0

With the recent release of AX 2012 cumulative update 8 there has been some considerable changes to the installation. I will try explain a few of the major ones to consider.

Before anything you must read the blog post from Microsoft:

http://blogs.technet.com/b/dynamicsaxse/archive/2014/11/24/ax-2012-r3-cumulative-update-8-faq.aspx

Download is available on LCS now. We are given 2 choices a slipstream and an update installer. When you run the update installer it will download actual installation files (application models/binary) at the time of installation and you are able to save it the end of the process.

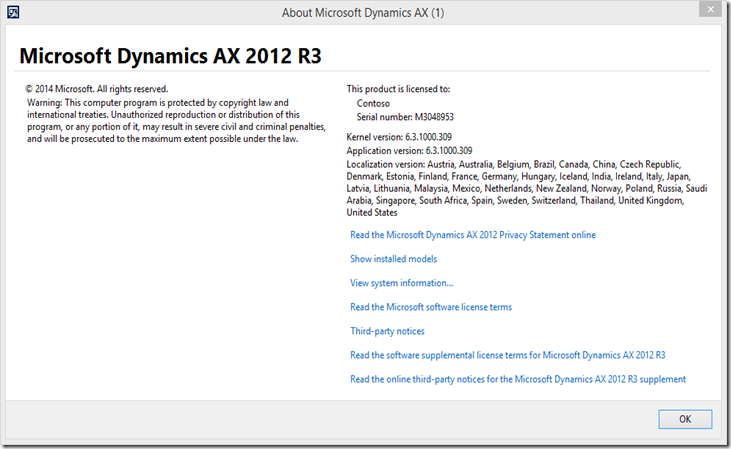
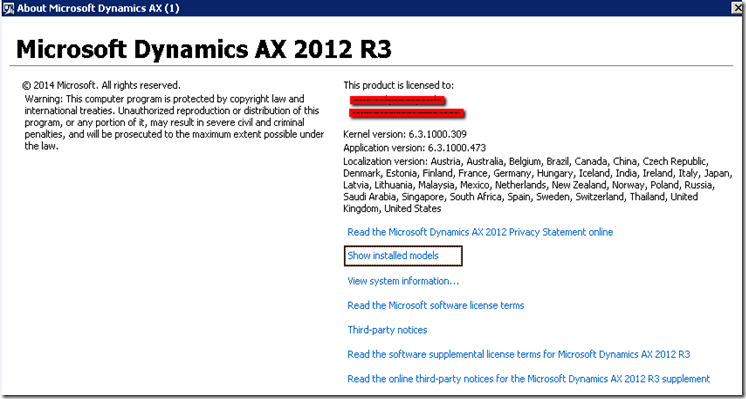
Below are screenshot of the About form. Notice the version number difference. Read the blog link for detail – it explains both versions.

  
Slipstream2015-01-11_About_slipstream
Update Installer2015-01-11_about_update
  

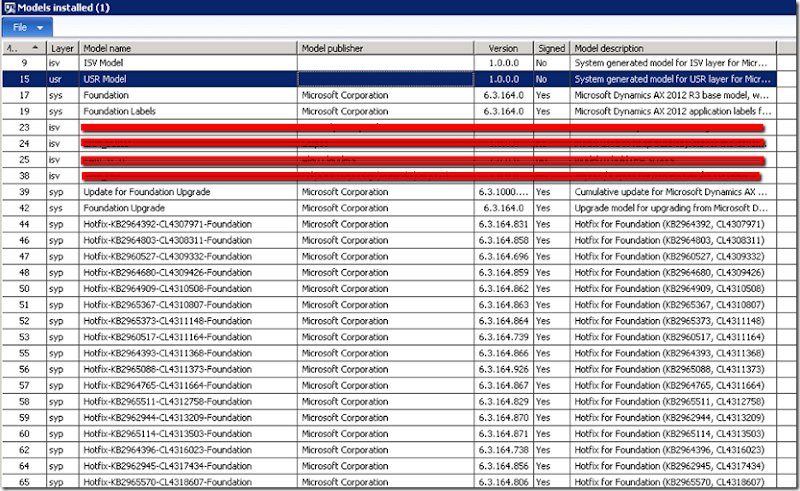
Below are screenshots of the models installed form. Notice how a slipstream (ie. New installation) contains a single SYP model. On the second screenshot notice how it has installed over 1500 models (each one with the hotfix number).

Slipstream2015-01-11_model_slipstream
Update Installer2015-01-11_model_update

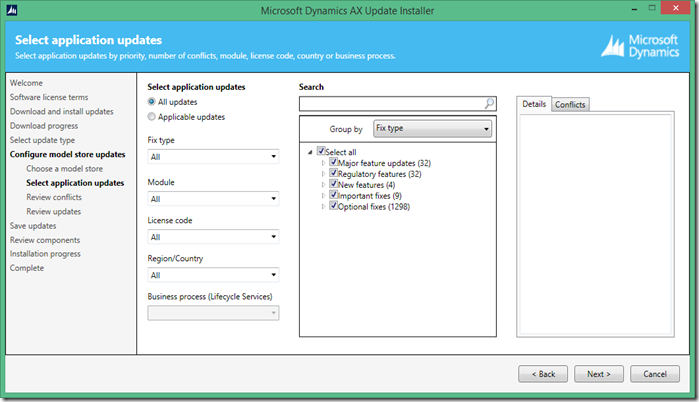
When you run the update installer it actually allows you select the specific hotfix to install otherwise you can choose to install all.

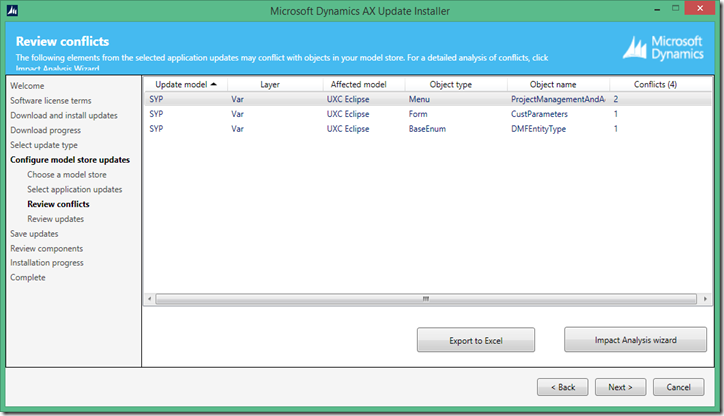
2015-01-11_UpgradeScreen 

If there are any conflicts the next step will show the objects and you can run the impact analysis.

2015-01-11_Conflict

Once you are happy with it you can save the package for use next time.

Bringing copy company back [AX 2012]

$
0
0

Back in 2013 I wrote a blog post on how to duplicate a company. I basically summarised Microsoft's guide on MSDN. http://dynamicsnavax.blogspot.com.au/2013/07/duplicate-company-in-ax-2012.html

The big issue with those steps are that it is very manual and can scare a lot of people. Imagine having to copy a company set up for 10 plush companies. This can be very tedious and time consuming. Plus there are some references that have to be set up manually like the journal names voucher series. So, why not automate.

I have put my project on codeplex which you can download and use (READ here carefully).

User guide

  1. Download the class from https://dax2012copycompany.codeplex.com/ under source codes tab
  2. Import it into your AOT
  3. Run the class ECL_CopyCompany – Right click Open.

image

  • From company – Enter the from company id
  • To company – Enter the new company id (if company doesn’t exit it will create it)
  • Use record ID compression – RecIds are recreated and in sequence
  • Release products – To release the products into the new company
  • Copy worker employment – To copy the employment record to the new company.

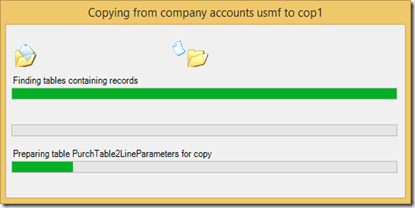
You will get a progress bar. It should take about 5-10 minutes on contoso demo data.

2014-09-26_0815

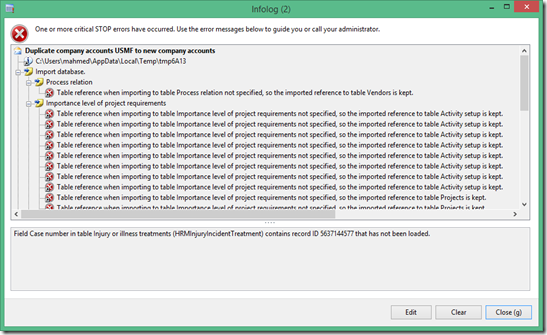
If there are issues importing certain tables it will give you a warning. I would advice to fix these manually.

2015-01-22_0918 

How it works

This works by exporting the dat/def to a temp folder and then creating it in the new company.

  1. Creates the Legal entity
  2. Copy the ledger set up – this includes the system accounts and account structures
  3. Copy the company/legal entity specific number sequence – resets the next number to 1. This step does not copy shared number sequence.
  4. Exports the dat/def for all tables that have the following conditions( Method is copyThisTable()).
  • Table group = Group, Reference, Parameter, Miscellaneous, Framework
  • Excludes tables that are virtual tables, system tables, temp tables.
  • I have manually added these tables PrintMgmtDocInstance and PrintMgmtSettings to include some print management tables. To add more tables that may not have the correct property, just add it to this method copyThisTableMore
  • image
  • Imports the dat/def into the new created company and deletes the temp file
  • Updates the voucher number sequence on the journal names – Ledger journal name, production journal name, inventory journal name. As that is company specific.
  • Release products into the new company if the flag is ticked
  • Copy worker employment to the new company if the flag is ticked
  • Now you should be able to navigate to your new company. Go to the legal entity and enter the company information (name, address etc).

    You can not use Data Import Export Framework to import your customers, vendors and all your master records.

    Limitations

    • This is class is a duplicate company and works with in the same partition.
    • It expects the account structure used in the from and to company are the same. If they are different I would say don’t use it. Just do the company set up manually or use other import methods.
    • There maybe other tables that need manual fixing or some coding. For example, I found the Print management setups where not set up. So, I added them to the exception tables list.

    REMEMBER this is given as is. No guarantee it will work perfectly for you. IMHO Microsoft has not developed a similar copy company intentionally (similar to AX2009 copy company). As it isn’t a perfect solution for AX2012. It has a lot of limitations, it would have given false impressions and negative feedback. DIXF is the future of most of Microsoft’s efforts.

    CREDIT - I have taken inspiration from AX 2009 copy company class. It does very similar thing of using temp dat/def.

    FEEDBACK is appreciated. If you use it in any way, please give me feedback/comments/enhancements.

    Stop workflow submitter from approving [AX 2012 R3 CU8]

    $
    0
    0

    This is a common request in previous versions of AX. Usually you would want to stop the submitter from approving their own workflow.

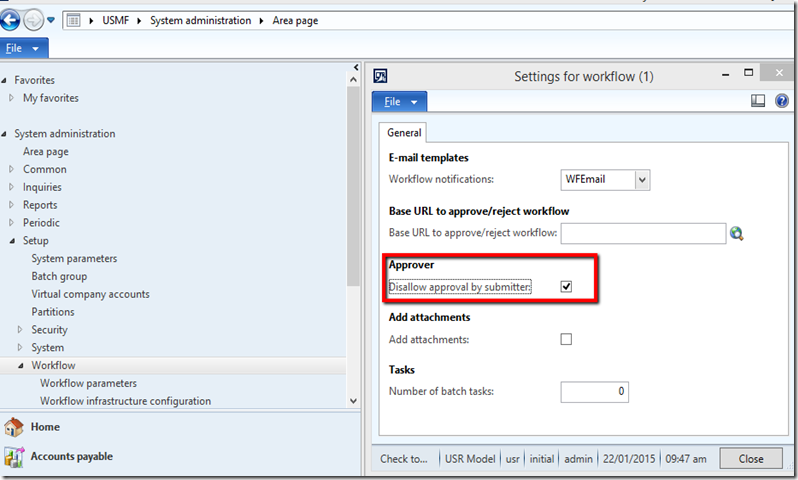
    Dynamics AX 2012 CU8 has introduced a new flat on the Workflow parameters. “Disallow approval by submitter”. This is a global setting and not workflow specific.

    2015-01-22_0947

    To test this out I created a user group with 2 users. One of them being my account.

    image

    I created a workflow for journals and used Role based assignment to the APTeam user group.image 

    I was allowed to submit it but I found the workflow history had an error. ie Submitter cannot be the approver.

    image

    I understand why Microsoft has done it this way but I am not a big fan of it. I don’t like introducing errors in the workflow history. It makes the workflow configuration very difficult. Lets say you had a team of 5 users. Each one was able to submit but not approve their own journals. Then you would have to create a complex workflow configuration to deal with all the combination.

    I have done similar solutions in the past where the check was done at the time of approval. The user received an error on click of Approve.

    TFS labels with multiple models [AX 2012]

    $
    0
    0

    For sometime I have been working on a project which uses multiple models. TFS doesn’t support multiple models and one of the issues is labels. It only works with a single label file from the system settings.

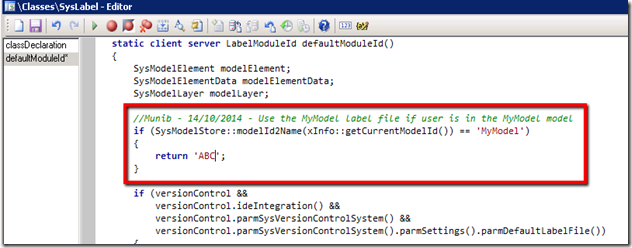
    My project was building a new module in AX with its own label file. This way we don’t have a dependency on the the existing implementation. We decided to keep it simple by modifying the class that returns the default label id when objects are checked in.

    By making the small change below – It will return a specific label id (ABC) when you are in the particular model (MyModel).

    LabelVersionControl

    “Error in getting SID” when running Named user license count report [AX 2012]

    $
    0
    0

    Recently I tried running the Named user license count report and got this error.

    “Error in getting SID”

    From the error I know what the problem is. One of the users can not be found in Active directory.

    I wrote a quick job to find me the invalid users.

    staticvoid navax_findBadUserNames(Args _args)
    {
    UserInfo userInfo;
    container con;
    ;   whileselect forUpdate userInfo
    where userInfo.Enable&&
    userInfo.AccountType!= UserAccountType::ADGroup
    {
    con = SysUserLicenseMiner::getUserRoles([userInfo.Id, userInfo.company]);
    if(conLen(con)==0)
    {
    warning(strFmt("Userid: %1, username: %2", UserInfo.networkAlias, UserInfo.name));
    }
    }
    }

    You will get something like this in the infolog.


    image


    Workflow hierarchy assignment common errors explained and tester job [AX 2012]

    $
    0
    0

    Workflow hierarchy assignment has a lot of interdependent data that must be set up. If one of those is missing or is incorrect – the processor will just error out. Sometimes with very little information or confusing errors.

    Below is an example of an error that is not very well written. It doesn’t tell you which record failed. Someone went into the effort of creating the labels correctly but did not use it properly.

    image

    Here are some common errors you would get while processing the workflow.

    • “The hierarchy provider did not return any users.”– Next Position was not found.
    • “Worker not found for position ID %1.”– No worker is attached to a position. Go to the worker and make sure they have a primary position. If no primary position exists, then the system will find the oldest position (one with the earliest start date). Also make sure the worker is an employee of the company to submit the workflow.
    • “User not found”– User not found for the worker. Check the user relations.
    • “User or job not found for position ID %1, worker %2, user %3. Verify that the position is assigned to a job.”– The position found does not have a job related to it.

    Now here is a quick solution I put together to help you diagnose or test out your hierarchy. I wrote a job below for Expense lines but to change it to any other table is pretty straight forward. Fill in the missing information and run it. It will give you an infolog with the user id, worker id, position id, the reports to position id, their spending limit and approval limit.

    Code:
    staticvoid navax_workflowHierarchyTester(Args _args)
    {
    WorkflowTypeName workflowTemplateName = 'TrvLineItemTemplate';
    TrvExpTrans trvExpTrans;
    TrvExpNumber trvExpNum = '000015'; //Expense id
    str nodeId = '000530'; //Starting worker id

    WorkflowHierarchyLevel level = 0;
    WorkflowContext workflowContext;
    SysWorkflowTable workflowTable;
    WorkflowLimitHierarchyProvider workflowLimitHierarchyProvider;
    WorkflowHierarchyProviderNode workflowHierarchyProviderNode;
    HRPWorkerLimit workerLimit = newHRPWorkerLimit();
    HcmWorker hcmWorker;
    DirPersonUser dirPersonUser;
    RefRecId hcmPositionRecId;
    HcmPosition hcmPosition;
    container spendingCon, approvalCon;
    UserId userId;

    select firstOnly workflowTable
    where workflowTable.TemplateName == workflowTemplateName;

    select firstOnly trvExpTrans
    where trvExpTrans.ExpNumber == trvExpNum;


    workflowContext = WorkflowContext::newWorkflowContext(
    curext(),
    tableNum(TrvExpTrans),
    trvExpTrans.RecId,

    workflowTable.WorkflowCorrelationId);

    workflowLimitHierarchyProvider = newWorkflowLimitHierarchyProvider();

    //Level 1
    while (nodeId && level < 20) //20 is just a fall back. In case it goes into an endless loop.
    {
    workflowHierarchyProviderNode = workflowLimitHierarchyProvider.getNextNode(nodeId, level, workflowContext);
    nodeId = workflowHierarchyProviderNode.getnodeId();
    hcmWorker = HcmWorker::findByPersonnelNumber(nodeId);
    userId = DirPersonUser::findParty(hcmWorker.Person).User;
    hcmPositionRecId = HcmWorker::getPrimaryPosition(hcmWorker.RecId);
    hcmPosition = HcmPosition::find(hcmPositionRecId);

    spendingCon = workerLimit.getWorkerSigningLimit(
    hcmWorker.RecId,
    SourceDocumentRelationType::ExpenseReport,
    HRPLimitType::Spending,
    hcmPosition.PositionId);

    approvalCon = workerLimit.getWorkerSigningLimit(
    hcmWorker.RecId,
    SourceDocumentRelationType::ExpenseReport,
    HRPLimitType::Approval,
    hcmPosition.PositionId);

    info(strFmt("UserId: %1 | WorkerId: %2 | PositionId: %3 | ReportsToPosition: %4 | SpendingLimit: %5 | ApprovalLimit: %6",
    userId,
    hcmWorker.PersonnelNumber,
    hcmPosition.PositionId,
    hcmPosition.reportsToPosition(),
    con2Str(spendingCon),
    con2Str(approvalCon)
    ));

    level++;
    }
    }


    The final result looks like this.


    image

    Import custom dimensions job [AX 2012]

    $
    0
    0

    This is a job I had in my kitty. Thought I just blog it before I lose it. It imports custom dimensions. I had to write one up

    image

    Code:
    staticvoid naxax_importCustomDimensions(Args _args)
    {
    //dialog
    AsciiIO asciiIO;
    Filename filename;
    NoYesId skipFirstLine;
    Container line;
    Dialog dialog;
    DialogField dialogFileName, dialogSkipFirstLine, dialogCountryRegionId;

    //values
    DimensionFinancialTag dimensionFinancialTag;
    DimensionAttribute dimensionAttribute;
    DimensionAttributeValue dimensionAttributeValue;
    RefRecId categoryRecid;
    Name name;
    DimensionValue dimValue;
    Description description;

    dialog = newDialog("Import custom dimension values");
    dialogFileName = dialog.addField(extendedTypeStr(Filenameopen), "File name");
    dialogSkipFirstLine = dialog.addField(extendedTypeStr(NoYesId), "Skip first line");

    if (dialog.run())
    {
    filename = dialogFileName.value();
    skipFirstLine = dialogSkipFirstLine.value();
    }

    asciiIO = newAsciiIO(filename, 'R');

    if (!asciiIO || asciiIO.status() != IO_Status::Ok )
    {
    throw error (strfmt("@SYS19312",filename));
    }

    asciiIO.inRecordDelimiter('\r\n');
    asciiIO.inFieldDelimiter(',');

    if (skipFirstLine)
    line = asciiIO.read();
    ttsAbort;
    ttsBegin;
    while (asciiIO.status() == IO_status::Ok)
    {
    line = asciiIO.read();

    if (line)
    {
    name = conpeek(line,1);
    dimValue = conpeek(line,2);
    description = conpeek(line,3);

    dimensionAttribute = DimensionAttribute::findByName(name);
    if (dimensionAttribute)
    {
    categoryRecid = dimensionAttribute.financialTagCategory();
    if (categoryRecid)
    {
    dimensionFinancialTag = DimensionFinancialTag::findByFinancialTagCategoryAndValue(categoryRecid, dimValue,true);

    if(!dimensionFinancialTag)
    {
    dimensionFinancialTag.clear();
    dimensionFinancialTag.Value = dimValue;
    dimensionFinancialTag.Description = description;
    dimensionFinancialTag.FinancialTagCategory = categoryRecid;
    dimensionFinancialTag.insert();
    }
    else
    {
    dimensionFinancialTag.Description = description;
    dimensionFinancialTag.update();
    }
    }
    else
    {
    error(strFmt("Dimension %1 is not a custom dimension", name));
    }
    }
    else
    {
    error(strFmt("Cannot find dimension name %1", name));
    }
    }
    }
    ttsCommit;
    }

    Named user license count report [AX 2012 R3 CU9]

    $
    0
    0

    It looks like there are some updates to the license count reports in CU9.

    First you will notice a new report called “Named User License Counts History”. Lets go through both.

    image

    1. Named User License Counts

    This was a report that existed since the initial release of AX2012 but some additions have been made. Now you have the users (which was released sometime in R2) and in R3 CU9 we have another addition. We now see the users role, not just the license type.

    image

    2. Named User License Counts History

    This report takes a from and to date. Then displays a summary type report of what the actual is and what you are licensed for.

    image

    Walk through of PowerBI

    $
    0
    0

    On 24th of July Microsoft announced the release of PowerBI. With that comes a lot of new features and I have to say it is a lot simpler to use.

    In this post I will walk you through what I did to get my first report done in 10 minutes.

    Download PowerBI Desktop and install it. (No need to show installation steps as it was super simple to follow the wizard).

    https://powerbi.microsoft.com/desktop

    Once that is done, I signed up on the website with my work email (we are already on Office365).

    First thing to do is give it a data source. In my case I chose OData to get AX data.

    image

    You will get the list of data sets available in AX.

    image

    I selected one of them and manipulated some of the columns. Usual thing you would do is rename the columns, maybe do filtering or grouping. You may add additional data to link to. Then next thing you do is click on the Load (Close & Load button).

    image

    Once it is loaded, you can start creating the report.

    I did a basic pie chart. You then can click on the Publish. However you can save a local copy as *.pbix file.

    image

    It will launch your browser and take you to PowerBI site. Same report will be available there.

    image

    Next thing to do is create a Dashboard (won’t give screenshot as it is obvious).

    But the not so obvious thing was the little pin at the top right hand side. Click on that to pin the report to a dashboard.

    image

    Now if you navigate to the dashboard you will see all your reports in there. You can rearrange and then share your dashboard.

    image

    I installed PowerBI on my mobile. Signed in and this is what I got. Very cool.

    image

    One final note, if you want to schedule a refresh you need PowerBI Personal Gateway.

    More information on scheduling a data refresh is on the PowerBI support site.

    This wasn’t a useful report but just to illustrate how the technology is really simple to use. The hard part is making something useful and meaningful.

    General ledger cube using Power BI [AX 2012]

    $
    0
    0

    With the recent release of Power BI desktop it has been an exciting week to play with new toys.

    I decided to do a quick general ledger cube using Power BI desktop. I put together some SQL scripts to resolve the dimensions.

    1. Open up PowerView Desktop and select Get data and select SQL as the source.

    2. Paste the following query I mashed up to get the GL transactions with the 3 financial dimensions. The RecIds I have there are based on Contoso database. In my next blog I will try to explain how to get the RecIds.

    SELECT
        GeneralJournalCube.*,
        OLAPBUSINESSUNIT,
        OLAPCOSTCENTER,
        OLAPDEPARTMENT
    FROM GeneralJournalCube INNER JOIN
    (
        SELECT
            DAVC.RecId as CombinationId ,
            MAX(CASE WHEN DA.RECID = 22565421195 THEN DAV.ENTITYINSTANCE ELSE NULL END) AS OLAPBUSINESSUNIT ,
            MAX(CASE WHEN DA.RECID = 22565421197 THEN DAV.ENTITYINSTANCE ELSE NULL END) AS OLAPCOSTCENTER ,
            MAX(CASE WHEN DA.RECID = 22565421196 THEN DAV.ENTITYINSTANCE ELSE NULL END) AS OLAPDEPARTMENT
        FROM
            DIMENSIONATTRIBUTEVALUECOMBINATION DAVC INNER JOIN
            DIMENSIONATTRIBUTEVALUEGROUPCOMBINATION DAVGC ON
            DAVC.RECID = DAVGC.DIMENSIONATTRIBUTEVALUECOMBINATION INNER JOIN
            DIMENSIONATTRIBUTELEVELVALUE AS DAVL ON
            DAVL.DIMENSIONATTRIBUTEVALUEGROUP = DAVGC.DIMENSIONATTRIBUTEVALUEGROUP INNER JOIN
            DIMENSIONATTRIBUTEVALUE AS DAV ON DAV.RECID = DAVL.DIMENSIONATTRIBUTEVALUE INNER JOIN
            DIMENSIONATTRIBUTE DA ON DA.RECID = DAV.DIMENSIONATTRIBUTE
        GROUP BY DAVC.RECID
    )
    Dimensions ON
        Dimensions.CombinationId = GeneralJournalCube.LEDGERDIMENSION

    Should look like this once pasted.

    image 

    3.  Now for the dimensions we will use SQL as our source too. Paste the following for the department dimension.

    SELECT
        T1.ENTITYINSTANCE AS OLAPDEPARTMENT,
        T2.VALUE AS VALUEATTRIBUTE,
        T2.NAME AS NAMEATTRIBUTE
    FROM  [DBO].DIMENSIONATTRIBUTEVALUE T1
    CROSS JOIN  [DBO].DIMATTRIBUTEOMDEPARTMENT T2 
    WHERE      (T1.DIMENSIONATTRIBUTE=22565421196) AND 
            (T1.ENTITYINSTANCE=T2.KEY_) AND
            (T1.PARTITION = T2.PARTITION)

    4. Continue to do the same for all 3 dimensions and the main account.

    For the main account it is fairly easy query

    select RecId, MAINACCOUNTID, Name from MAINACCOUNT

    5. Once you have added the data source. Click on Manage relationships to link up the tables. That should be easy now that you have the RecIds for the tables and the dimensions renormalized in the first Transactions query.

    image

    6. Now the recIds on the data sets is a bit un friendly and we don't want to show it in the report. Just right click the column and click on Hide from report.

    image

    7. Also the column names are a bit unfriendly as its the field names and not the labels. Just right click and Rename.

    8. Click on Reports and start putting your report together.

    image

    We can now publish the report the PowerBI portal.

    Key take always from this blog:

    1. I spent a few hours getting the GL transactions query to the way I want it. Hope this saves you time.
    2. I have tested this with a large database 29million records. It took about 7 minutes on a all in one development box 16GB ram.
    3. I don’t mention how you could use alternative data sources to mash up together.

    Assumptions I made:

    1. I did not consider partitions here
    2. I ignored Enums. However you could get it from SRSANALYSISENUMS table.
    3. I ignored column names
    4. Multi language and currency is not considered
    5. I have tried the same with OData but found it a little heavy for such a large table. For the most thing I would have probably used OData.
    6. I did not add date dimensions

    Some great tips on the Microsoft Solution Architecture blog.

    http://blogs.msdn.com/b/axsa/archive/2015/02/18/power-bi-and-dynamics-ax-part-1-introduction.aspx

    Viewing all 219 articles
    Browse latest View live